Tuesday, July 31, 2018

Adding Nooksack

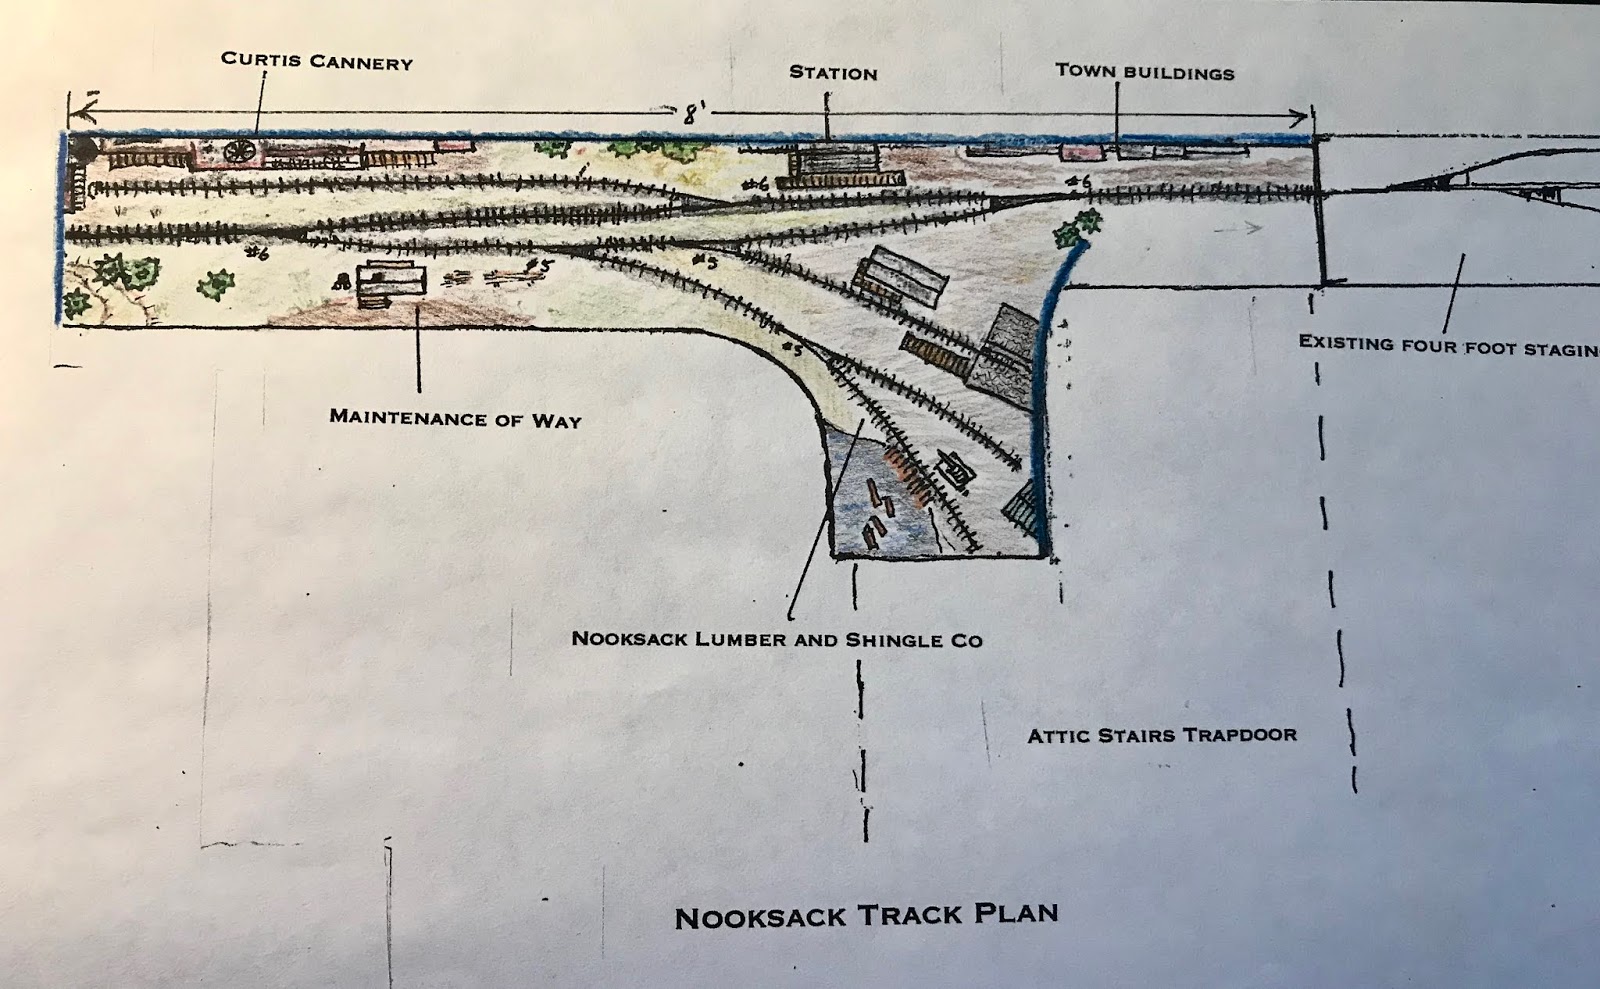
Draft plan for Nooksack, extended from Willow Junction to the east
Last spring I started planning for extensions to the initial attic layout, starting with this plan for Nooksack. The Nooksack section extends from Willow Junction, replacing the current location of the four-foot staging section and then cantilevers over the attic trapdoor. While later I am planning on adding additional trackage to the east, for now the plan is to continue to use the four-foot staging to the east, on the other end of Nooksack.

Operationally this plan has some upsides and some downsides. The upside is the addition of two larger industries: Curtis Cannery and Nooksack Lumber and Shingle Company. Both of them are based on similar industries in Whatcom county. For example, Everson, Washington had a large produce cannery active from the 1920's through the 1950's. The downside is the lack of "empty" running space between the initial "U" (Willow Junction) and this new section. The timetable shows around four or five miles between the two; the layout will have a full height backdrop scene divider between the two. Clearly, one-half inch and four scale miles are not the same! Perhaps, manual block division points are the operational solution.

Curtis Canning Company is represented as shallow buildings and/or flats behind a long spur siding. During the busy/harvest season it requires a fair amount of traffic. Can blanks from American Can Company in Seattle arrive with the bottom already attached. I found an interesting industrial film from the 1950's showing the can-making process. These are rather bulky loads requiring several car loads a week. The cannery also requires labels, cardboard box blanks, salt, and occasionally produce itself delivered to the siding. Canned produce will be shipped out at about the same rate as bulk cans arrive. Using several sure spots along one spur siding and the size of the facility will add operational interest/complexity.

As seen on the track plan, the lumber mill will be only partially represented on the layout, with most of the mill itself on the perpendicular backdrop/scene divider or in the aisle.  The office/warehouse, loading dock/end of drying house, and the log dump are on the layout and provide operations for the Great Northern and my logging railroad which has trackage rights over the 4th Subdivision.

Yes, it is armchair modeling, but planning for a next phase has been fun.


Tuesday, July 24, 2018

Track is Painted!


Well, now that the track is painted I can move on to scenery and operations without disclaimers. In this post, I will review the process.

The first step was to fine tune the track work: soldering rail joiners  and adding track nails as needed. The photo shows the tools needed. I worked on different parts of the initial "U" layout at different times, which means that several areas have gone through complete changes in season without track buckling despite my soldering most joiners. A nail punch is included because I did not fully set nails until I had run locomotives through the layout. All track (other than at the trestle) was completely finalized, permanently attached, and thoroughly tested before the painting was attempted.


The second step was to scrub all the solder joints with denatured alcohol and replace any missing ties. Any flux that remained on the track would keep the paint from adhering properly. The process I used was much like what Cody Grivno demonstrated on several MRVP videos. While wearing protective gloves, I dipped a toothbrush into the alcohol and scrubbed until all of the gold- colored flux and solder residue was gone. Then, after the alcohol dried, I prepped some ties by removing the tie plates with a chisel pointed hobby knife and an emory board so the tie would slide under the rail joiner and fill the visual gap. While somewhat laborious, replacing the ties tied the trackwork together visually; a process that was completed with the later painting of the track.

The third step, after all the track was prepped, was to mask the rest of the layout as needed, as well as masking electrically sensitive parts of the turnouts.  In my case, I had finished backdrops, fascia, and basic landforms around the trestle to protect. I used newspaper and blue painter's tape to create a protective barrier over the finished parts.

Again, following advice from Cody Grivno MRVP videos, I masked the points and heels of the turnouts with small pieces of blue painter's tape. I also protected the rail ends on the trestle section of track as it will not be permanently installed until after the scenery is further along.

This photo shows the tape masks on the points and heels of several turnouts and the curved piece of track that will later be mounted on the trestle. I used MicroLux Rail Brown (#29001) mixed with around nine parts paint to one part 70% isopropyl alcohol. I am still a novice with an airbrush, but even with my inexperience, I was able to get a fairly decent job done with two coats. That said, I don't think that the airbrush needle was adjusted quite correctly, or that I had the ideal air pressure. Painting the rails and ties was a good task for practicing, as they did not need perfection.

After cleaning the airbrush and letting the second coat of paint dry for around a half hour, it was time to for the next step of removing the tape from the track and using a Bright Boy track cleaning pad. As the acrylic paint had not fully set up, it was relatively easy to clean the rail heads by scrubbing the Bright Boy along the surface of the track. On one of the turnouts, I had not affixed the blue tape carefully enough and some paint had crept under the tape. By going into my airbrush cleaning supplies, I was able to use Windex and a pipe cleaner to clean the points of all paint residue.

The final step was to carefully touch up around the points and heels. I used unthinned paint and a medium (green handled) micro brush to paint the ties and outer part of the point rails and around the heels. Later that day, after the touch up paint had dried, I successfully ran a locomotive around the railroad, running through all the turnouts and down all the spurs. As seen in the initial photo, the track is ready to ballast after the surrounding scenery is initiated. As part of the planning for scenery, I will decide on a plan for ballasting the mainline a bit differently than the spurs.