Showing posts with label Scenery. Show all posts

Friday, October 24, 2025

Research, Hiatus, and Next Steps


Sisal and static grass foundation
In my last post, I left off with the notion of researching apple orchards, and I found that a fair amount of information and images can be found on the internet. A good first overview can be found here. First of all, while it is not the center of the Washington state apple industry, the area I am modeling (Whatcom county around Ferndale), had apple orchards in the 1950s and continues to have apple orchards.  The scratchbuilt sisal foundations make a reasonable model of apple trees with the proper leaf color and the addition of apples themselves. Looking at a number of photos through different time periods, the addition of ladders, baskets, and boxes would add to the suggestion or appearance of apple orchard. I was not as successful finding appropriate apple picking figures in HO scale. Preiser has a set with figures, baskets, and a ladder. However, the clothing is not correct at all. Before I go too far with this, I should remember that I don't really have a plan for a location for an orchard, This is something to keep in mind for detailed planning in the future. An orchard scene fits the story I am trying to tell, and I should plan on including such a scene as I move into additional phases following my TOMA plans. 

As mentioned in the last post, I learned this sisal technique of scratchbuilding shrubs from a Boomer Diorama video. One of his thoughts on modeling vegetation such as trees and shrubs is to model a specific example. One that I might use is Pacific ninebark or Physocarpus capitatus. These sisal trunk and branch structures are appropriate. The ninebark grows to 12 -18 feet high which is just about what these first examples work out to. I would need to highlight the trunk with several colors and use lighter color leaves than my first samples. Also, the trunk, with its twisting strands appearing somewhat correct, should be fairly hidden by other shorter vegetation. As I plan to model August or September, the white flower clusters of the ninebark would be diminished and transitioning into smaller red/brown seed clusters. Pacific ninebark is native to the area and would be found along stream beds, so it would be a reasonable choice for the trestle scene outside of Nooksack. 

While I have successfully done some research, my plans to form the "at least a few minutes every day" habit has not been that successful. In fact, actual work has been on hiatus. After having a problematic echocardiogram stress test, I was scheduled for a heart catheterization procedure. That procedure, which revealed a blocked artery, transitioned into angioplasty and stent placement. TMI, but the scheduled electrical work has been delayed until I am able to assist with that project. I will soon be able to work with the electrician, and after those projects are complete I can return to prepping more train room space and modeling. 

Restart building a habit: on the workbench and a return to Nooksack:

  • Make some Pacific ninebark
  • Wooden warehouse
  • Nooksack packing house, 15 steps continued
  • Rolling stock projects
  • Touch toggle cups install on Nooksack
Other next steps:
  • Make some real headway on Nooksack
  • Phase two of TOMA plans; a new module expanding scenery to the west
  • Return to Ingleton as part of train room revitalization


Monday, October 6, 2025

Big Shrubs or Start of an Orchard?


Unintended result: apple trees!

While not everyday, but most days I have been working in the basement. One of the "habit forming" projects at the workbench that I mentioned in my last post was making shrubs with sisal rope. The process is outlined below. You can click on the photos to enlarge them and see details more clearly.

I rewatched a Boomer Diorama video on modeling shrubs, taking notes on his process. Once I had the notes and the materials on hand, I started the process thinking that I would explore making inexpensive shrubs and forming the habit of regularly spending time in the basement/trainroom. I had some sisal on hand from a well-used cat tower, several Noch leaf packets and a jar of matte medium from my tub of tree making supplies, and a packet of 12 mm static grass from a recent trip to Trains and Lanes hobby shop. 
The first step was to cut the sisal into two inch lengths before dipping one end into a 50/50 mixture of matte medium and water. The recommended dip into the mixture was one quarter of an inch. In hindsight, I probably went deeper than that, and I believe the thinned matte medium wicks a bit into the sisal fiber. The result needs to dry overnight (or at least for several hours). The next step is to untwist the unglued end and splay out the individual fibers.
Once the sisal fibers are fanned out, the next step is to turn them upside down, dipping them into more of the 50/50 mixture of matte medium, and sprinkling/dabbing on the 12mm static grass. A couple of notes here from the video and my experience: Lay the wet pieces out on wax paper to dry. Use old yogurt cups for mixing and dipping. Save the 50/50 mixture in capped medicine bottles. Wash goopy hands before the matte medium starts to dry, as it dries almost as tightly and hard to remove as super glue. 

After letting my sample shrubs dry overnight, the next step was to "massage" the branches allowing the loose static fibers to fall off. Then the dipping and sprinkling was repeated a second time. After drying, the branches were again "massaged" to remove any lose fibers. One recommended step that I omitted was a third application with 7mm static grass. In this photo, the trunks and branches have been painted with two camouflage rattle can colors, a dark grey/brown from underneath and a much lighter tan from above. 

The final step is to add leaves. In my case, I used Noch medium green leaves. I also have some light green, but I wanted to see what these would look like. For applying the leaves, full strength matte medium is used. Instead of dipping the branches, I followed the recommended process of dabbing full strength matte medium onto sections of the branch structure with a stiff brush. Then, I sprinkled on the leaves. The goal is to apply leaves to the smaller branches without clumping them onto thicker branches or the trunk. 


As seen in this photo, these sisal models make nicely detailed foliage when they are positioned horizontally or with the trunk hidden. They could represent large shrubs or a small tree. While they take some time and effort, their expense is minimal (compared to some commercial shrubs). The few that I have completed could have some drybrushing done to the trunks and some trimming done of an occasional stray fiber as a final step. After researching what large shrubs that I might model, I could fine tune the paint color and airbrush instead of using rattle cans. I could also attempt to adapt my technique to avoid the large groups of sisal fiber reforming and creating thicker branches than I would prefer. 

Looking at the opening photo, the sisal treees as modeled could easily represent apple or other fruit trees with both their size and appearance. This unintended result is making me think that an orchard scene would be an interesting addition to my plans for the model railroad. Afterall, a fruit and produce packing house is one of my current structure projects, and having an orchard represented in the vicinity would reinforce the story. In cursery online research I found a contemporary orchard in Lynden that also has an orchard in Ferndale. With more research I could identify orchard details to represent in such a scene. 

Thursday, July 31, 2025

Basement versus Train Room

After returning from the convention in Novi, I have taken a slightly different approach on the railroad. Rather than immediately resuming the work on the packing complex scene, I tried to gather some momentum on prepping more of the basement as semi-finished train room. In a post from the beginning of the year, I discussed how the state of the basement functioned as a major gumption trap. I can't decide if our record wet May and sump pump failure added more to the gumption trap or more motivation to overcome the gumption trap. Seeing some complete model railroads, visiting my friend Brad's railroad, and purchasing a Power Cab system to reactivate the Ingleton switching shelf from its current junk drawer status inspired me to attempt to revisit the transition from basement to train room.


The previous "bar" has been taken down, and I have started removing the worst of the immediate debris. Having watched a few YouTube videos on open French drains, I am still unsure of how to create a berm so the drain doesn't overflow at the one area here where it is not quite deep enough. The slope of the drain does appear to be good, allowing flow to the opposite corner with a floor drain to the dry well. A lot of wood from dismantling the "bar" still needs to be cleaned and moved to the wood shop in the garage. Phase two of my TOMA plan calls for two modules, one based on one brought from Meadville and one totally new one to extend from Nooksack along this wall. Before I get too involved with that, I need to follow through with completing the basement to train room transition, not only here, but throughout the basement. 


Months ago, I purchased a rolling cart from Harbor Freight, and having uncovered the sawhorses covered with junk, finally put it together to use in scenery or other projects on the railroad. I have to say that I was somewhat inspired by seeing Brad's use of his as a workstation as construction continues on his railroad. Putting the cart together was fairly straight forward, although not quick. Beyond the standard socket and screwdriver, the one tool seen here that I really appreciated was the telescoping magnetic pick up tool. An occasional washer or nut slipped from my shakey hands to the floor, but my pick up tool made for quick recovery. When I do return to the packing house scene scenery, the cart will be ready to use as a workstation!


Thursday, July 3, 2025

A Scene in Fifteen Steps -- More Updates


I got on a roll last week and started on the wooden warehouse. I am using a wooden block as the core, a technique that Bill Schopf from my old division taught us about. In the photo, one can see the strip of plastic stone that I trimmed and folded to suggest the foundation. I cut the side walls from clapboard sheet wood. Delving into my collection of doors and windows, I cut the ones I chose from the sprue and sanded the edges to prep them for spraying with primer. 


Step one, in my list, was to wrap up the brick kitbashed portion of the produce packing complex. In an earlier post, I explained making a shadow box and the lighting in this building. Here in a more recent photo, the wiring of the two LEDs is finished and the shadow box is glued in place. I did paint the interior wall black in front of the open side of the shadowbox before mounting it. Yes, it would have been easier to paint the interior wall before mounting the exterior roof. For the other windows and doors I fashioned black construction paper barriers, so it does not appear as obvious that this building is a flat. 


Unlike working on the structures, several of the steps in my original list of fifteen were relatively quick and easy. I sanded a couple of sections of the cork roadbed where, examining photos, I noticed an overhang or lip where the two halves of the roadbed originally split apart. In looking closely at this photo, I see another one, but it is an easy fix. My friend, Dick Bradley, noted some dramatic brush marks and embedded specks in the sky on this portion of the backdrop quite a while ago. Carefully sanding the backdrop ameliorated the worst of the irregularities. It is tempered hardboard, so it should appear smoother than plywood. Just yesterday, I mixed up some Sculptamold to apply some texture to the terrain between the spur and the mainline. Due to the high humidity, the sculptamold is not fully dry yet today; I plan to wait until it is dry before painting.   

I probably won't get much more done beyond painting the bright white plaster before I start getting ready to travel to Novi, Michigan for the 2025 NMRA convention. Since I am taking our car for the week, I need to make sure my wife is stocked up on everything she will need while I am gone. 

It will be my first national convention and I am looking forward to learning a lot. Today I started getting my tool kit ready as I am signed up for two Modeling With the Masters events. I hope to attend one of the Operations Road Show training sessions.  Once that is scheduled, I can plan my other activities. I want to be sure to visit at least one of the layout tours, a Great Northern railroad depicting a part of the Cascade Division, and I see a variety of interesting clinics from which to choose. 

Sunday, June 22, 2025

A Scene in Fifteen Steps -- Step 6, a Photo Backdrop

A photo backdrop has been under consideration all along

In my previous post, I noted my notion of trying Bob Frankrone's approach to completing a scene in fifteen steps. There, I listed fifteen steps to completing the Nooksack Valley produce complex spur scene. In that list, the sixth step was to add a photo backdrop a la Paul Dolkos. As I was preparing a clinic to present for my NMRA division, my focus for the last couple of weeks was on this step.

Early in my planning for this scene, I researched packing plant images, both for structures and entire scene images. In my Google image searches, I came across this site that included a photo that featured the section seen to the left. This scene is fairly modern and includes modern semi-trailers, but it was the best starting point I found.

After living with the original image leaning in place, I decided to make some changes. I took a fairly analog approach. I printed out the original image and resized it to what seemed appropriate on my inkjet printer/copier/scanner. Then I printed several copies to create a collaged version of what I thought I wanted. Using a sharp number 11 blade and glue stick I made several changes by covering the trailer, removing the large fruit boxes, and extending the building to the left in my final collaged image.

I photocopied the collaged image, and after printing it out went ahead and cut out the image I planned to use, again with a sharp hobby knife. As I was working down in the train room this time, I cut on the tempered glass on my workbench.  As inkjet printed images are subject to bleeding if they get wet, I sprayed the image with several layers of Testors Dullcoat. After that protective layer dried, I used a sepia Prismacolor marker to color the white paper along the cut edges. My recommendation would be to use a light gray or sepia colored Prismacolor rather than black or a Sharpie of any color.

For this experiment I used Scotch Super 77 as the adhesive. It is a very aggressive adhesive, so make sure to protect whatever surface you are working on. I used some old packing papers and a paper towel, but still managed to get one spot on the benchwork. I had to go back with lacquer thinner to remove it. The point of using this glue is to avoid the photo peeling off later. 

Before applying the spray adhesive, I marked the location of the where I wanted the photo on the benchwork and experimented with coving the bottom of the photo onto the benchwork. After I applied the spray adhesive and let it dry to tacky, I placed the top in place. After smoothing the top edge down, I carefully smoothed down the bottom on the benchwork leaving a coved or rounded gap between the top and bottom edges. The photo to the left shows the photo glued in place, hopefully hiding the right angle between the backdrop and the benchwork with a coved image. 

The most recent step I have taken was to do some painting on the brown plywood bench top. The goal is to further hide the joint between the photo and the bench top surface. I used grimy black and a slate gray acrylic paint to blend from the ground into the photo. I blended the two colors, wet on wet, as I applied them. I am not entirely happy with the results, but the paint is just the first layer. I will be adding sanded grout, which I may apply up into the photo. Although I don't always follow my own advice, in general it is best to stop before I go too far. I remember Gerry Leone saying in a video that he "tries to stop when he thinks to himself, 'just a little more'."


Thursday, June 12, 2025

Updates and Goals

I have updates and goals for both the train room (aka the basement) and for the railroad. 

As I left off my last post with wet basement issues, I will start with that. My wife helped me last week on one of our continuing rainy days, and we made a good start on removing the scabbed-in bar. As you can see in the photo, I still have some framework to remove. The damp floor in what I was calling "the floodplain" can also be seen. Not labeled, but suggested is the approximately one inch wide "French Drain Canal" between the green concrete floor and the yellow wall. Judging from the existing rot, the floodplain has been an ongoing issue, exacerbated by our wettest May on record. A steady stream of water was flowing into the "canal" until about ten days ago. I will need to build a lip along the floor (a levee) to prevent the canal from overflowing here in the future. 

In addition to the wet basement abatement, another goal for this summer consists of more electrical work. The sump pump and water conditioner are currently powered through a gnarly extension cord draped across the ceiling. They need a direct line. Renee wants some general lighting in the basement with a switch. I want a line to outlets for the railroad lighting (current and future) also switched. Plus our three season room's outlets need to be reconnected and a few more receptacles added in the basement. This really should be done before any significant  additions to the railroad are contemplated! We need a firm plan and easy access before we call in the professional. 

I want to continue with this area around the fruit and produce spur. I am giving a clinic soon, and I would like to try using the photo that I have propped up against the backdrop in this image and share the results. It actually isn't a straight photo; I collaged parts of the photo to make changes. The other experiment is to cove or curve the photo from mounted to the backdrop to glued to the benchtop. I will need to remember to coat the photo (printed on my inkjet printer) with a fixative so that water based scenery doesn't make the colors bleed or otherwise destroy the image.  Then I can experiment with first layers of scenery and weathering to blend the road surface onto the benchwork. 

Several years ago I attended a clinic by Bob Frankrone about completing a scene in fifteen steps, and thought I might try that approach to the fruit and produce spur area. Here is a to do list of my fifteen:

  1. Last steps on brick building
  2. Warehouse a la Bill Schopf (multiple steps)
  3. Sand the cork edge
  4. Sand the painted sky 
  5. White wash for atmospheric haze
  6. Photo backdrop a la Paul Dolkos
  7. Sculptamold for texture
  8. Paint and first layer of scenery
  9. More layers of scenery 
  10. Fence
  11. Tie pile 
  12. 12 volt DC lighting bus
  13. Connect lights
  14. Ballast spur
  15. Details

In this prototype photo of the Interbay Yard in Seattle, I really like the area between the tracks in the bottom right area: a little uneven terrain, some tall grass and shrubs, and a pile of ties. This photo is from the digital library at the Cornell University. 

Friday, September 27, 2024

East Branch Scenery Updates -- Part 4


Here at the eastern end of the East Branch staging yard, the first phase of scenery is complete. Yes, more details could be added such as crossbucks, static grass tufts, and more bushes or shrubs. However, for the first layer, it is complete enough to move on. This scene generates Pacific Northwest atmosphere which is one of my goals. This scene also brings to a successful close the fix or extension to the originally planned staging. The first layer of ground foam and other scenery materials disguises the abrupt foam hillside to some extent. Time to move on!


Here, another section of the East Branch staging module exhibits enough first layer of scenery for me to feel ready to move on. The track is ballasted, the original clearcut area has been expanded, and some texture is applied from the berm and gap in the rear to the front fascia. Another layer of scenery should be applied later, but a foundational level of atmosphere and realism goals are there. Now, I need to get up the gumption to add to the first layer of scenery between these two areas, at least make sure that some texture is applied everywhere beyond painted plywood before I return to the Nooksack module's buildings, scenery, and operations.

In my last post, I discussed long range plans and a desire to improve the surroundings in the basement. While I do want to connect the two first phase finished areas ASAP, my thoughts about the basement were reinforced  when our new cat sitter came by to meet Jane and Gracie yesterday. When we mentioned the trains, she wanted to see them. As the first phase of the 4th Subdivision is coming together and I can take some pride in it,  I fear that the surrounding basement is more than a distraction; it destroys the illusion. Some improvements to the surroundings must be fit into the schedule!


Monday, August 26, 2024

East Branch Scenery Updates -- Part 3

Working from the east end

In my last post I ended discussing a patch of trees as a way to disguise the dead-end of the far end of the East Branch Staging.

The first step was to pencil in the location of shadows on the sky from the temporarily placed trees. Then, during a recent Thursday modeling night, I painted in some trees using acrylic craft paints and some brown from the lid of my gallon of latex brown dirt color. Finding the green to be too light compared to the furnace filter trees, I mixed up a slightly darker color and added some darker brush strokes with slightly more detailed branch ends. The next day I drilled holes for the trees and marked them with toothpicks before adding a layer of a Scenics Express "Conifer Floor Blend," a ground foam and static grass mix, to the area.

In addition to gluing down the ground cover, I also applied ballast to the track, here between the tree locations. After the scenic glue had dried I went ahead and fit the five furnace filter trees in place. While no one has been able to explain the the reason for the phenomenon to me, I am a believer in the "odd number groups of trees looking more natural" theory. The five trees are made up of different colors, sizes, and construction techniques. While they actually block the track, the illusion and hidden shadows by the painted trees on the backdrop works well enough for me. 

In my previous post I explained the materials and techniques used for ballasting here on the East Branch staging section. While working here, I went ahead and finished ballasting the main and passing tracks between the clearcut and here at the east end. As seen in the photo, one segment of the ground needs some additional first layer work behind the passing track. My notion is that a path needs to be added, a gravel parking area at the end of the gravel road should be included, and some landscaping needs to be worked out around the yard office (which needs to be finished). 

Working backwards from the patch of trees, a section of the backdrop needed work. If nothing else, the patch between sections of backdrops created with the runaround extension from last September has never been resolved. I decided on showing a clearcut going into the distance. 

Using Google image, I went through a number of photos online until deciding on one from an online report from the University of Cincinnati. I did a screen grab and then saved a portion as a JPEG. My first idea was to do some old school cut and paste before glueing it into the backdrop as an experiment with collaging a photo into the painted backdrop. While trying out various positions of my photo cut outs, I changed my mind. Why not just use the photo as a source and try painting the distant ground and trees instead of trying to blend the photo with the rest of the painted backdrop? So, that is what I did. 

By having a source photo to work from and using my standard latex brown as one of my colors along with a few craft store paints, I think the transition from 2D backdrop to 3D bench-top works. I am not going to give up on ever collaging in a photo into the backdrop, but I will save that technique for buildings. The technique that I think will make that work is applying visual foils on either side of the building, an approach suggested by one of my model railroad inspirations: Paul Dolkos. Paul passed away earlier this month, but I was able to briefly meet him and visit his Baltimore Harbor Railroad several years ago before his railroad was taken down. 

In the last photo, the railroad crossing boards can be seen glued down, and the stumps are loosely positioned, but still need additional weathering. While I am making progress here on the East Branch staging, I still have more to do before I can say, "The first layer of scenery here is complete, let's run some trains and return to Nooksack." First layer of scenery is a doable goal here within a reasonable length of time, and may supply inspiration for additional progress on the railroad as a whole. 

Next Steps:
  • Stump weathering
  • Yard office completed
  • Switch stands
  • First layer of ground cover where missing
  • Experiment with static grass and static grass mats


Tuesday, August 13, 2024

East Branch Scenery Updates -- Part 2

For a variety of reasons, some good and some not so great, I have not been working very steadily on the railroad. I have made some progress though with next layers of scenery, ballasting, and finalizing the plans for scenery here on the East Branch section. 

This photo shows the area behind the tracks where I envision extending the clearcut. I continued to work on staining and painting some stumps that I had ordered, but they are not yet where I want them. I got them to a point where I am happy with the color representing just-cut trees, but the stumps need additional weathering to age them for this scene. Also, they are stumps of large trees! I have ordered some more smaller stumps to mix in. Once the additional stumps are ready and the clearcut area is expanded, I will post with details about the process. 

Working outwards from this same area, I started the next layer of scenery, which in this case, consists of ballasting the track and adding ground cover along the track. One of the standards that I have established for the railroad is the use of real rock ballast instead of the ground walnut shell materials from Woodland Scenics. Here, I am using Arizona Rock and Mineral 1152 "Empire Builder" for the mainline and passing track. For the spur track I am using Scenic Express #50 Blended Ballast. In an earlier post, I discussed my ballasting techniques. 

After ballasting a section of track and while the scenic cement was still wet, I sprinkled on some fine ground foam along the ballast edge. I used Earth Blend and Green Blend of Blended Turf from Woodland Scenics. As seen in the photo, I applied the Blended Turf in gaps between the ballast and earlier applied sanded grout. While I plan to later apply additional scenic layers such as static grass tufts and mats as well as static grass fields, shrubs, and bushes, for now my goal consists of applying a first layer obscuring any painted plywood. 

While I am working outward from a clearcut patch, not all of the East Branch staging section is intended to be clearcut. Evergreen trees are part of the identifying atmosphere of the "Evergreen State," so as I mentioned in my last post, I have gotten into my stash of trees. I found one bag of somewhat derelict trees, some from my module days with a layer of "snow" and some half completed furnace filter trees. After picking out the best and poking them into a foam block, I took them outside for a quick blast of dark green camouflage spray paint.  I plan to utilize trees I have on hand here on this sceniced staging section before going into a new phase of tree construction. 

The far end of this section where the track runs into the backdrop has been a bit of a conundrum. One temptation is to apply some mirror trickery. On the other hand this is a "temporary" staging section and that might be considered a bit of overkill. In fussing with some of the trees I have on hand, I think that I have a plan. First of all, in placing some conifers temporarily, I see that painted trees on the backdrop are needed to hide the shadows from the three-dimensional ones. With the tracks running into dark shadows and patch of trees, I am thinking the dead end will be sufficiently visually disguised.

I still have quite a lot to do on the East Branch, but I plan to start by focusing here at this end before working my way back towards the clearcut and the Nooksack section. The first phase of work here at this end will include:

  • Backdrop painting
  • Track ballasting 
  • Gluing the crossing planks
  • Applying ground cover
  • Applying static grass mat and tufts
  • Adding shrubs, bushes, and trees

Sunday, July 14, 2024

East Branch Scenery Updates

A little bit of Pacific Northwest "Atmosphere"

In my last post I mentioned that the scenery on the East Branch staging had become a series of stumbling blocks that morphed into a gumption trap. Over the last week or so I have tried to work through them.

One area that had been bothering me was the road towards the east end of the East Branch. I had glued down cork sections for the road, but I was not really happy with them. As seen in the photo I applied a first layer of wallboard mud when I was adding sculptamold to the painted plywood last month. Even after sanding and painting with gray craft paint, I still was not pleased with how it looked. Trimming a too wide section of the curve was a step in the right direction. Another layer of joint compound, sanding, and painting . . . warmer, but not there yet.


Well, it was time for the scenery material du jour: sanded grout. I have been experimenting with sanded grout as a first layer, combing it with various other materials, and preparing a short clinic on using it. Here, I mixed up a dry batch of mainly gray sanded grout and some gray fine ballast from Woodland Scenics and used my now standard approach: white glue, grout mixture tapped from a spoon, isopropyl alcohol, and scenic cement. One issue with the cork road surface was the dip where the cork ended. I was able to disguise that with the grout mixture. While it is still not perfect, I am satisfied with the texture here on this gravel road.

As I mentioned before, I have been applying sanded grout as a first layer on a lot of the East Branch sceniced staging. In this photo I am applying a second layer over an area that appeared "too" soupy after the scenic cement was applied. Particularly when this second layer is a subtly different mix of grout colors or additives, this adds a variety of color and texture without impacting the overall unity of the scene. This is one of the kinds of scenic techniques that approach using elements and principles of art that Lance Mindheim discusses in his book, Model Railroading as Art. 

Two of the goals that I have for building this model railroad are to strive for the model railroad to function as a three dimensional art form and to capture the "atmosphere" of the Pacific Northwest. Yes, it is a model railroad and the trains are important, but maybe they aren't the top priority for me that they may be for some others.

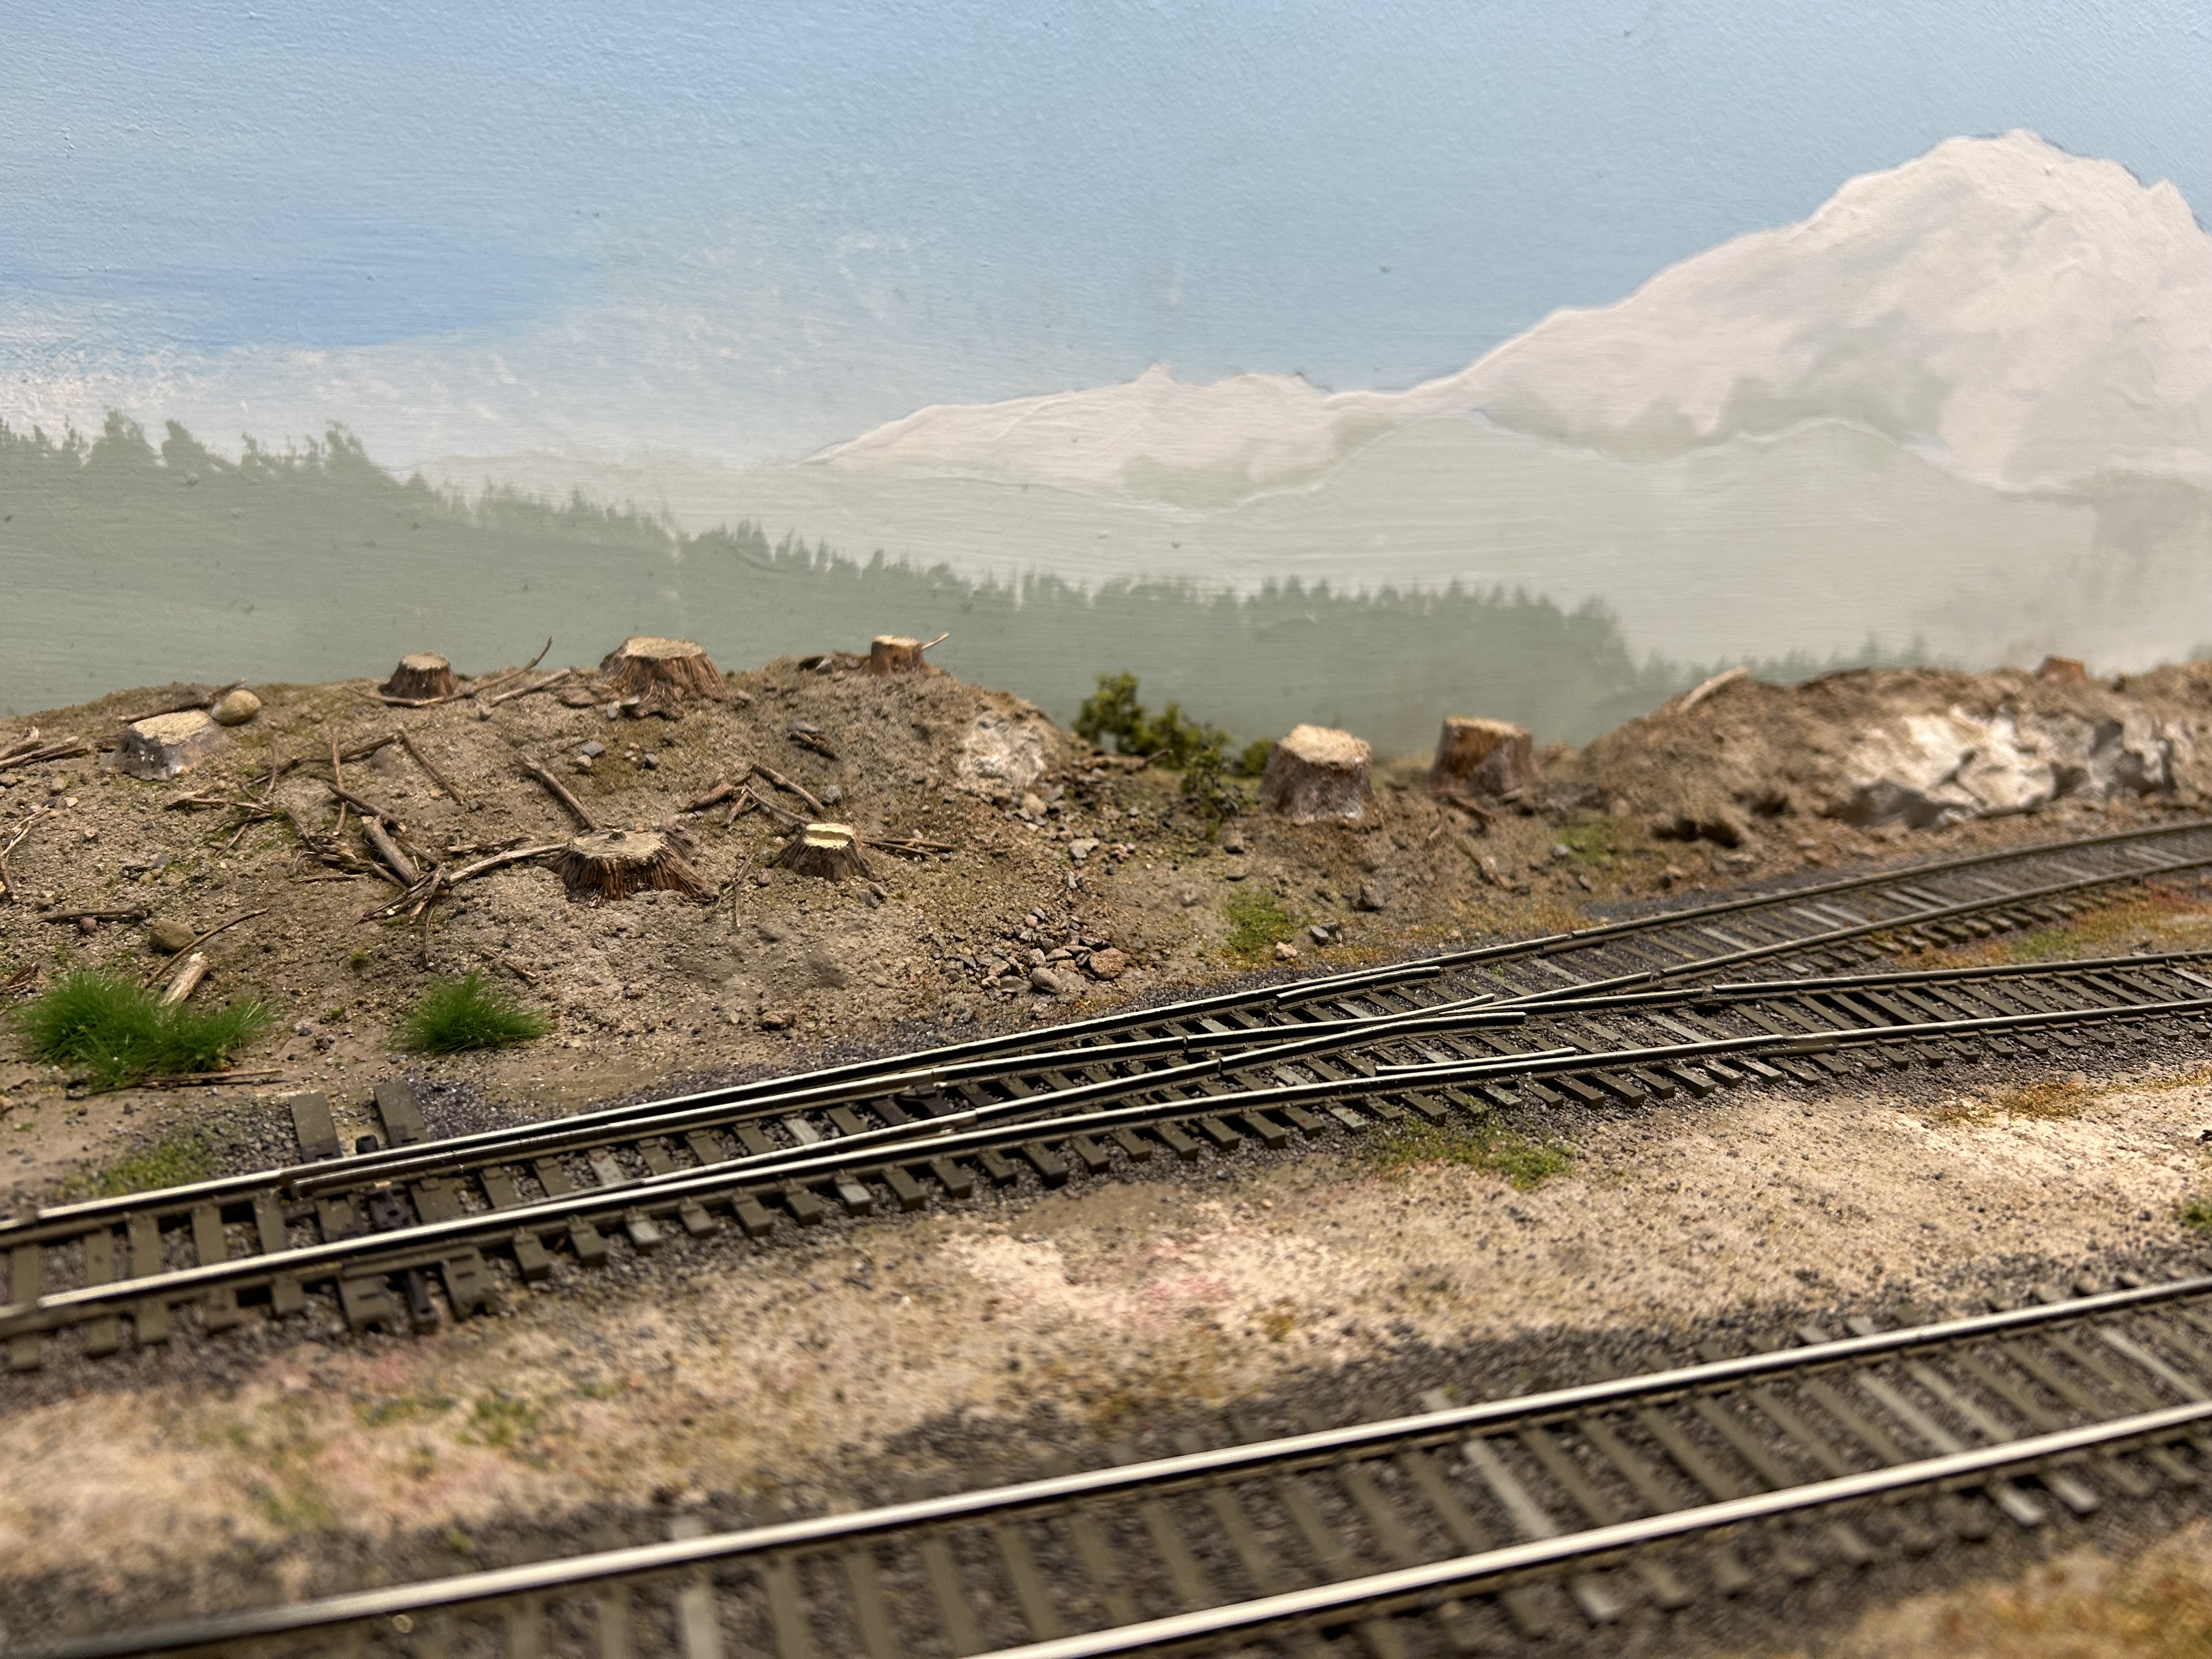
With the goal of capturing some atmosphere, I tackled one area of the berm between the three dimensional benchtop and the backdrop. It already had a first layer of sanded grout applied, and I wanted to attempt to model a section of clearcut there. Using Google images I looked at a number of photos of clearcuts. I had some plaster stump moldings on hand and ordered some more. Using the older ones, I stained them with a dark gray wash and started arranging them in place. Once I was happy with their placement, I used some of my dry grout mixture to level their bases. In the photo one can see this leveling process. 

Having been exploring the look of clearcuts, I decided to expand on my first layer approach and move this scene into a more finished state. I explored using a spray/mister bottle to apply the alcohol wetting agent. Having noticed stray sticks of various sizes abandoned among the stumps in the photos, along with rocks and some greenery, that is what I tried to model. I had a box of grayish (I think oregano) branches that I had collected from our garden in Meadville, and I got into my tub of scenery materials to find some static grass clumps and other foliage. Placing them on the damp grout, I then applied scenic cement.  The end results can be seen in the opening photo of this post. 

Having gotten started, I am enjoying the process. Next up, I envision the clearcut area doubling, exploring with static grass mats and static grass applicator, getting into my box of trees, and ballasting the track. I just watched a couple of videos of model railroaders stating that having one section of completed scenery inspired them to be enthused about their railroad. 

Wednesday, June 26, 2024

What's Been Happening On the Railroad: Stumbling Blocks or Gumption Traps?

It has been over a month since I last posted, Yikes! I shouldn't get too down on myself; it is somewhat expected that summer is a slow season for model railroading. I have done a few things, just not the steady progress that I had laid out for myself. Some slow progress has continued on the Curtis Cannery roof-top water tower, but I hit a small stumbling block. I tidied up the railroad, cleaned track, and did some solo operations, but I hit a bit of a stumbling block. (Do we sense a theme here?) Just last week I spent some time in the basement because it was the only cool part of the house during our week long heat wave. While there, I returned to scenery on the East Branch, which had been stymied by, wait for it, a series of stumbling blocks.

While my original drawings for the water tower had a different approach, I changed the plan at the last minute to the 12' X12' posts all aligned as straight and plumb verticals with a 90 degree angle at the base instead of many of the posts in the bents having a slight angle. I saw this approach with all straight posts and an angled board added at the end of the bent in a coal trestle somewhere, but I don't remember where. I may be breaking the "don't model from models" rule here. At any rate, I drew over my original drawing, cut and stained the parts, and went ahead starting to glue up the bents with braces as seen in the photo. 

Avoiding the heat working outside on another day, I went down to the workbench in the basement and wrapped up the rest of the braces and slanted end boards. After the glue was dry, I started brainstorming how to tie the joists holding the tank up, the bents, and the tank itself together. I was able to accurately glue the bents together by lining the parts up on the waxed paper covered drawing. Attempting to balance the 6" X 12" joists and bents in place with my shaky hands was unsuccessful as a trial of the new process. This was the stumbling block I mentioned earlier. At first I thought I would have to design a fixture to hold the joists in position and then glue the bents in place upside down. Now I am thinking that an easier approach is to glue the central joists in position at the bottom of the tank with the tank upside down before gluing the bents in place. At least I now have a plan, and I can move forward with cutting the joists to length and staining them. 

As I mentioned in the first paragraph, I spent a couple of afternoons in the basement with solo operations. I am experimenting with the notion of having the car cards at an agent's desk that I discussed here and here earlier this spring. Clearing off the layout and cleaning track and loco wheels went fine. I arranged some cars in place and made up the first switchlist. After that I ran a first session that was enjoyable, lasted a little over an hour, and suggested that "model railroading is fun." But then, for the next session, the return of the first session's turn, I had too many cars in the East Branch yard, too many destinations, too many cars to pick up at the NP interchange. And worst of all, too much in my head moving back and forth from the railroad to the agent's desk. Model railroading was NOT fun. Well, over the last month, Lance Mindheim has posted links to some Switching Operations 101 videos on his YouTube channel and discussed solo operations on his blog. After considering his suggestions, my takeaway is to simplify and slow down, instead of trying to jam the operations plan of the whole completed 4th Subdivision into this one location and small yard. 

I had hit several stumbling blocks (actually, a full on gumption trap!) earlier this year on the East Branch staging. Looking back, this is probably why I started the cannery project. I was unhappy with how several parts of this temporary staging were turning out. (They all appear in this photo from February.) I tried justifying the obvious seam between two sections of sky panels as "deal with it, it's just temporary." Despite that, it bothers me every time I notice it, and I don't want to finish painting the tree line there because of it. On the aisle side of the module I had "scalloped" the fascia that I had installed after carving out some of the foam to create some three-dimensionality to the foam tabletop. I also had glued in a cork base for a road at the far end of the scene. I worried that I was in a "can't make a silk purse out of a sow's ear" situation, but didn't want to start over, so I ground to a halt.

Last week, during the worst of our heat/humidity wave, I bit the bullet and mixed up some Sculptamold. I applied it along the edge of the fascia, hoping to emphasize some irregular natural ground surface and deemphasize the too regular scallop I had cut into the fascia. After painting with my standard brown color, I was satisfied that it had mostly worked. I also went ahead and applied some wall board mud to the cork road base. After painting that a gray color, I am still not happy with it. However, I can see what to do next to correct that, rather than worried I will make it worse and not willing to do anything. 

At this point, I would say that I have possible solutions to most of my stumbling blocks, so that I can move forward and not be a victim of multiple gumption traps. We still have a lot of yard/garden projects to complete, but the railroad in the basement feels more like a place I want to go, a mental respite not a chore.  


Sunday, February 11, 2024

Scenery From the Ground Up -- Part 2

Having decided to keep the signal tower in its location at East Branch and the NP interchange, I have continued with the first layer of scenery around it. I started by modeling a wooden grade crossing for the driveway that accesses the tower. Then I created a gravel road as the driveway. Today, I expanded the sceniced area with more of the original grout ground cover. 

Knowing that I was going to create a gravel road, I decided on a rustic wooden grade crossing. I chose sixteen feet as an appropriate width for a one lane drive, particularly as that is a typical length of wooden planks. I had 1/8" X 1/8" and 1/32" X 1/8" strip wood on hand, and those sizes worked well with my flex track. Those sizes roughly represent 12" X 12" and 3" X 12" boards in HO scale. I cut them to length on my chopper and stained them with grimy black acrylic paint, thinned with 70% isopropyl alcohol. After they had dried I glued the thinner planks to the plastic ties with CA, and the two thicker boards were glued to the painted foam with Elmer's Glue-All. 


I am very happy how the grade crossing came together. The 1/32" board along the outer edge of the rail is super glued to the spike heads, angled up from the ties and butted up to the rail. Moving outward from the rail, the next 1/32" thick piece is superglued directly to the top of the ties. The outer board is one of the 1/8" square pieces, glued directly to the foam. The same pattern is repeated on the other side, outside the rail. Four of the thinner planks are super glued directly to the ties, between the spike heads, leaving room for the wheel flanges. This combination appears to work really well, leaving room for the rolling stock to move through the crossing without problems. 

The next step was to attempt to model a gravel road with sanded grout. I used the 09 Natural Gray color of Polyblend Plus and Woodland Scenics' fine gray ballast blended together while still dry. Following the same method of painting on thinned white glue, tapping a spoon of the grout mixture over the glue, and then eyedroppering alcohol as a wetting agent followed by dripping on scenic cement described in the earlier post I created a somewhat soupy mess. Tapping on a bit more of the grout mix and some straight ballast on the wettest parts firmed up the road. While it was drying I used a sacrificial HO vehicle to form some tread marks (perhaps a little too deep) and then let it dry. A final step after the roadway had dried was to sand the crossing planks that had been stained by the scenic cement with 320 grit sandpaper. 


Earlier today, I expanded the area with the first layer of scenery to the east of the gravel drive and to the east along the back berm. A repeat of the same process with more of the original mix of both colors of sanded grout and some filtered sand from the tube sand. Yes, it is rather barren looking without additional greenery and details. That said, I am really liking the sanded grout as a first layer. It provides some texture and color that is closer to scale than the ground goop I have used in the past. I also like the wooden grade crossing, which fortuitously came together easily as a mini-scratchbuilding project.