Saturday, February 22, 2025

Wrapping Up a Quick Build for Nooksack


Having repaired the buckled track work here in Nooksack, I returned to the workbench to finish a small craftsman kit that I started a few weeks ago. This is the Juniper Freight House, a Fos Scale Models kit. When I first ordered it I intended to use it as part of the Curtis Cannery complex. Now, I am thinking that I will use it, at least temporarily, here in the front of the benchwork where I have thought I would have a fuel supply company. It may become a lumber and fuel supply company. This little freight house fits nicely here, between the fascia and the spur track. Signage and details will have to wait until I determine the structure's use. 

This was the first kit that I have built from Fos Scale Models. The instructions were complete and relatively clear. The drawings showing the location of bracing were particularly helpful. By bracing the walls, they did not warp with staining or painting. I did let them dry under weight which may have helped prevent warping too. I used Hunterline Driftwood stain on the walls and for unpainted wood. I drybrushed Americana Buttermilk on the walls after the stain had dried to give the appearance of worn and weathered paint. For the plastic windows, I used a rattle can dark green, while I brush painted the wood trim and freight doors with Vallejo's Camo Olive Green. 

The only complaint I have with this kit is with the rolled roofing material. It is packaged folded and I couldn't figure out how to completely remove the fold. In the future, I would use the Jason Jensen technique of using black construction paper. Another step I would take in the future is to more carefully sand the glueing edges along the top and bottom of the walls, so the trim boards line up exactly with the laser cut walls. This was operator error, not the fault of the kit. Overall the quality of the kit is quite good. Both Jason Jensen and Fos Scale have some excellent You Tube videos on craftsman kit construction, painting, and weathering. They both are modeling really run down urban areas, so I am not attempting to weather as drastically as they do. Their techniques are worth emulating though.

I have another of the Fos Scale Models kits to build, but I think that I should focus on the buildings of the two complexes that I have already started here in Nooksack: the cannery and the packing house, seen here behind the recently completed freight house.  I felt a sense of accomplishment from actually completing something before moving on to something new. I hope to build on that feeling and make some progress on the kitbashed and scratchbuilt industries already under way here in Nooksack.  


Tuesday, February 11, 2025

Buckled Track Repair


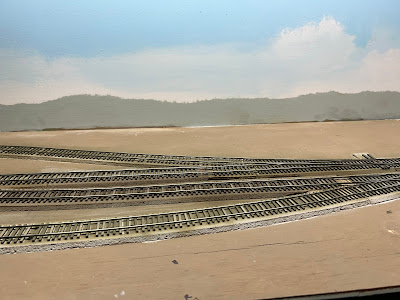
Although I thought that track work (and track wiring) was complete here on the first phase, it turns out that I was mistaken. Gremlins appeared. In my last post, just a few days ago, I mentioned that the track had buckled on the passing track at Nooksack. After further review I suspect that the cause is not exclusively rail expansion, but at least partially benchwork wood shrinking with the low humidity of our house with the furnace blasting this winter. In addition, the turnout to the left of the buckled track has twisted and no longer lies flat causing derailments. 

At first I considered what I thought to be the easiest solution: unsolder the rail joiners, cut off a bit of each rail, and resolder the joiners. I wouldn't have to make any changes to the wiring; the existing feeders would still be adequate. However, what might happen in the summer when the wood expands? I decided to take a different approach.

I got out my Dremel and using the cutting disk, cut a new gap in the buckled track. After filing the ends of the rail flat, the flex track straightened and the turnout flattened down. The cutting disk left an appropriate gap. I removed some of the ties, filed the rail ends, and slid rail joiners onto the rails. With everything back in place after gapping the rails, both the track and the turnout were realigned. By not soldering the new joiners, the rails can move with the changes in humidity/temperature through the seasons. But. . . now we have a possible electrical gap, as loose rail joiners are notoriously untrustworthy.  

Needing to add a set of feeders to ensure connectivity, I fetched my electrical toolbox. Knowing that this approach entailed dropping feeders, I had plugged in my soldering iron as an early step.  A hot iron, having all materials gathered (yes, literally in a toolbox), and tinning the rail and feeders before soldering the feeders in place made for quick work. I tested continuity between the feeder ends under the benchwork and the rails with my multimeter before joining the feeders to the DCC bus wires with suitcase connectors. Cleaning up and putting the track tub and wiring toolbox away left only a repeat of replacing several ties as tasks in the basement. 

While writing this post, I remembered that I needed to add the new gap and feeders to my "Propulsion Circuitry Diagram" in the three ring binder that I have started towards the Electrical Achievement Program should I chose to attempt it in the future. It is good practice to document what is going on down under the model railroad in any event, NMRA AP or not.

Friday, February 7, 2025

Moving Forward With Nooksack -- Continued

Revised distant hills line
I mentioned in my last post that I was not satisfied with the distant hills that I had painted. I thought that they were too dark. Renee, my wife, noted that the pencil lines that I had sketched in to guide the painting were visible in places, and she thought that they distracted from the illusion. I was also unhappy with the bushes or trees that I had painted in the foreground. They appeared to accentuate rather than hide the right angle joint between the benchwork and the backdrop.

I decided to repaint, basically changing my approach while applying a second coat. First of all, I added some more white primer to the small tub of paint that I had mixed up and saved. Using a #6 round brush I painted over the first coat and any foreground that I had attempted. With a bristle #2 flat, I carefully applied a subtle tree texture to the top of the hill line by dragging the brush up into the sky. In this in-progress photo, the difference in apparent value of the hill and dirt colors between whether they are on the flat plywood or the vertical backdrop is quite noticeable. This phenomenon is probably caused by the reflective quality of the paints on the flat tabletop with the LED lights directly overhead. This will be a complication to work around as I add any painted foreground details or work to hide the right angle joint. 

With buildings and rolling stock cleared off for backdrop painting, I noticed that ties are missing at a number of the rail joints here in Nooksack. So, while thinking about it I found a tub of ties and got to work. Apparently saving little bits of everything is planning ahead rather than hoarding! Using a chisel blade in the hobby knife, I sliced off the tie plates and spikes. This is a technique where it is important to pay attention to the relationship between finger location and blade direction. After the replacement ties were prepared, I painted them with a random mix of rail tie brown and Americana Slate Grey craft paint. In slipping the replacement ties in today, I noticed a section of flex track and a turnout that are buckled from rail expansion: another task to take care of while moving forward with Nooksack. 

Over the last few days I did some thinking and decided that with my desire for one lighting system for structures on the model railroad that I would go with a 12 volt system. I ordered a regulated 2 amp 12 volt power supply and some of the LEDs from Evan Design. With that I will be able to include the couple of buildings that have incandescent bulbs built in already in one lighting system. Having made a decision, I can return to the structure building projects new and old. 

Moving forward towards the goal of visitors in April with a rough to-do list:

  • Repair buckled track (trains must run smoothly)
  • Steady progress on structures and mockups:
    • Cannery complex
    • Packing house complex
    • GN Station
    • Others?
  • Big picture of roads and terrain
  • First layers of scenery on several mini scenes:
    • Team track area
    • River and trestle scene
  • Declutter the basement and continue train-room and presentation prep.

Is turning this into SMART goal format going too far into the weeds? Would it help or hinder progress?