 |
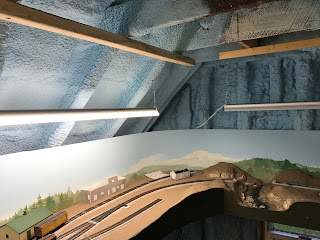
| First steps of lighting and adding valance |
The accompanying photo also shows the 2" x 2" that I screwed into the collar ties to hang the 16" valance. I had a 4 x 8 sheet of 1/8" tempered hardwood ripped lengthwise into three pieces about 16" wide. The 16" valance will work out to be around 13" inches from the plywood base of the layout. This works well for me, as I then don't see the blue foam above the backdrop, and it will be comfortable to reach in to the gap during switching operations. It turns out that my wife, much shorter than me at 5'2", does see the gap. Ah, the best laid plans . . .
The shop-lights were up, but I still had to figure out a plan for getting power to them without having extension cords in a spider web all over the floor. I ended up mounting a scrap plywood cross piece across two legs, mounting a power-strip to it with cable ties, and dropping the cords behind the backboard to plug into the strip. It is convenient to just reach under the layout and flip one switch to turn on the layout lighting.
While we clamped part of the valance in place to see how it looked, I still need to work out the final details of mounting it, particularly at seams. The other side, the Willow Junction side, is going to be a bit trickier for both lighting and the valance. On that side I am going to try LED strip lights, and I am going to have to come up with a different technique for mounting the valance. The slate roof on that side of the house, over the decades, has developed a slightly parabolic shape rather than a consistent straight angle, so I didn't leave myself room for the 2"x 2" hanging strip. My next steps will be to figure out the LED strip lights, clean up the cord situation, and then move on to the valance for the balance of the layout.

No comments:
Post a Comment