Sunday, June 25, 2023

East Staging: First Structure, a tool shed


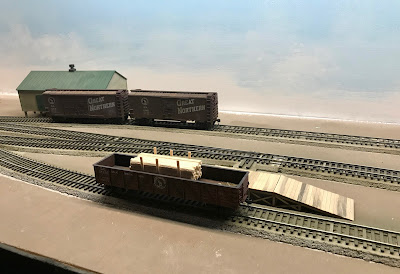
In working on the east staging, I decided that I wanted to build a couple of small structures that would be appropriate for a small yard. The first one that I tackled was an ITLA toolshed. This seemed like a good start since I am out of practice with building wood structures, and I want to improve my modeling skills. I have also started some terrain work, but I would like to have the structures on hand to finalize the placement of roads, paths, and simple foundations. As I am hoping to consider composition in creating the scene, having the actual buildings will be helpful. 

After reading the instructions and checking that all the parts were there, I decided on a paint scheme. While depots and public buildings would have been in GN's two-toned grey scheme or the new white and green scheme in the 1950s, buildings such as this tool shed were painted in a "Mineral Red." Early depots had a dark green (almost black) trim with the Mineral Red body color. I have a photo of a shed painted in that scheme that I took in Puyallup, Washington. I made the decision to go with that scheme rather than all Mineral Red. 

I mixed Vallejo Model Color 70.908 Carmine Red with 70.994 Dark Grey for the Mineral Red. I found the mix too light and bright on this first coat, so added more of the Dark Grey on the second coat. For the trim, I mixed Vallejo 70.894 Camouflage Olive Green with the same 70.994 Dark Grey. As seen in the photo, I painted the trim still in the carrier sheet and the walls before assembly.

While for the most part I followed the instructions provided in the kit, I did make a couple of changes. I decided to add bracing to the kit, carefully planning where to add 1/8" square strip wood to further support the tab joints of the kit. I also switched from using a canopy glue to using Titebond 2 yellow wood glue, after seeing how the canopy glue dried glossy and was hard to remove if it oozed out. After the bracing dried I painted the inside of the walls with a light grey craft paint. After that dried I glued the walls together and to the floor, bracing with a pair of small angle squares as seen in the photo. In the last wood structure kit I attempted, several corners were noticeably out of square in close-up photos.  Careful bracing with angle squares or the Micro-Mark magnetic glueing jig (tools that I have on hand) should be mandatory when building future structures. 

After the walls were glued together and dry, it was time to work on the doors, windows, and trim. Another change from the instructions came about as I struggled with the windows. As best as I could tell, the supplied clear plastic was intended to fit into the window openings in the walls. I could fit the window sash in after careful sanding, but the window "glass" did not cooperate. So, I followed the directions for the sash and trim, but chose to cut oversize clear plastic from my plastic sheet collection and glued it inside the wall. As I worked to complete the walls, I touched up the interior and trim pieces with a second coat of paint. 


Walls, windows, and trim complete;
clamp and glue the roof beam.

Spread a thin layer of wood glue on the walls and beam,
position the laser cut shingle panels, and clamp with a rubber band.

Before installing barge boards, weather the shingles 
and along the bottom with "Oiled Earth."

Learning Points:

  • Consider both aesthetics and realism for paint schemes; consult resources such as photos and GN "Reference Sheets."
  • With wood construction, brace and paint/stain all sides to prevent warping.
  • Find a glue from all the appropriate options that you are comfortable with, in my case wood glue.
  • Utilyze jigs and clamps to insure secure and correct glued joints.
  • The ITLA kit was high quality; I would use their materials again. I really liked their shake roof!


Saturday, June 17, 2023

TOMA Phase One: Developing a Rolling Stock Roster


Earlier this spring I attended several of the online NERX clinics, including one by Drew James on developing a realistic or plausible rolling stock roster. In developing my initial rolling stock roster for this first TOMA section, Nooksack and a sceniced staging module, I am using notes from his clinic, some information from a Great Northern 1955 Annual Report that I found online, and some of my planned industries for the 4th Subdivision. This roster is focusing on freight cars; passenger and engine rosters are a different topic.

Percentage of Railroads Represented

Drew James, in his clinic, suggests considering the era, the setting, and the type of railroad. In my case this is 1954, Whatcom County in Washington State, and a branchline of the Great Northern Railway connecting with the mainline in Ferndale and interchanging with the Northern Pacific. I described this in a recently posted rationale. He then goes on to suggest developing a target percentage of the railroads represented in the roster and ultimately creating a spreadsheet of cars. Keeping in mind that this is the percentage of different railroads, not kinds of cars, at this point, here is his suggestion for target percentage:

  • Home Road: 50%
  • Connecting Foreign Road: 25%
  • Foreign in Region: 13% (This would include such roads as Milw, UP, CN, SP&S, etc.)
  • Foreign Outside Region: 6%
  • Private: 6%
If I pick a total amount of around thirty cars for this first iteration of the 4th Subdivision, his target percentage of rolling stock would work out like this:
  • 15 Great Northern cars
  • 8 Northern Pacific cars
  • 4 foreign in region 
  • 2 foreign outside region
  • 2 private

Percentage or Number of Different Car Types


I have guidelines for the number of cars from different railroads, but what about the numbers of different types of rolling stock? Just a few days ago, I found a Great Northern annual report online from 1955 that included information about the amount of freight revenue by different commodity groups in 1954. While this may not reflect my branchline, it does give an overview of traffic pattern (and hence types of rolling stock) for the Great Northern in general. Here are some percentages and notes theorizing about variance based on location in the Pacific Northwest:
  • Forest Products: 15% (a lot from the PNW, so percentage may well be higher)
  • Agriculture: 31% (almost 2/3 of that grain)
  • Manufacturing and Misc.: 31%
  • Mines: 18% (Most was iron ore, 25% of that is other)
  • Animal and Petroleum: around 2% each
The freight traffic along the 4th Subdivision is much more likely to be impacted by the types of industries present than the traffic patterns of the railroad as a whole. So, an inventory of industries and likely traffic should also be considered. 
  • Nooksack:
    • Cannery: boxcars, refers, tank cars 
    • Fuel Dealer: tank cars
    • Grocery Warehouse: refers, boxcars
    • Team Track: gondolas, flatcars, boxcars
  • NP Interchange:
    • Limestone: hoppers
    • Miscellaneous: boxcars, refers, all kinds
  • Farther East:
    • Silica Sand: covered hoppers
    • Copper Ore: ore car
    • Lumber: flatcars, gondolas, boxcars
Using the same 31 total cars I built an initial breakdown of car types. In addition to the general and specific commodities and industries considered I was also influenced by a chart of "railroad cars in service" from 1955 in Jeff Wilson's Freight Cars of the '40s and '50s in coming up with a first draft of target numbers for different types of cars: 
  • Boxcars: 12
  • Hoppers: 3
  • Tank Cars: 3
  • Refers: 3
  • Flatcars: 2 
  • Gondolas: 4
  • Covered Hopper: 3
  • Ore Car: 1 

A New Spreadsheet and Other Considerations


With my rolling stock having gone through a second move and with these target numbers in mind, I plan to create a new Excel document for this first phase based on Nooksack. I have a spreadsheet of rolling stock that I created in Meadville for the first version of the 4th Subdivision. I hope to become more familiar with sorting functions in Excel, so that I can design this new spreadsheet with railroads represented and car types easily sorted. Even without new Excel skills, I can always resort to analog techniques with color pencils. 

Revisiting my standards may well be another consideration as I develop, review my existing collection, or add to my rolling stock roster. A much earlier post describes my existing standards, and another post explores combining mechanical standards with weathering. I haven't yet written about or fully determined what standards I might develop for level of modeling detail for this new version of the railroad. In developing this new roster, I am striving for a level of plausibility and realism based on overall impressions and assumptions rather than researching and recreating actual car lists from September 1954. (Although a first step in this direction might be obtaining a 1954 edition of the Official Railway Equipment Register.) At this point though, near flawless running and overall impression of realism take higher priority than insisting on contest level rolling stock. On the other hand, I have nothing against improving my modeling ability or raising my expectations moving forward. 

Wednesday, June 7, 2023

East Staging, a Switch to Modeling

Interbay Yard, Seattle 1960 Cornell University Library
"U.S. President's Railroad Commission Photographs Collection"
While the east staging still continues as my initial focus area, I find that I am transitioning from what I think of as layout building to, more directly, modeling. More and more I find having prototype photos useful. I have printed out both the opening photo (believed to be in the public domain) and one of the SP yard in Eugene, Oregon from Tony Thompson's post: Open-car Loads: Forest Products. These photos are inspirational for several kinds of modeling, providing inspiration for both scenery and rolling stock and to some extent even structures. 

Scenery starts with terrain. With my interest in backdrops and hiding the transition between them and the benchwork, I started with a berm along the back. I covered the track with blue painter's tape and the painted backdrop with waxed paper. Then I formed a berm or slight rise with paper and masking tape before then applying plaster gauze. I have more plaster gauze on order as a joint between the Nooksack modules hidden by a now collapsed hill will need to be repaired, and I used up what little gauze I had on hand. The next step will be to apply some Sculptamold, and perhaps create some small plaster rocks.  I think I will carve some drainage into the foam along the mainline in the front. Referring back to the two photos, the yard area can be quite flat, but a subtle ditch and very slight rise between the mainline and the spurs would kill the pool table look. I should at least start thinking about vegetation; the photos suggest a variety of static grass and small shrubbery. Somewhere along the backdrop I will place some fir trees. I have read about or watched videos of two conifer modeling techniques that I want to try.

Before I get too carried away with planning the terrain (such as, will there be a road or just paths?) I need to think about structures. I ordered a yard office from GCLaser and a tool shed from ITLA, both kit companies whose products I have not worked with before. I also am considering a third small building, a telephone booth/car-knocker shed. I have several six-over-six window and a door casting that would be appropriate if I decide to scratchbuild that one. I started the tool shed by consulting the GN Railway Historical Society's Reference Sheet No. 402: Standard Exterior Colors of GN Frame Structures and Depots to come up with a reasonable color scheme. One more modeling session should finish the tool shed; its construction may be my next post. 

Another possibility is to review my standards for rolling stock and to consider what my initial rolling stock roster will look like. Tony Thompson's lumber load post referenced above really got me thinking about another modeling project, adding a couple of flatcars to the roster. Whether modeling structures, scenery, trees, or rolling stock I have plenty of modeling projects to get me back to the workbench and back in practice.