I can't believe I haven't posted to the GNbranch blog in two and a half months! Well, first of all, most of my model railroad time and energy has gone into the formation of the new division: The Alleghany Western, or Division 12, Mid Central Region, NMRA. Rather than list what all has been involved, I'll just say that I have taken on a lot of duties in the process.
In the non-railroad part of my life, I have been substitute teaching around a day or two a week, and my wife and I have started a budget remodeling of our kitchen. While subbing is less of a time commitment than regular teaching, it is at least as exhausting.
At any rate, Spring is sort of here and inertia must be overcome. Last week, on my birthday, I went up to the attic to run over half of the planned operations in sequence, and it was fun!
Also, I recently purchased these three 3' LED shoplights at our local hardware chain for a very reasonable price. I think it is time to tackle the lighting and valance for the initial "U" part of the layout. I have an idea of how to do it, but the details will have to be worked out in the process. The valance in particular has been a gumption trap for a while, and it is time to break inertia by actually starting.
The purpose of this blog is to document and share the planning, construction, and operation of a small HO model railroad set in the Pacific Northwest. Discussion of "Version 2" of the model railroad starts in the fall of 2021.
Sunday, March 25, 2018
Monday, January 1, 2018
Elevator Complex - Feed & Seed Part 1
During December, I started a new structure for the Willow Springs side of the layout.
While I was originally going to build American Model Builders #706, Elevated Warehouse, as an office/warehouse for the planned grain elevator at Willow Springs, I decided to locate it across the tracks as a related feed and seed business. The first step of building this wood laser kit was to read through the instructions and check the parts. For the wood parts, I stained the parts with my standard Prego jar stain (70% alcohol, black ink, and raw umber acrylic paint). My plan was to stain both sides to reduce warping, but I missed one wall section interior side. After the stain dried I painted the exterior walls with Model Master Reefer White. Rather that trying to get complete coverage with the white paint, I followed a modified dry-brushing technique allowing some of the stain to show through the clapboards towards the bottom of the walls.

The next step was to remove the walls and floor from the carrier sheets and prepare them for assembly. I used a new #11 blade in a modeler's knife and a cutting mat to facilitate cutting the tabs holding the part onto the carrier sheet. From the beginning I planned on adding interior details and lighting to this simple structure. I used Google images to find photographs of feed store interiors, and resizing and splicing several together, I mounted them on one interior wall with Scotch Super 77 spray adhesive.Using the supplied floor risers and additional 1/8" square stock, I glued bracing to the wall sections with yellow carpenter's glue. I also glued 1/8" square stock to the underside of the floor, being careful to measure to avoid the floor risers and pier locations.
Up to this point, my process aligned well with the kit's instructions. My one significant divergence was to mount the doors and windows in the wall sections before I glued the walls together. I painted the door and window parts with Model Master Dark Tan before removing them from the carrier sheet and with a second coat after removing the parts. I mounted the sliding doors in an open position to allow the interior of the building to be more visible. On the interior of the track side wall, I scratchbuilt window and door molding, as this interior wall will be visible through windows and the open loading doors. To help assemble the multi-part peel and stick doors and windows, I fashioned a temporary jig from a small machinist's square and a metal ruler. This temporary jig can be seen in the photo to the left. As I assembled the doors and windows, I glued them into the wall openings. As the wall sections were completed, I glued the walls together, using the floor to square everything together.
While I was originally going to build American Model Builders #706, Elevated Warehouse, as an office/warehouse for the planned grain elevator at Willow Springs, I decided to locate it across the tracks as a related feed and seed business. The first step of building this wood laser kit was to read through the instructions and check the parts. For the wood parts, I stained the parts with my standard Prego jar stain (70% alcohol, black ink, and raw umber acrylic paint). My plan was to stain both sides to reduce warping, but I missed one wall section interior side. After the stain dried I painted the exterior walls with Model Master Reefer White. Rather that trying to get complete coverage with the white paint, I followed a modified dry-brushing technique allowing some of the stain to show through the clapboards towards the bottom of the walls.
The next step was to remove the walls and floor from the carrier sheets and prepare them for assembly. I used a new #11 blade in a modeler's knife and a cutting mat to facilitate cutting the tabs holding the part onto the carrier sheet. From the beginning I planned on adding interior details and lighting to this simple structure. I used Google images to find photographs of feed store interiors, and resizing and splicing several together, I mounted them on one interior wall with Scotch Super 77 spray adhesive.Using the supplied floor risers and additional 1/8" square stock, I glued bracing to the wall sections with yellow carpenter's glue. I also glued 1/8" square stock to the underside of the floor, being careful to measure to avoid the floor risers and pier locations.
Up to this point, my process aligned well with the kit's instructions. My one significant divergence was to mount the doors and windows in the wall sections before I glued the walls together. I painted the door and window parts with Model Master Dark Tan before removing them from the carrier sheet and with a second coat after removing the parts. I mounted the sliding doors in an open position to allow the interior of the building to be more visible. On the interior of the track side wall, I scratchbuilt window and door molding, as this interior wall will be visible through windows and the open loading doors. To help assemble the multi-part peel and stick doors and windows, I fashioned a temporary jig from a small machinist's square and a metal ruler. This temporary jig can be seen in the photo to the left. As I assembled the doors and windows, I glued them into the wall openings. As the wall sections were completed, I glued the walls together, using the floor to square everything together.
Thursday, December 21, 2017
Updates on the 4th Subdivision
Despite dropping the ball on posting to the blog during the past several months, I have been active in model railroading. The NMRA division to which I belong has divided, a long story I will not go into here, and I have taken on a fairly active role in the formation of a new division: Division 12 of the Mid Central Region. This has frankly taken up a major part of my model railroad writing energy.

During this time, much has been accomplished at Willow Springs on the 4th Subdivision. In a post from August, I listed a series of steps in transition towards a focus on scenery and operations. Most of these steps are now complete. In addition to installing and labeling all the bill boxes, I mounted the Willow Springs control panel and installed the final NCE UTP panel. I suspect that creating some sort of shelf or mini desk, for sorting waybills or writing out switch-lists, is a step I will regret skipping.
While I am still not quite ready to paint the track, most of the steps to do so are complete. In late October, I soldered the remaining rail joints. I also tacked down any loose track and corrected a loose and miss-aligned curve near the box company spur. A few days after soldering, I went back and scrubbed any soldered areas with denatured alcohol and an old toothbrush. The purpose of doing this is to remove any flux or dirt from the track, which will prevent the paint from adhering. I also started the somewhat tedious process of filling in missing ties. Really with just a few more hours work in the attic replacing ties, the Willow Springs trackwork would be ready to paint.
During this time, much has been accomplished at Willow Springs on the 4th Subdivision. In a post from August, I listed a series of steps in transition towards a focus on scenery and operations. Most of these steps are now complete. In addition to installing and labeling all the bill boxes, I mounted the Willow Springs control panel and installed the final NCE UTP panel. I suspect that creating some sort of shelf or mini desk, for sorting waybills or writing out switch-lists, is a step I will regret skipping.
| Tools laid out for soldering the rail joiners. |
While I am still not quite ready to paint the track, most of the steps to do so are complete. In late October, I soldered the remaining rail joints. I also tacked down any loose track and corrected a loose and miss-aligned curve near the box company spur. A few days after soldering, I went back and scrubbed any soldered areas with denatured alcohol and an old toothbrush. The purpose of doing this is to remove any flux or dirt from the track, which will prevent the paint from adhering. I also started the somewhat tedious process of filling in missing ties. Really with just a few more hours work in the attic replacing ties, the Willow Springs trackwork would be ready to paint.
Monday, October 9, 2017
Landforms Around the Trestle--Part 2
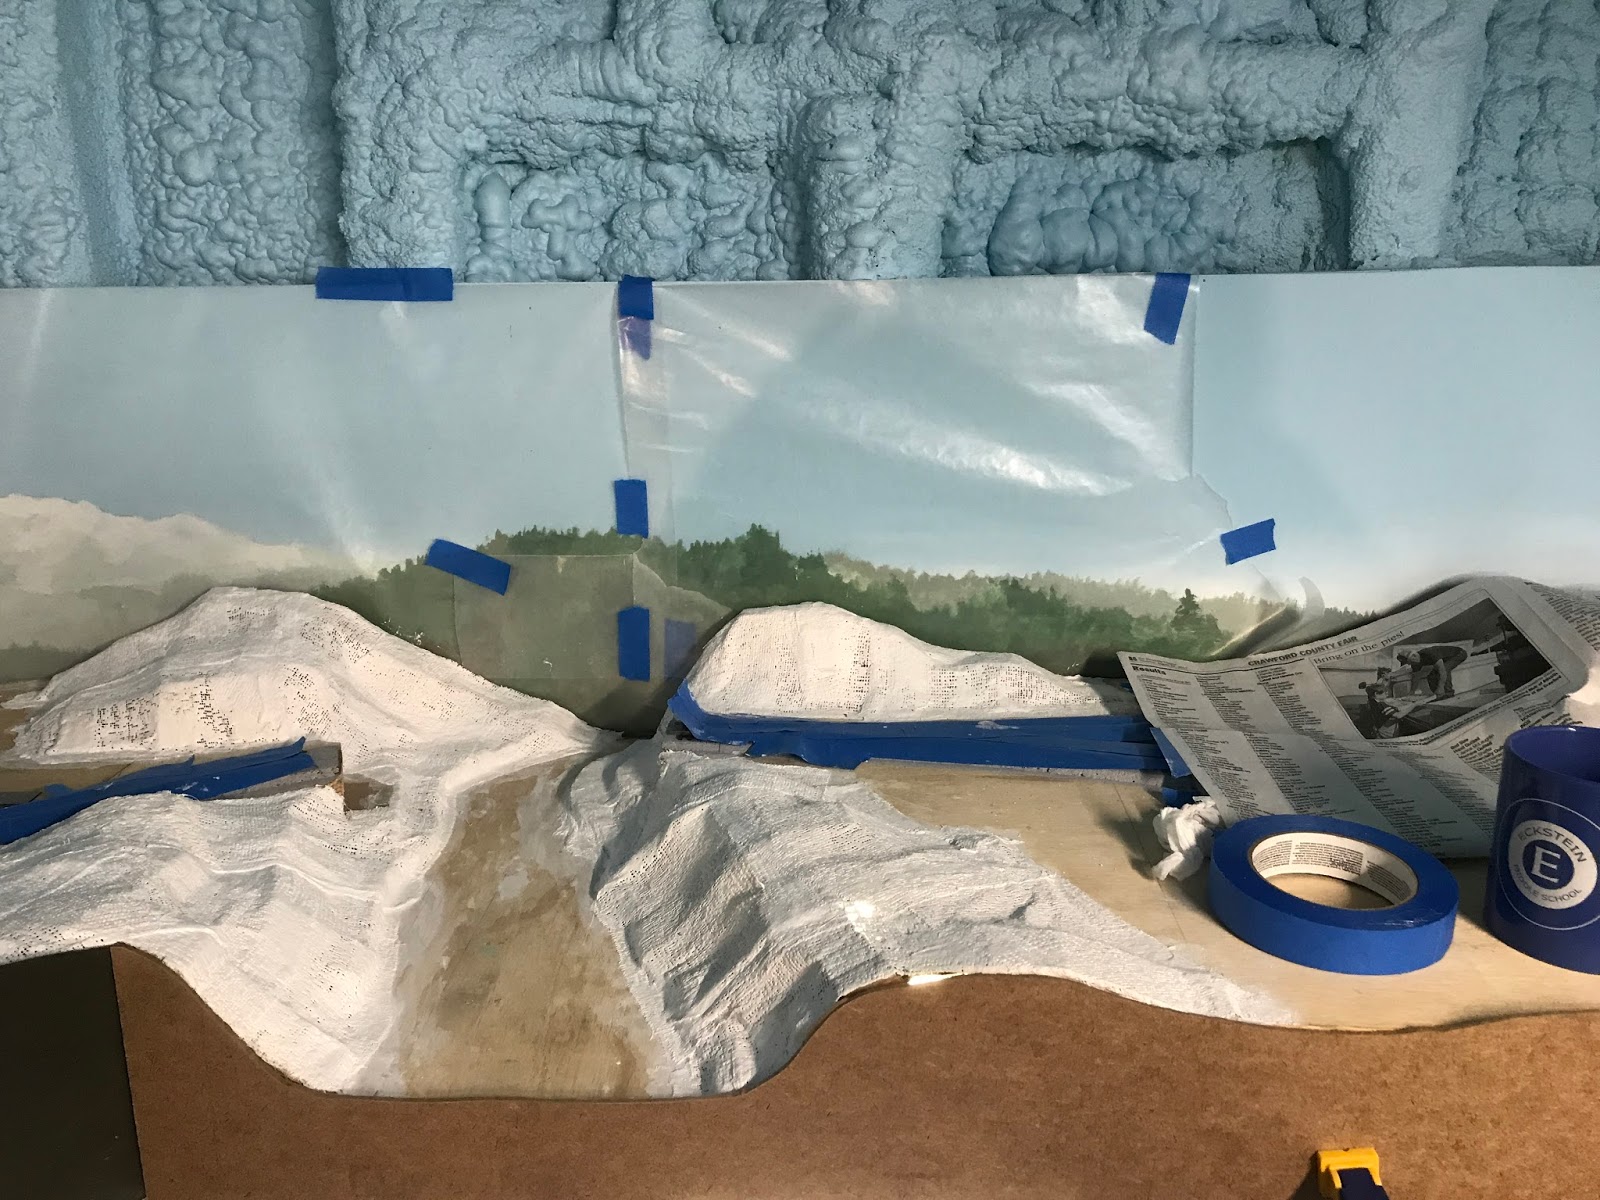
| Trestle scene ready for ground cover |
The initial landforms around the trestle are now complete other than adding detailed texturing with gravel, soil, ground foam, shrubbery, trees, and water. In this post, I will continue to describe the steps I went through to get to get here from where I left off in a previous post.
| Fascia clamped in place |
| Materials |
This is where I went off plan. I decided to pour the remainder of the plaster into the river bottom and spread it out. While I was not yet really happy with the way it was smoothing out, the plaster started setting up. I rushed out to our driveway and collected some gravel and small rocks. I pressed some of the rocks and gravel into the plaster, pressed the hardening plaster into the banks with a putty knife, and smoothed out a path for the stream itself.
Back to the original plan. I mixed up some Sculptamold using recent dollar store purchases: a plastic bowl and rubber spatula. Then using a combination of the spatula, a putty knife, and my fingers I applied a layer of the Sculptamold to the hillside. My goal with this application was to hide the webbing contours and the mini-holes from the plaster gauze.
| Staining the rock castings |
| Castings on the cut and real rocks in the stream bed |
After giving everything a day to dry, I came back and painted the hillsides with my brown base color of latex flat paint. For the stream, I used a latex black and blended the two colors for the stream bank. While I had the paint out, I painted all exposed plywood on the rest of the layout with the base brown color. Also, I attached the fascia panel and painted it with the dark Pullman green color I am using on the layout. With the completion of this layer of landform, the scenery is at a point that the track-work and operations plan can be tested before moving on to add additional textures.
Friday, October 6, 2017
Alco RS-3 and Weathering
When the Bachman Sound Value Alco RS-3 was on sale at Walthers last year I added it to my order. It has been waiting for the 4th Division to be ready for multiple trains, so I opened the box yesterday and tried it out. I used the program track to reset its address to 229 (the loco number) and ran it around a bit. The engine sounds cool and it seems to run okay. It has a bit of a lurch going from 2 mph to 3 mph, but I can try to fine tune that later. The "Sound Value" SoundTraxx decoder doesn't have a lot of extra features, but for now I am not using much beyond lights, bells, and horn anyway. In general, I am pleased with it, particularly considering how reasonable the price was.
Today, after reviewing an MRVP how-to video on diesel weathering with Cody Grivno, I tackled weathering the RS-3 with my Christmas airbrush. Well, I started off badly because the Vallejo White, that I intended to use for the thinned fade coat, does NOT thin with 70% alcohol. It coagulates into white splatter dots instead of a thin transparent white. The Microlux Rail Brown does thin with 70% alcohol, so I switched to using it for both a control, fade coat over the initial splatters and as the dirt along the bottom and the trucks of the locomotive.
Since I had a jar mixed up and loaded into the airbrush, I tackled three unweathered box cars. I grabbed them from staging and sprayed the bottom and ends with the thinned rail brown paint for a dusting effect. After cleaning the airbrush, I continued weathering the boxcars with Bragdon weathering powders and a white colored pencil. I brushed rust and soot colors on the roofs, and rust on metal parts and springs of the trucks. I used the white pencil to duplicate chalk marks on the side of a boxcar. Then I gave a quick coat of Dull Coat over the box cars.
Having regained my confidence, I returned to the RS-3. I mixed up a wash of Model Master Grimy Black and 70% alcohol to brush paint into the louvers and other details. After that had a chance to dry, I also used Bragdon powders on the locomotive. While it is a bit more heavily weathered than I originally planned, it certainly looks less toy-like than it did when it came out of the box yesterday. As a bonus, I now have had a little bit of practice with the airbrush.
Saturday, September 23, 2017
Curved Pile Trestle--Part 3
| Trial fit of the trestle in place. |
| Which bent has castings? |
Glueing the bents in place was easy since the location was obvious based on only having the deck planks at the bent locations. The only tricky part was keeping track of which bent went where. I was working upside down and other than the two central bents, each one was a slightly different height.
| Only two more sections to go! |
| NBW castings aren't always awful |
Wednesday, September 6, 2017
Landforms Around the Trestle
| The plaster cloth is cold to the touch, so it is not dry yet. |
To install the trestle (the last step to finish the track-work) I needed to actually start the scenery by creating the landforms around the trestle. In addition to the creek bed directly under the trestle, I am creating the landforms in the vicinity--hills on either side of the creek and a cut through the hill for the track.
A number of techniques are possibilities for creating 3-D landforms: pink foam insulation board, screen and plaster, geodesic foam scenery, paver sand à la Paul Scoles, rosin paper, or glue shell. I have chosen to use cardboard web and plater cloth, largely because I have a bunch of cardboard around the house--Ikea packaging and the seemingly endless stash of boxes from the move across the country. While it has fallen somewhat out of favor, I will describe the process of this old-school technique.
The first step is to cut 1 inch strips of cardboard using a utility knife and a metal straight edge. Then, the framework for the landform is created by weaving the strips into the desired location. The ends can be attached with a staple gun or hot glue gun. To attach the strips to each other as they are woven together, either an office stapler, hot glue gun, or white glue and clothespins can be used. I used the office stapler and hot glue gun to save time; I also burnt my finger with oozing hot glue.
After the cardboard webbing is satisfactory, the next step is to protect any surrounding parts of the layout from the application of the hardshell. While using plaster cloth is a lot less messy than paper towels dipped in plaster, the potential is still there for plaster drips to cause an unsightly glob where you least want it. I covered the track and cork with blue tape and the backdrop with wax paper. This photo shows the webbing complete and the rest of the layout protected, ready for the application of the plaster cloth.
I had a roll of Woodland Scenics plaster cloth on hand. I picked up a budget kitchen scissors at the dollar store for, wait for it, a dollar, and it has become the dedicated plaster gauze cutter. I cut the pieces at 4-6 inches, and piled up a bunch of them before starting. The application is fairly straight forward. Picking up a rectangle by two corners, it is dipped into water just long enough to wet the surface, held above the bowl or paint tray to drip excess water off, and then it is applied to the cardboard web.
Subscribe to:
Comments (Atom)
