Thursday, June 30, 2022

Nooksack: Planning For Operations with TOMA


The main difference with the TOMA approach is that one section is built to completion and operated before adding additional modules (actually sections). While planning ahead for the later, larger model railroad with the potential for operations sessions with multiple operators, I also need to intentionally plan for the initial one-town model railroad. While I intend Nooksack to ultimately be one of several modeled towns on the 4th Subdivision, initially it will be the main focus by itself, with some staging on each end. Hopefully without going too far into the weeds in this post, I will discuss four interrelated approaches to operations planning for the TOMA based, first phase town of Nooksack that I have been considering. These include advice for planning for engagement and fun on a small layout from Byron Henderson, making choices from the many train forwarding and car forwarding approaches, and combining research and scenery planning with operations planning by making industry choices.

Byron Henderson discusses "enjoyable operations on smaller layouts" in a blog post from 2019. I recommend reading his full post, but I will list what I consider some main takeaways. A central idea is to include "diversity in roles" by including the opportunity to both classify and spot/pull cars in a small railroad. Another idea includes planning for "variety" by including the notion of more cars than needed and changing waybills after the 4th cycle. Incorporating prototypical challenge rather than difficult switching puzzles by considering needs at different times of year, including sure spots, and applying railroad rules are all considerations. In reviewing Henderson's ideas I concluded that my TOMA staging on at least one side should incorporate the possibility of classification even if it expands the initial scope somewhat. 

Operations planning, even with a one-town or fun-for-one approach, breaks into two interrelated parts: micro or car forwarding and macro or train forwarding including train types, control, and communication. For car forwarding I plan to start with car cards and waybills. I wrote about this in a blog post describing how I used car cards and waybills on my earlier attic version of the 4th Subdivision; while that post described using different locations than the new railroad, the system is the same. In another post from that same series in 2019, I wrote about using switch lists. I intend to continue to use switch lists as a key part of my car forwarding approach. While the conductor will continue to use switch lists, whether the car cards and waybills continue to be part of the conductor's job or whether I will somehow have an agent job as the new 4th Subdivision expands and develops is unclear. In either event, car cards, waybills, and switch lists will be the focus of car forwarding on the 4th Subdivision in Nooksack and as the railroad grows over time. Train forwarding with the one-town initial TOMA approach is less clear in my mind. On my earlier attic version, all of the modeled railroad was within yard limits. In my newer version, that will not be the case. While not really prototype based, my 4th Subdivision will follow some prototypical guidelines as to the time period (1954) and GN practices on branchlines. I plan to start very simply with a sequence system and running one train at a time. As the railroad grows, I am guessing that I will ultimately implement some sort of dispatching potentially utilizing a timetable and train order system.   A process of further evaluation and research will be needed as the train forwarding system evolves with the railroad. 

I have started another process of evaluation and research as I have started planning the industries for Nooksack. I intend whatever I select to be appropriate for the setting (1954 Pacific Northwest) and for both the initial stand alone Nooksack and the evolving larger railroad. I have nascent construction notes and prototype research underway for the industries: an agricultural cannery, a logging supply company, a fuel oil dealer, and a team track. Returning to my initial goal of not going too far into the weeds with this post, I will leave the development of these industries as prototype, operations, and scenic linchpins to later posts along with updates to the slow progress on the layout space and new workbench location.


Tuesday, June 7, 2022

Real Life, Real Estate Deals, and the Railroad


Real life, including a family gathering in Maine and my involvement in my wife's gardening plans, along with some upcoming renovations on our home have led to a bit of a slow down in progress on my railroad. Perhaps a modeling slow down is to be expected in the summer season!

At the end of May and first week of June, we had a lovely visit to Mid-Coast Maine, where my wife's family rents a house for a week most summers. Our bedroom faced the east and as seen in the opening photo, we had some beautiful sunrises. No railroad visits this time, but on our last trip to Maine in 2018 we visited the WW&F which is a great little railroad (part tourist railroad and part railroad museum). This trip we had some good food, visits to the Maine Botanical Gardens, and stops in some historical sites in Massachusetts on the way home. 

When we moved into our home last fall, we had a lawn service do the mowing, and besides planting some perennials in a fenced area we didn't do much in the way of gardening. My wife and I are planning on transitioning the lawn into more of a mixture of other gardens: pollinator, native, and vegetable. This summer, we cancelled the lawn service and bought a battery powered mower to keep things civilized during the transition. Mowing, planning, and planting all take time and energy that otherwise might be spent on the railroad. 

We have planned from the beginning of our move to do some sort of kitchen remodel. The first step is to move the washer and dryer, now in an alcove of the kitchen, to the basement. To accomplish this, the space that I have taken over for my modeling workbench and storage was traded to become part of the laundry. Contractors are coming next week to plumb and wire the new set up, and my workbench is still in place. I think I know where the workbench will go, but the new location is not prepared. Time to repack my work area! 

While work directly on the railroad is on hiatus, planning and replacing the workshop in a new space, layout room prep, and operations planning will continue. 


Tuesday, May 3, 2022

Nooksack: TOMA Start on the "New" 4th Subdivision


Starting with Nooksack

In the last several posts, I discussed the initial design and planning for operations for the 4th Subdivision, my model railroad set in northwestern Washington State in 1954. My first phase of construction using the TOMA (one module approach) will be the town of Nooksack and related pile trestle scene. This section was originally Willow Springs from my earlier attic version that we moved from Meadville. The drawing above shows a couple of slight changes to the existing trackwork and labels for the intended industries in this town. 

My first step was to lengthen the passing track on the main town section. While working with existing modules (or sections) shortens the construction time, it illustrates the difference between "remodeling" and "new construction" approaches even in model railroading. Unsoldering wires to the Tortoise switch machine and the turnout rail joiners allowed for reuse, but required extra care and cleanup steps. Removing cork glued down with yellow carpenter's glue was fairly straight forward; removal of the rough cork and glue remnants was trickier. When I found initial scraping and sanding insufficient, I turned to a wood chisel, bevel side down, allowing me to essentially plane the plywood smooth. 

After removing the track, cork, and glue remnants from the original turnout and shorter passing track, the process was much like installing new cork and track. I cut and fit the cork, glued it in place, and painted it with a gray craft paint after the glue had dried. I carefully cut, filed, and fit track joiners to the track. As I have done previously, I soldered the feeders to the underside of the rail. Before actually fitting the track into place, I drilled holes for the feeder wires, the green frog feeder on the turnout, and for the throw rod for the Tortoise. 

At this point, today, the new longer passing track is in place. By lengthening the passing track, I will be able to run seven car trains, rather than be limited to just five cars plus loco and caboose. I still need to solder the metal rail joiners and set the couple of track nails that are holding the curve in place. Before doing that, I need to flip the module up and install the Tortoise switch machine in its new location and complete the rewiring of the turnout and track feeders. Once that all checks out, I can fit in the missing ties, clean the soldered joiner connections and new track, and paint the one section of new track.

While I am feeling good about the progress I have made, one unintended consequence has appeared. Following the TOMA model, I will be using this section (with temporary staging) by itself for a period of time. I will be operating Nooksack, building the structures, and working on the scenery here before building an adjoining section containing mainly scenic negative space to its left or west. By moving the turnout almost to the edge of the existing layout, I didn't leave room for even a basic runaround. I need to think through adding a bit of additional track, and if I do, how much. Will it be a part of the temporary staging or a part of the planned next section?

Another task, as I work on Nooksack, is to prep the corner of the basement where Nooksack will be located. Progress on that, updates on completing the trackwork revisions, as well as research and planning for operations in Nooksack may be topics on upcoming posts. 


Monday, April 18, 2022

Planning for Operations on the 4th Subdivision: Trains and Towns


Eastbound "Mail Train" with a local freight in the siding at Willow Springs on the old layout 
My plans for the current model railroad include two scheduled passenger trains and several scheduled freight trains. Also, with my current plan, the logging railroad has trackage rights on the 4th Subdivision. 

One scheduled passenger train will be a "mail train" traveling between Port Gulick Bay staging and Chikamin with stops at stations between them and turning at Chikamin. It will be made up of the doodlebug and sixty foot RPO seen in the photo. The other scheduled passenger train will be a "milk train" that leaves from Ferndale Jct. staging, works the Carnation plant spur, returns empty milk cans along the way, and then turns at Chikamin to return. It will pick up full milk cans at stations, before working the Carnation plant and returning to Ferndale staging. 

At least one scheduled local freight will travel between Ferndale Jct. and Chikamin. Other expected daily freights will include the "Rock Train" with silica sand from east of Chikamin and limestone from the NP interchange and then returning with empties. A daily turn from Ferndale Jct. to Port Gulick and back may be scheduled. At some point, a weekly "stock train" may be added as an extra, and when needed an additional local may also be added as an extra. 

Benchmark footprint plan for the 4th Subdivision

Traveling from the west at sea level through farmland and forest to the east into the Cascade foothills, the 4th Subdivision travels through several towns with related industries. I will list them in order with prototype and modeling notes:

  • Port Gulick 
    • Look at Anacortes for industry details and ideas
    • Mayger Old Fish Station at Columbiariverimages has backdrop ideas
    • Passenger train and town industries into hidden staging to turn
    • Harbor and wharf industries as modelagenic features
  • Curtis 
    • Features a lumber mill
    • Look at Nooksack plans from Meadville layout
    • Good stretch of scenery between Port Gulick and Curtis
  • Ferndale Jct. 
    • Hidden run-through
    • Hidden fiddle tracks (see recent track plan)
    • Walk through utility area (furnace, well, filter, etc.)
    • Removable staging for work on utilities?
    • Carnation Company is visible (have photos and plans of prototype)
  • Nooksack
    • Use existing Willow Springs module
    • Extend passing track for seven car train?
    • Everson as prototype for cannery
    • Other industries? 
    • NP interchange and logging junction in scenic section?
  • Chikamin
    • Use existing module, but extend it a bit?
    • Redo all the track? (It is code 100 and Atlas switches)
    • Replace turntable? 
Schematic sketch of 4th Subdivision (boxes represent scenic breaks)


Thursday, April 7, 2022

Update on Designing the 4th Subdivision


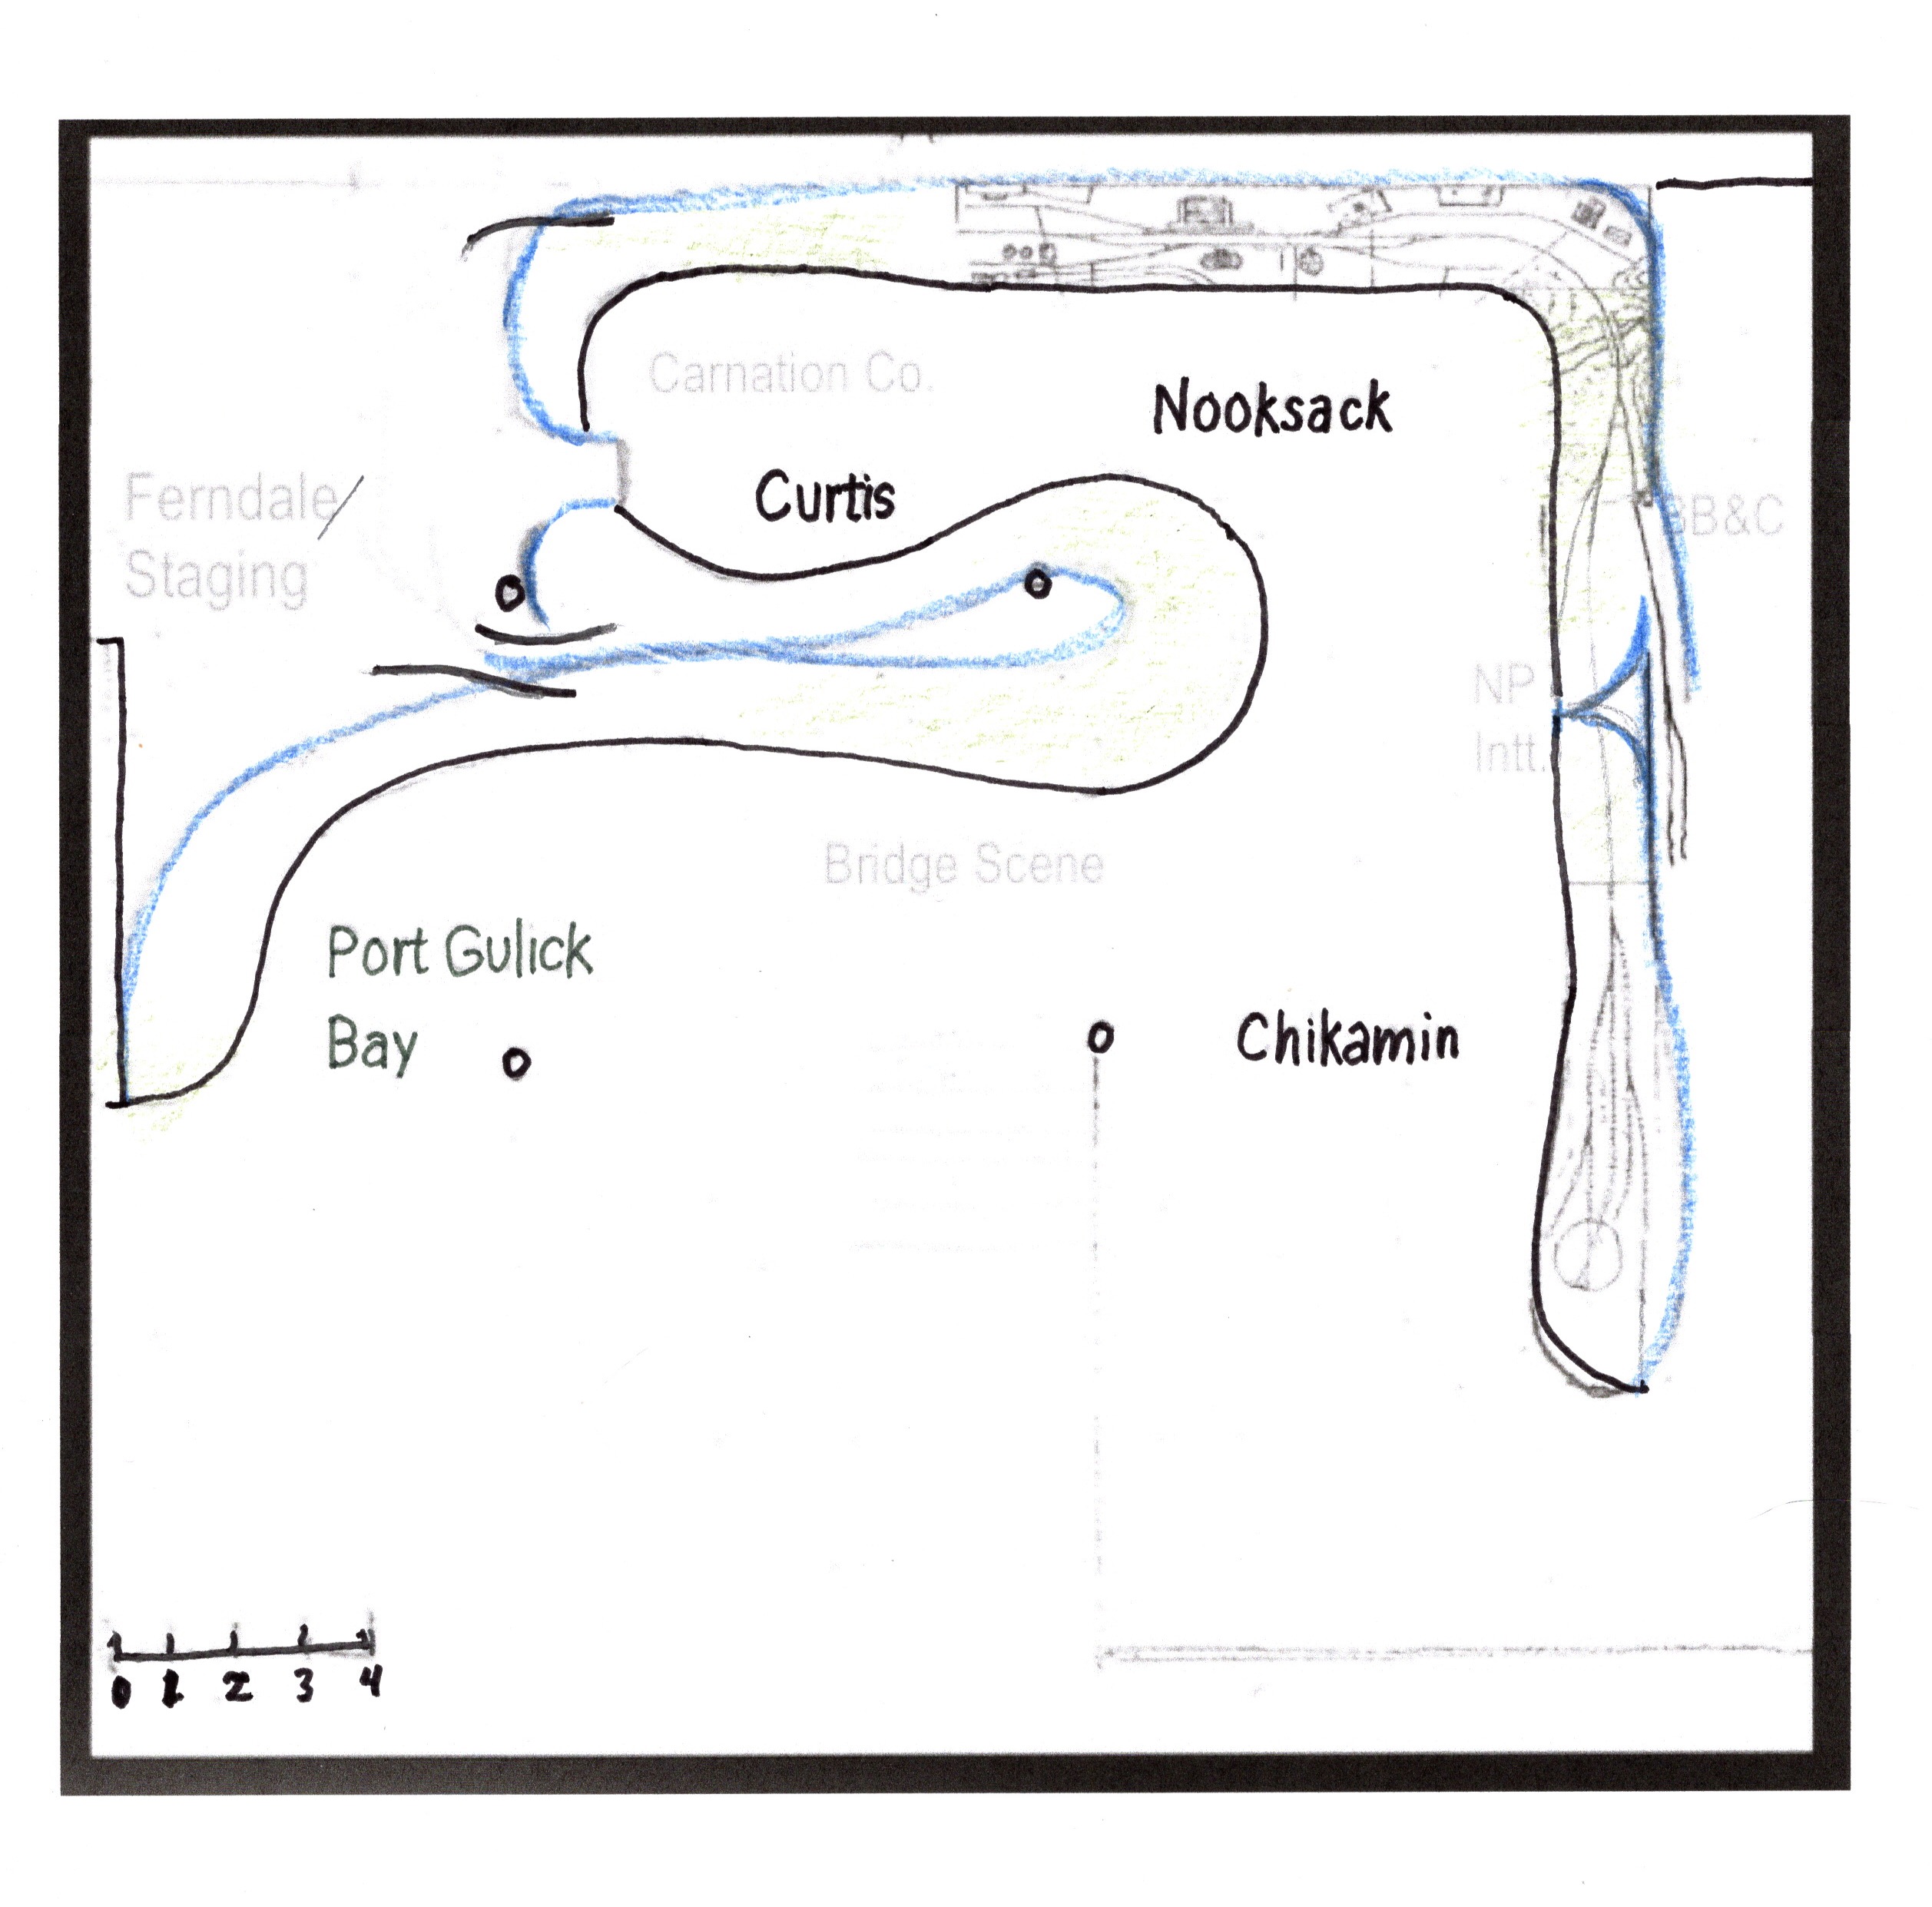
Most recent version of the 4th Division


In planning for the larger railroad, intended to fill two thirds of the basement, I have been following some of the guidelines in Lance Mindheim's book, How to Design a Model Railroad, as I described in a post last November. In addition to the three plans mentioned in that post, I worked out three or four others (each of them had some problems) utilizing modules from my attic layout in Meadville before coming up with this final (?) version. 

In addition to using some of the previous modules or sections, I want to hit some operational and visual goals. While I expect to be just running by myself most of the time, I also want to be able to match at least the minimum requirements for the AP operations (Chief Dispatcher) certificate and be able to hold operations sessions with a few others in case I find myself leaning in either of those directions. I also know that for me to be happy with my model railroad, I will want it to appear realistic, like a miniature world, approaching the look of a three dimensional painting.    

Existing modules to incorporate

Keeping in mind that while this planning is for the entire railroad, I intend to follow Joe Fugate's TOMA (The One Module Approach) suggestion of building one or two sections to completion and operate with temporary staging before adding additional sections. The town of Nooksack on the benchwork footprint plan at the beginning of this post is one of the existing modules as is the trestle scene module that we moved from our former home. While I may want to lengthen the passing track, those modules should go back together well. Unless I make a huge shift in my thinking, making some minor adjustments to those two modules and getting them under way will be the beginning of the 4th Subdivision v.2.

In Mindheim's book, he suggests reviewing several considerations before moving from the footprint and route stage to overlaying the final schematic and track plan. Generally following from his prompt questions, here are some of my thoughts based on this final version.

  • While I might want some kind of continuous run possibility, this is essentially a point to point design. The staging/Ferndale area is not developed at this point, but my unplanned concept is for a combination of fiddle yard staging and a direct run through. If practicable I may add continuous running here with "the blob" as the other end, but if it doesn't work out, that is okay as it won't interfere with my operations plan. 
  • For the most part, this design contains easy access without lift-outs or duckunders, and it has fairly open aisle-ways. Ferndale staging is the main exception to this as it is hidden from the main layout, and the access to it requires walking around into the utility area. The dead end aisle with both Carnation Co. and Curtis has the potential to become crowded with multiple operators, and the entrance to it is below my desired four foot aisle-ways. It is more spacious than the rejected plans though.
  • The turn-back blob at a five foot width will allow for maintaining my curve radius minimum of 24." The reach-in distances are all quite manageable. Both of these were issues in previous design attempts. 
  • One area of concern is having suitable scenic or negative space between the more intensive secondary track elements. Particularly if I plan on somewhat longer train lengths, I want to avoid trains just running from one built up area directly into another with the locomotive in one and the caboose still in another. 
While I don't have all the areas and trackwork thoroughly planed here, I am confident that I can identify any minor changes in the Nooksack modules needed to move forward, start those changes, and begin some room prep.


Saturday, March 26, 2022

Ingleton: Scenery, Rolling Stock, and Operations Update


Swift reefer in front of Associated Grocers warehouse

Since my last post, I have finished ballasting the track and started some operations on the Ingleton shelf. In doing so, I have made some progress and have discovered the need for some focus. In this post, I hope to define the next steps for myself, as well as review track ballasting. 

First of all, Ingleton is freelanced other than it is designed as a possible Inglenook switching puzzle or game. It is set in the 1930s to be able to use some of my rolling stock collection that would not be found on the 4th Subdivision, my larger railroad set in 1954 and still in design phase. Initially, I have been using switch lists to structure some switching on Ingleton, which I am imagining to be several spurs at the edge of a yard set in the Pacific Northwest. My 0-6-0 yard switcher backs in with three cars to be set out at specific locations and with instruction to pick up the three cars from the spur tracks; a fun, short session. The next step may well be to figure out how to set up the Inglenook game. 

To get to the point where I can explore implementing the Inglenook rules, I need to enlarge my collection of rolling stock. This doesn't mean buying more, but building some existing kits and making sure that some of my existing rolling stock is up to standard. That in turn requires revisiting what those standards might be. A focus for the next month for me and a future blog post may well be an exploration of those standards and the process of making sure at least eight pieces of rolling stock are ready. As I have quite a stash of unbuilt kits and cars in need of repair or upgrade, I may end up with more than the minimum, adding some variety to the play. 

As mentioned before, I have finished the ballasting on the Ingleton shelf. I worked slowly and carefully, applying materials for just a few feet at a time. This approach, using actual stone materials, works well with what I feel are acceptable results. I may want to later revisit the ballast to add airbrushed effects. At one of the modeling Zoom sessions that I attend, Dick Bradley pointed out that what I thought was reddish rust is actually brake dust. That color, soot or oil, and spillage from rolling stock are all textures that might be applied later. While I like the real stone ballast, when I move on to the 4th Subdivision, I may change the proportion to lighten the final mix just a bit. At this point I will pick up from the last post with a review of how I ballast track. 

Ground cover along the tracks
After my last post describing ballasting between the rails, I worked my way along all the track on the Ingleton shelf, adding a layer of basic ground cover along the track. I first painted  a stripe of white glue along each side of the track and then applied a mix of ground covers. The main three that I applied were Woodland Scenics Blended Turf Earth Blend, Scenic Express Medium Natural Soil and Dirt, and Woodland Scenics Blended Turf Green Blend. I then applied 70% Isopropyl Alcohol and Scenic Glue with medicine droppers. I then sprinkled on more of the ground covers in light areas. 

Ballast applied between the rails and the ground cover
The next step was to apply my ballast mix between the outside of the rails and the (now dry) ground cover along the tracks. Using a plastic spoon, I applied the ballast along the outside of the rails. Then, using a soft brush, I brushed the ballast off the tie ends and the dirt and greenery along the tracks. I pinched on a bit more in light spaces and made sure I was satisfied before applying the alcohol wetting agent and scenic cement with droppers. In applying either material, it is safer to move the dropper along the rail above the ballast and along the ground cover below the ballast, allowing the materials to wick into the ballast. 


Learning Points:

  • MR's Cody Grivno's approach to ballasting works well for me.
  • Painting the tie tops and using real stone ballast provides acceptable realism.
  • A slightly lighter color ballast and applying additional color or texture are next steps 


Saturday, March 5, 2022

Ingleton Shelf: Scenery Started

This recent photo was taken with the scenery cement still wet

In my last post I mentioned starting scenery around the Associated Grocers warehouse, so that is what I have done. While the track plan was designed primarily to facilitate the Inglenook switching puzzle, my intention has been to also represent more prototypical operations with the three stub sidings servicing the warehouse and associated team tracks. I also wanted to work on developing realistic scenery techniques that might translate to the larger railroad. 

To hide the inherent flatness of the plank and the mainline look of the cork roadbed, I applied Sculptamold around the edges of the cork and painted it after it dried. One problem of using the narrow shelf and the Inglenook track plan involves a not quite large enough space for the future loading dock for the team track. By adding some raised fascia on the ends and building a couple of different styles of track bumpers, I hopefully solved the imminent  problem of rolling stock careening off the shelf. In this photo, one can see the first use of the tentative ballast color for the shelf and at least part of my future railroad. 

Instead of the generic Woodland Scenics grey made from walnut shells that I have used in the past, I am experimenting with a different mix on the Ingleton shelf. I am leaning towards a mix of two parts Arizona Rock and Mineral Company's #1152 Empire Builder to one part Express Scale #50 Blended Ballast as a starting point. In studying my GN Morning Star book, https://www.amazon.com/Great-Northern-Color-Vol-Lines/dp/1582481849, the color of the ballast varied from location to location as well as from various track types, mainline to siding. Airbrushing rust and soot colors over the track and ballast is another approach suggested by studying the prototype photos in Hickcox's book. 

On the shelf, I have continued with the ballasting approach suggested by Model Railroader's Cody Grivno that I reviewed in an earlier post. He starts by spreading the ballast between the rails,  brushing it off the ties and web of the rail, and applying wetting agent and scenic cement with an eyedropper from the outside. He lets that step dry before attempting to ballast outside the rails or on the shoulder of the cork. In the photo, one can see my use of a soft brush to clear off the tops of the ties. In my most recent session, I went ahead and applied other scenery along the side of track in the team track area. I used a mix of brown and cinder ballast along with Express Scale's Medium Natural Soil & Dirt as well as several other ground foams to establish the team track area. If I am not happy with the result, I can always add another layer. 

This shelf is really quite freelanced, with less specificity than the 4th Subdivision. It is set in the west in the 1930s. As I work to improve my skills, I am finding that having a prototype to work from leads to significantly more realistic results. I recently found a prototype source that I can work from or at least be inspired by on this shelf and in planning the new version of the 4th Subdivision. The Cornell University Library has a set of over one-hundred photos from 1960 taken in yards and sidings of the Great Northern in Everett and Seattle here. I printed one out and had it available while working.

The next steps include some very basic ground cover along the rest of the track and ballasting the track. I do not like the abrupt end of the flat seen in the photo. For that issue, I have a couple of ideas, but I just am not sure. I have ordered a loading dock kit and several tie piles from Blair Line for the team track area. Whether I will add additional structures or go with just scenery such as a small cut, a dirt road, or berm with trees is up in the air. For now, I may just complete the ballasting and as suggested by Mindheim's blog post, spread some Heki grass fiber over the brown paint, and start focusing on developing the operations. 

Learning Points:

  • Prototype sources are helpful even in creating realistic scenery
  • Roads, scenery, and structures should be considered in original planning
  • A custom, quality ballast mix adds realism