Thursday, December 21, 2017

Updates on the 4th Subdivision

Despite dropping the ball on posting to the blog during the past several months, I have been active in model railroading. The NMRA division to which I belong has divided, a long story I will not go into here, and I have taken on a fairly active role in the formation of a new division: Division 12 of the Mid Central Region. This has frankly taken up a major part of my model railroad writing energy.


During this time, much has been accomplished at Willow Springs on the 4th Subdivision. In a post from August, I listed a series of steps in transition towards a focus on scenery and operations. Most of these steps are now complete. In addition to installing and labeling all the bill boxes, I mounted the Willow Springs control panel and installed the final NCE UTP panel. I suspect that creating some sort of shelf or mini desk, for sorting waybills or writing out switch-lists, is a step I will regret skipping.

Tools laid out for soldering the
rail joiners.

While I am still not quite ready to paint the track, most of the steps to do so are complete. In late October, I soldered the remaining rail joints. I also tacked down any loose track and corrected a loose and miss-aligned curve near the box company spur. A few days after soldering, I went back and scrubbed any soldered areas with denatured alcohol and an old toothbrush. The purpose of doing this is to remove any flux or dirt from the track, which will prevent the paint from adhering. I also started the somewhat tedious process of filling in missing ties. Really with just a few more hours work in the attic replacing ties, the Willow Springs trackwork would be ready to paint.

Monday, October 9, 2017

Landforms Around the Trestle--Part 2

Trestle scene ready for ground cover

The initial landforms around the trestle are now complete other than adding detailed texturing with gravel, soil, ground foam, shrubbery, trees, and water. In this post, I will continue to describe the steps I went through to get to get here from where I left off in a previous post.

Fascia clamped in place
While the land forms were roughed in with cardboard webbing and plaster cloth, they needed another layer before I applied paint or ground cover. Since the basic shapes we're present, I went ahead and cut the fascia panel for the bottom of the "U" seen in the photo. While I was cutting that fascia panel, I also cut the ones to finish off the Willow Springs side of the layout. After clamping the panel in place, I noticed that, in addition to gaps appearing between the scenery and the fascia, the cardboard webbing telegraphs through to the surface much more than I liked.

Materials 
My plan was to make a batch of rock castings, apply a layer of Sculptamold, and then apply the rock castings. I started by spraying the rock mold with wet water and mixing up some Hydrocal plaster. I mixed the plaster in a disposable plastic sour cream cup to avoid rinsing plaster down the drain. Following the AAP protocol (Always Add Plaster) I mixed plaster to the water in the cup until it was the consistency of a milkshake. After I filled the molds, I had a lot of plaster left.

This is where I went off plan. I decided to pour the remainder of the plaster into the river bottom and spread it out. While I was not yet really happy with the way it was smoothing out, the plaster started setting up. I rushed out to our driveway and collected some gravel and small rocks. I pressed some of the rocks and gravel into the plaster, pressed the hardening plaster into the banks with a putty knife, and smoothed out a path for the stream itself.

Back to the original plan. I mixed up some Sculptamold using recent dollar store purchases: a plastic bowl and rubber spatula. Then using a combination of the spatula, a putty knife, and my fingers I applied a layer of the Sculptamold to the hillside. My goal with this application was to hide the webbing contours and the mini-holes from the plaster gauze.

Staining the rock castings
After cleaning up the Sculptamold tools, it was time to release the rocks from the mold. I had read in a Dave Frary scenery book that  he liked to stain the castings while they were still "green" or not completely set up. I mixed a new jar of stain with about half and half 70% alcohol and water with a few drops of India ink. Then I used an orange-brown craft paint and a black acrylic to apply additional washes, wet-on-wet, to the castings. As the rocks dried, I experimented with different placements in the cut approaching the trestle and along the creek banks.


Castings on the cut and real rocks in
the stream bed
To attach the castings, I mixed up a small batch of Sculptamold to use as a cement and as a filler around the rocks. I was trying to have the rock castings appear to surface from the hillside rather than look like they were glued to the surface of the hill. When I get to the future step of applying ground textures, I will also attempt to emphasize that appearance. After this photo was taken, I mixed up more Sculptamold and applied more castings to the stream banks. I also built up some more bank at the backdrop to emphasize the appearance of the the creek curving behind the hill rather than meeting the backdrop directly.

After giving everything a day to dry, I came back and painted the hillsides with my brown base color of latex flat paint. For the stream, I used a latex black and blended the two colors for the stream bank. While I had the paint out, I painted all exposed plywood on the rest of the layout with the base brown color. Also, I attached the fascia panel and painted it with the dark Pullman green color I am using on the layout. With the completion of this layer of landform, the scenery is at a point that the track-work and operations plan can be tested before moving on to add additional textures.


Friday, October 6, 2017

Alco RS-3 and Weathering


When the Bachman Sound Value Alco RS-3 was on sale at Walthers last year I added it to my order. It has been waiting for the 4th Division to be ready for multiple trains, so I opened the box yesterday and tried it out. I used the program track to reset its address to 229 (the loco number) and ran it around a bit. The engine sounds cool and it seems to run okay. It has a bit of a lurch going from 2 mph to 3 mph, but I can try to fine tune that later. The "Sound Value" SoundTraxx decoder doesn't have a lot of extra features, but for now I am not using much beyond lights, bells, and horn anyway. In general, I am pleased with it, particularly considering how reasonable the price was.

Today, after reviewing an MRVP how-to video on diesel weathering with Cody Grivno, I tackled weathering the RS-3 with my Christmas airbrush. Well, I started off badly because the Vallejo White, that I intended to use for the thinned fade coat, does NOT thin with 70% alcohol. It coagulates into white splatter dots instead of a thin transparent white. The Microlux Rail Brown does thin with 70% alcohol, so I switched to using it for both a control, fade coat over the initial splatters and as the dirt along the bottom and the trucks of the locomotive.

Since I had a jar mixed up and loaded into the airbrush, I tackled three unweathered box cars. I grabbed them from staging and sprayed the bottom and ends with the thinned rail brown paint for a dusting effect. After cleaning the airbrush, I continued weathering the boxcars with Bragdon weathering powders and a white colored pencil. I brushed rust and soot colors on the roofs, and rust on metal parts and springs of the trucks. I used the white pencil to duplicate chalk marks on the side of a boxcar. Then I gave a quick coat of Dull Coat over the box cars.

Having regained my confidence, I returned to the RS-3. I mixed up a wash of Model Master Grimy Black and 70% alcohol to brush paint into the louvers and other details. After that had a chance to dry, I also used Bragdon powders on the locomotive. While it is a bit more heavily weathered than I originally planned, it certainly looks less toy-like than it did when it came out of the box yesterday. As a bonus, I now have had a little bit of practice with the airbrush.

Saturday, September 23, 2017

Curved Pile Trestle--Part 3

Trial fit of the trestle in place.
The trestle is now complete other than attaching the track and ballasting.

Which bent has castings?
At the last trestle post, I left off with the next part being the "fiddly bit" of placing NBW castings in the bent sway braces. I spent hours doing just one bent. So frustrating. The NBWs would spring out of the tweezers, never to be found. The post had to be just the right length or it wouldn't find the hole or fit in the hole I had drilled for it. The tiny bit of CA would transfer itself to my finger or the tweezer--anywhere but stay on the post that was supposed to slide into the hole. All in all, so tiny and super frustrating. A complete gumption trap. Weeks later I ended up just drawing the nut/washer combinations with a Pigma Micron 05 pen on all the rest of the bents in about a quarter of the time I spent on the one with castings. Once I had weathered the bents with Bragdon "Medium Rust" and "Soot" weathering powders, it was difficult to spot the difference between the actual castings and the drawn ones.

Glueing the bents in place was easy since the location was obvious based on only having the deck planks at the bent locations. The only tricky part was keeping track of which bent went where. I was working upside down and other than the two central bents, each one was a slightly different height.

Only two more sections to go!
With the bents in place and after testing the trestle in place, it was back to the workbench. Glueing the rest of the deck planks was not that difficult or even that tedious. I just filled in the gaps between the few that were already in place over the bents. To allow for the curve I needed to split an occasional plank from corner to opposite corner, placing the wide ends towards the outer or longer side of the curve. I also had miscalculated and had to cut and stain additional deck planks. I easily got into a zone: spreading glue on the stringers, placing several planks, and repeating the process.

NBW castings aren't always awful
After completing the deck, the next step was to deal with the guard timbers. I first cut the 8" X 8" scale strip wood to length, marking and cutting each one to fit along the curve. I made sure to keep the two batches (inner and outer curve) separated as I cut and stained the strip wood. After the stain dried, I glued the timbers in place. I chose to inset from the edge of the planking a bit more than necessary because after ballasting, the outer edges of the deck planks will be all that is actually seen. Also, unlike the bents' NBWs, the NBWs on the guard timbers will be front and center. So, I decided to try again. First of all, I went with a larger casting. Grandt Line #5123, with a 2 1/2" nut and a 6 1/2" washer seemed appropriate, and I had an unopened pack of them. While still on the sprue, I painted the casting with Model Master "Rust." I found a technique that worked much better for me. First I drilled the holes in the timber longer than I thought I would need and with a slightly larger bit in the pin vice.   Then I developed a method of holding and cutting the individual casting off the sprue without it flying off the bench or having the "post" too short. I grabbed the post just below the washer with a bent tweezer in one hand and with my left hand I cut the post off the sprue with the cutter "backwards." Normally with a sprue cutter or flush cutter, one cuts with the flat side towards the "good" piece. However in this case there wasn't enough room, and the flat side of the cutter had to go towards the waste on the sprue. Without removing the casting from the tweezer's grip, I dipped the end of the post into a drop of CA and slid it into a waiting hole in the timber. I only lost or destroyed two or three of the twenty odd NBWs I needed for bolting the guard timbers, and while it was not an easy process, it was not fraught with frustration this time. The addition of NBW castings will be a prominent bit of texture on the completed trestle, so I am glad that I tried again.

Wednesday, September 6, 2017

Landforms Around the Trestle

The plaster cloth is cold to the touch, so it is not dry yet.


To install the trestle (the last step to finish the track-work) I needed to actually start the scenery by creating the landforms around the trestle. In addition to the creek bed directly under the trestle, I am creating the landforms in the vicinity--hills on either side of the creek and a cut through the hill for the track.

A number of techniques are possibilities for creating 3-D landforms: pink foam insulation board, screen and plaster, geodesic foam scenery, paver sand Ã  la Paul Scoles, rosin paper, or glue shell. I have chosen to use cardboard web and plater cloth, largely because I have a bunch of cardboard around the house--Ikea packaging and the seemingly endless stash of boxes from the move across the country. While it has fallen somewhat out of favor, I will describe the process of this old-school technique.

The first step is to cut 1 inch strips of cardboard using a utility knife and a metal straight edge. Then, the framework for the landform is created by weaving the strips into the desired location. The ends can be attached with a staple gun or hot glue gun. To attach the strips to each other as they are woven together, either an office stapler, hot glue gun, or white glue and clothespins can be used. I used the office stapler and hot glue gun to save time; I also burnt my finger with oozing hot glue.


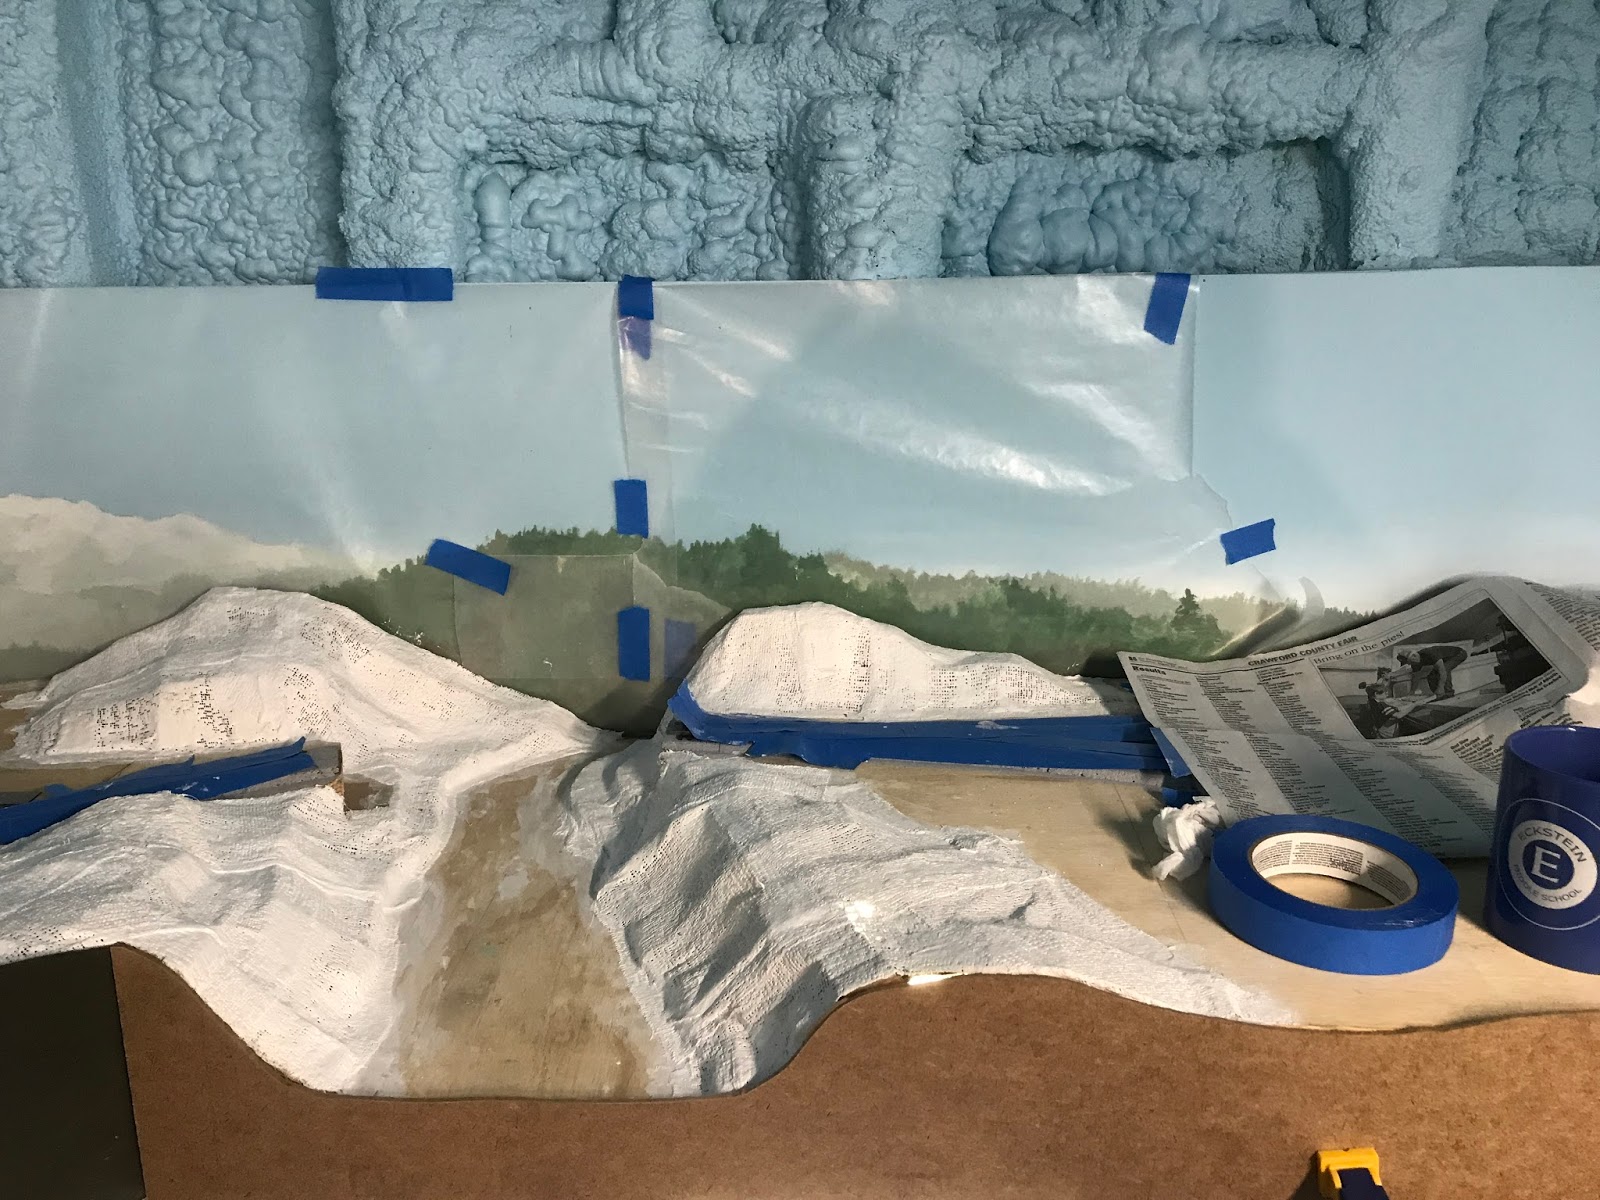
After the cardboard webbing is satisfactory, the next step is to protect any surrounding parts of the layout from the application of the hardshell. While using plaster cloth is a lot less messy than paper towels dipped in plaster, the potential is still there for plaster drips to cause an unsightly glob where you least want it. I covered the track and cork with blue tape and the backdrop with wax paper. This photo shows the webbing complete and the rest of the layout protected, ready for the application of the plaster cloth.

I had a roll of Woodland Scenics plaster cloth on hand. I picked up a budget kitchen scissors at the dollar store for, wait for it, a dollar, and it has become the dedicated plaster gauze cutter. I cut the pieces at 4-6 inches, and piled up a bunch of them before starting. The application is fairly straight forward. Picking up a rectangle by two corners, it is dipped into water just long enough to wet the surface, held above the bowl or paint tray to drip excess water off, and then it is applied to the cardboard web.


I overlapped the pieces by about a third, and then, smoothed out the plaster with my finger at the overlap to adhere the two pieces together. I also used my finger to smooth the plaster cloth down as it joins the plywood. After the plaster dries, I will double check the trestle in location. I may add a final layer of Sculptamold over the hardshell and a rock casting at the vertical face of the cut seen in this photo.


Friday, August 18, 2017

Transition to Scenery and Operations

Since my last post I have laid the track and wired the West (fold-down) staging track.
Folding staging deployed at the west end of the layout.
Now that all of the track for the initial "U" of the 4th Subdivision is in place and wired, my focus will be shifting to scenery and operations. While all the track is in place, some final testing should be completed and some joints still need soldered.

A major part of the transition from a focus on track laying and wiring to a focus on scenery is the trestle and creek scene. It is the one location where some scenery must be completed before the track-work can be finalized. At the least, the initial landforms must be in place for the trestle with its bents rising out of the landforms to be installed. A later post will discuss the technique I chose to use.

For a final test of the track-work I want to prepare for and conduct a first "operations" session. This will require that I complete a few more steps as well.

First Steps for Scenery:

  • River bank and hills/cuts around trestle--initial landforms
  • Complete trestle
  • Track ready for paint
  • Paint any bare plywood

Next Steps for Operations:

  • Mount Willow Springs control panel
  • Final NCE UTP installed
  • Bill boxes and labels in place
  • Program locomotive 

Monday, July 10, 2017

Willow Springs Under Way - - Last Spike

Extra 27 Westbound meets 288 at Willow Springs
Over the last week, I finished the track-work at Willow Springs; the mainline, passing track, and the four spur tracks are all complete. I did choose to use code 70 and adjust the ties to emphasize the difference from mainline trackage on the spurs. The fold up staging is the only remaining track and wiring to complete.

Today, I ran trains, including setting out cars at each of the spurs. The Willow Springs bill boxes still need to be installed, and all the boxes need labeled. While the track-work and the turnout controls mostly worked very smoothly, I did notice a short between the Baldwin switcher's glad hand and the "Y" at the bottom of the "U" which needs my attention. I will have to determine whether the turnout or the glad hand is at fault.

Now, I get to make the big transition from track-work and wiring to scenery and operations.