Friday, March 26, 2021

Not Really Moving Forward: Just Moving

When I started this blog, my wife and I had just moved from Seattle back to Meadville, my hometown and the town where we met attending Allegheny College in the 1970s. Part of the rationale for moving from the west coast was to be closer to my wife's family. One consequence of living through the COVID-19 pandemic this past year has been realizing that we are still too far from her family. With minimal stops, it is a six-hour drive each way across Pennsylvania to visit them in Western New Jersey. While flying from the west coast was more complicated, it still remains a multiple day excursion to visit with them. 

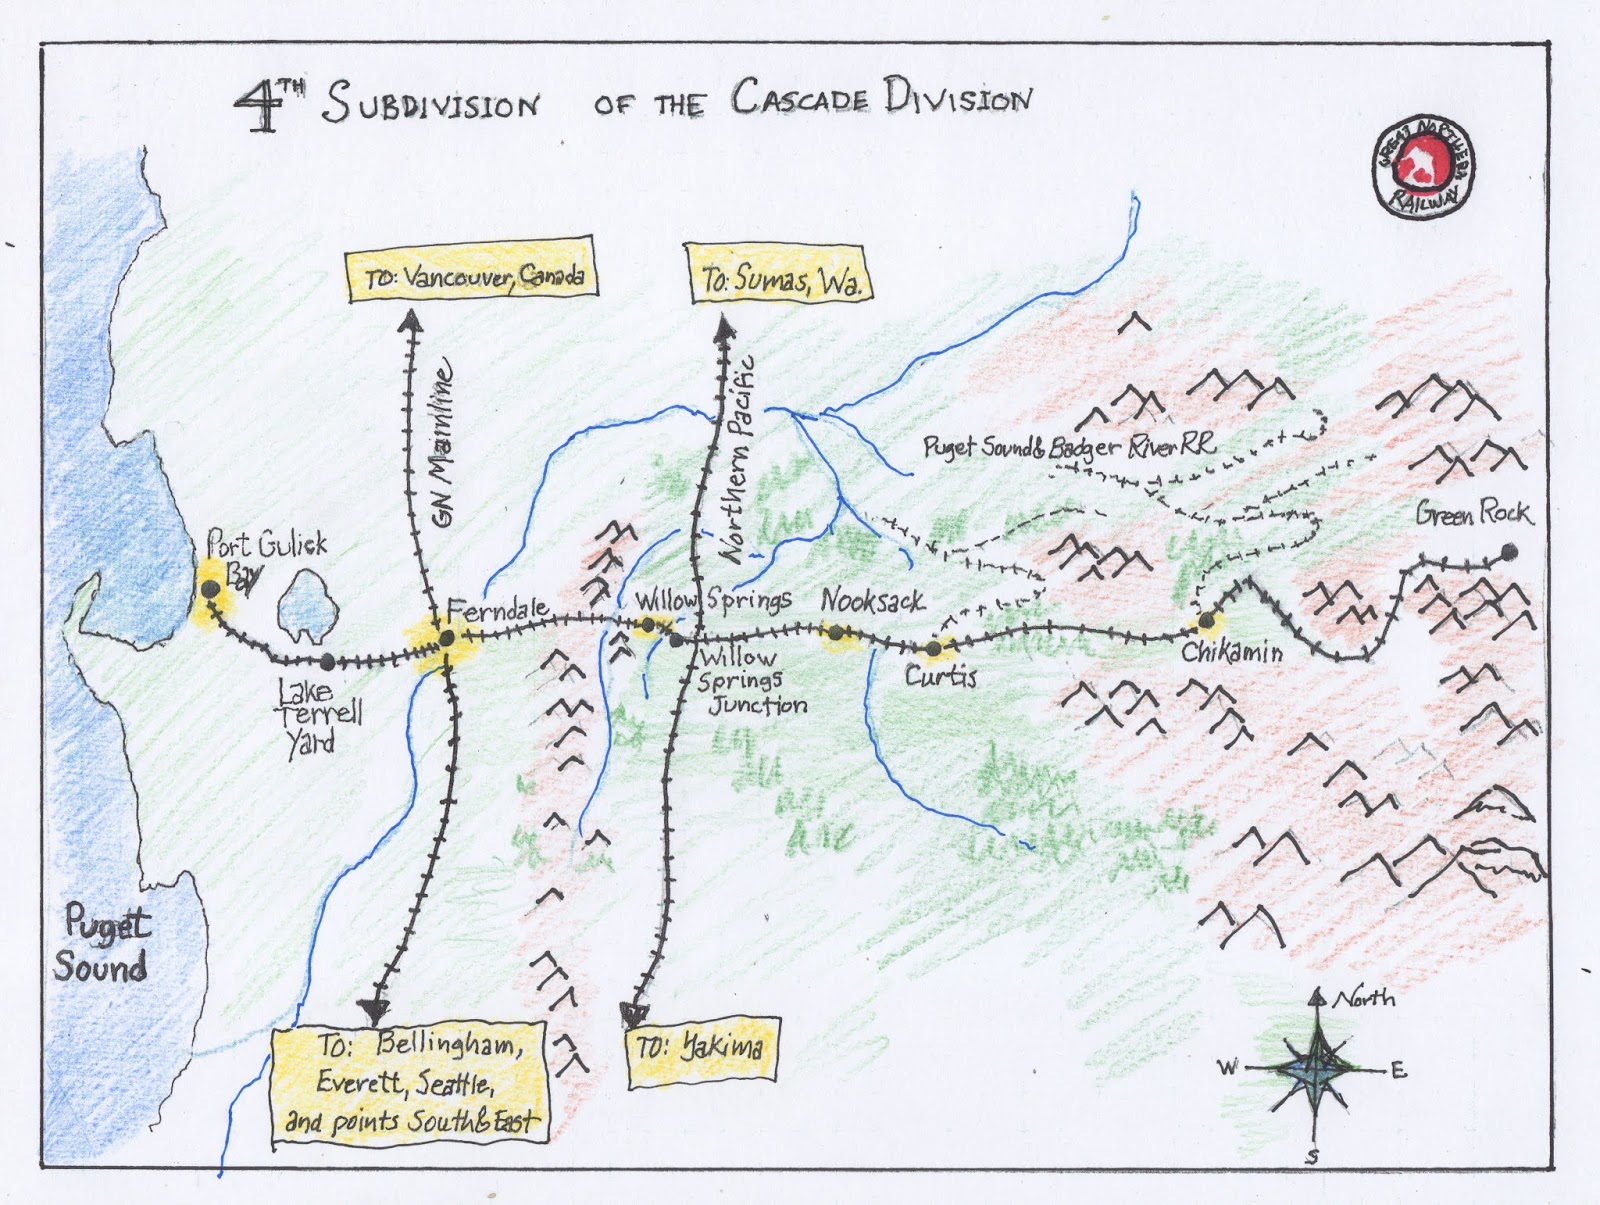
In recently chatting on email with one of my model railroading friends, I noted that I seem stuck between first planning phases of moving to be closer and making progress on the current 4th Subdivision layout in our house here in Meadville, without much progress on either.

Without further analysis of my struggles with inertia, let me discuss what I have been learning about moving with a model railroad. Two resources have been very helpful in focusing on the railroad in planning the move. Brooks Stover's article in the August 2020 NMRA Magazine, "Downsizing Does Not Mean Settling," gives advice on packing for a move, as does one written by William Lyders, "Moving: Dismantling A Layout Then Getting It Up and Operating Quickly" found in the NMRA Members Only Section: https://www.nmra.org/sites/default/files/sr202004-movingalayout.pdf.

For packing model railroad materials, building an inventory is an associated task important for the move as well as future insurance or estate purposes. Stover suggests that various small containers including zip lock bags help organize the small bits. He also suggests labeling the boxes on top and on front. 

Here are the first couple of boxes. I included a box number, brief description, and whether the contents are already on the "box list" and "inventory" on the labels. I also left room on each label for more information as we get closer to the move. Once we know where we are moving, I will include information about a more specific location where the box should end up at our new house. The box list is a general list of all boxes as we pack, including the rest of the household items. The inventory is specific to the model railroad. 

I started building the inventory list from an existing template in Excel  for household insurance inventory documentation. I included tabs for item or description, make or model, serial or model number, and estimated current replacement value. Box #1 includes unbuilt structure kits, and I was amazed to see the replacement value of just that one box creep up to over $450.00. While I do not have model railroad insurance at this point, building the inventory as I pack will be the first step of that process. 

Just last week, during the weekly modeling Zoom meeting associated with my NMRA division, I put together the box/trays from A-Line that I bought years ago. My thinking is that finished rolling stock will go in that carrier. I will be able to remove the rolling stock from the layout and safely store them. Scenery materials will be next, as I remove trees from the railroad, I can also pack all the other scenery supplies I have collected over the years.  I also will be packing the rest of my unbuilt rolling stock and structure kits before I start dismantling the railroad or packing my work area. I am sure that my wife would love to see me dispose of all my railroad magazines rather than lug them to a new house, but I am not sure I am ready for that step. I still prefer re-reading the dead tree versions to the electronic versions available in archives. We will see how this situation resolves itself!

Lyders' article, referenced above, talks about tearing down the model railroad one month before closing. I will be scheduling it sooner than that. Otherwise, his advice seems very applicable.  He suggests cutting the existing railroad into movable sections. As my original U-shaped benchwork consists of separate benchwork sections bolted together, that should be relatively easy with only trackwork and some first layers of scenery to be actually cut. Otherwise it is more of an unbolting and disconnecting the wiring process. Lyders notes that scenery takes a beating in a move, but I had not gotten far with scenery beyond some first layers. He also suggests cutting track back from the edge, to help prevent the track snagging and tearing larger sections loose. While I plan on reusing the segments, I am not sure they will go back
together exactly as they were, so cutting the track back from the edges seems prudent. Again following his precedent, where I have electronic components mounted together on plywood, I will keep the keep the circuit boards and other electronics mounted on the plywood panels and pack the panels. 

While I have made the decision that further progress on the 4th Subdivision does not make sense with the impending move, I may still finish a few projects that are currently in midstream before dismantling my work bench. My doodlebug and a steam locomotive are both partially apart with the intention of installing improved sound decoders. I may want to finish those installations while I have the support of fellow Division 12 members with more decoder knowledge to provide moral support. Disentangling myself from all the roles I have taken on with Division 12 is a whole other issue, not really relevant to this blog. 

At this point, my intension is to be sure to have appropriate model railroad space at our new home, wherever that may end up being. I also intend to keep a similar scheme for the new railroad, so this blog will continue to be where I document and share the planning, construction, and operation of a small (or medium sized) model railroad. 

Sunday, January 24, 2021

Moving Forward With Green Rock -- Another Update

Again, while I haven't been posting frequently, work has been steadily moving on at Green Rock and the end of the branch turntable. The Division 12 Thursday modeling night Zoom sessions have really helped me with progress. (Note to self: scheduled modeling time is a good thing.) At the end of December I wrote up a "to-do" list for Green Rock, and I have been able to check off a majority of those items. 

After my last post here and before writing the to-do list, I did, in fact, finish laying the track. One obstacle was that the thickness of the ties and the rim of the turntable pit were not the same. I used a crescent shaped bit of styrene left over from another project to form a ramp up to the lip of the pit. If I haven't mentioned it before, by this time the pit and other turntable parts have been sprayed with rattle can primer and first layers of acrylic paint. Also, as seen in the photo, I have applied some ground goop around the pit and roadbed. At any rate, after installing the track, soldering the joints, and double checking that all the track had adequate electrical connections, I went ahead with the next step -- painting the track.

With such a small area, I tried to save the time masking and cleaning the airbrush by hand painting the track. It turns out that approach is not a time saver! First I tried using the Testors "Enamel Paint Marker" seen in the photo. It didn't cover well, even with two coats. I had cleaned off the flux from soldering; perhaps cleaning all the rails with isopropyl alcohol would have helped, but I doubt it. So I tried brush painting the rails with rail brown acrylics after the enamel had dried. Even with multiple coats, I still had what I called "sparkle." Tiny dots of unpainted rail next to the spike heads reflected light and "sparkled." I applied yet another brushed on coat to the visible rail sides, ameliorating but not solving the issue. I also brush painted the ties with a wet on wet mix of rail brown and light gray before calling it good enough.  

Continuing with the good enough approach, I added some 3D scenery around the "light at the end of the tunnel" entrance to the Green Rock module, using the crumpled newspaper, masking tape, and plaster gauze technique I have described elsewhere. After that all dried I added Sculptamold, and after that dried I painted it with my standard brown earth latex paint. I also cut a piece of 1/8" hardboard to fit as backdrop behind Green Rock. I gave it a first layer of background paint blending the blue into white towards the bottom. At a later point I might decide that it is not good enough and add additional details. I did paint in some initial tree shapes around the hole through the scene divider. At that point it was time to focus on the turntable itself.  

The Walthers turntable kit had some problems, but by troubleshooting them and accepting hand operation, I was able to barely hit my good enough standard. The DCC and track power did end up working just fine. I had a PSRev auto reverser on hand that I have owned for maybe fifteen years. I cut and painted a piece of scrap plywood to mount across the legs of the Green Rock module. While my soldering skills are not great, I was able to attach short 14 gauge wire to the appropriate holes in the PSRev board. I then attached the circuit board with #6 screws using short lengths of plastic tubing as set-offs. I also attached some Euro- style terminal strips to the plywood for the incoming DCC bus and the outgoing wires to the phono plug I intended to use for connection to the turntable bridge. Luckily, this part of the turntable build has been working fine!

Otherwise, the turntable has been a bit of a disappointment. First of all, after buying it, I read some reviews. ( I know, that is not the proper order.) While some of the built-up Walthers turntables work well, the kits had terrible reviews, particularly in terms of operation. I guess one does get what they pay for.  I am not going to document the build of this model, but I will admit that with some careful painting, it looks pretty good. It could use some more weathering. Mechanically though, it has been a real struggle. Between the reviews and my test fitting, I early on decided to go with the manual approach rather than trying to use the motor. The bridge originally would not spin at all in the pit, despite my seemingly accurate construction carefully following the directions. I ended up using my orbital sander to sand down the ends of the bridge. It spun, but not smoothly as it still hung up in a few places. Then, in first actual trials with rolling stock, one end of the bridge would tip side-to-side causing the locomotive to derail. I tried attaching a small carved wooden block as an extra support next to the wheel on that side. After experimenting with using a dab of Labelle grease, it is approaching good enough status, but I fear I will need to keep experimenting with kludgy fixes.  


Friday, December 11, 2020

Moving Forward with Green Rock -- November Update

 While it is true that I haven't been posting about moving forward with the East Staging module transitioning into Green Rock, I have been working on it fairly steadily. 

The first step I took after drawing up a plan and cut list for the benchwork for the addition was to move to the basement where some of my power tools are set up for working on our kitchen. I used my miter-saw to cut pieces of 1" X 3" pine to length. Since I purchased an air compressor and nail-guns for installing bead board in the house, I have found it to also be very handy for gluing and nailing model railroad benchwork. It is noisier, but much easier than hammering finish nails by myself. It even goes faster than gluing and screwing. 


After assembling the framework, I  laid out the 1/2"plywood for the top. After marking it, I went ahead and cut the two pieces out with my jigsaw. I didn't want to attach it yet, as I felt the need to test the framework grid in place with the original staging yard. So, with Renee's help, I moved the addition up to the attic and set it up on a workbench with the staging module. It seemed like it was working, so I went ahead and screwed the new benchwork frame onto the original module. I still resisted attaching the plywood to the frame until I had the final track plan marked and the hole cut for the turntable. 

After selecting the center of the turntable opening, I made a simple beam compass with a paint stick and a brad as the center point trammel and a pencil held against the end of the paint stick to draw the circle for the opening. The instructions for the turntable kit gave me the diameter and I divided that in half for the trammel point brad. Before cutting the circle out, I drew the center lines of the tracks (and cork roadbed) on the plywood. I made sure to keep the center line straight for a few inches past the opening for the turntable and the curve to not exceed my minimum of 24" radius. 

With the plywood circle cut out I finally glued and nailed the plywood to the grid frame. After the glue had a chance to dry, my next step was to glue cork roadbed down following the center lines I had established for the three tracks leading to the turntable opening. Saving some money now and probably adding headaches later, I went ahead and configured the other two tracks using the two turnouts I had on hand, an older Atlas right hand and a Peco Insulfrog. As the rails later overlap the lip of the turntable pit, I also fit cork around the pit opening. The photo to the right shows the extension with the cork glued down and the turntable pit temporarily in place. 

Since then I have clamped the module in place, started work on the turntable, laid the track, started some scenery, and started thinking about how this will impact my operations plans. Hopefully I will update this blog more frequently and catch up with the modeling!


Thursday, September 24, 2020

Beefing Up the East Staging


Track Plan for new East Staging/Green Rock

While I have been working on the scenery on the Willow Junction segment, it has been going so slowly! Some medical issues have slowed me down in general. The pandemic and my frustration with our country's leadership tend to lead me into a general malaise. So, this past week I had a crazy idea -- what if I beefed up the "East Staging" module. Yes, my stated plan was to finalize some scenery at Willow Junction and then start on the new Nooksack section. But, I just got the notion to improve the existing East Staging and with that notion a burst of enthusiasm. 

Existing East Staging Module
Why does the East Staging module need to be improved; what is the rationale? While ops-sessions are on hold due to COVID-19 mitigation, my after action notes from an initial ops-session last January pointed out some inadequacies to this staging yard. Also, I have been contemplating aligning my operations plans with the minimum required for the NMRA Chief Dispatcher Achievement Program, should I want to go down that rabbit hole. For that I would need three scheduled mainline trains. The tracks in the existing staging yard are not long enough for the trains I am currently running, no way to turn engines or the doodlebug currently exist, and more tracks are needed for the number of trains I hope to run. In short, whether focusing on "fun for one" operations or working towards having a small crew run the 4th Subdivision, the existing staging falls short. 

As the plan I came up with to beef up the staging yard included a turntable big enough to turn the doodlebug rather than using track cassettes, my thoughts moved to scenicing the new version. What had been explicitly a staging yard, in this new concept will be sceniced and used later as Green Rock, a remote stub ended terminal at the eastern end of the 4th Subdivision. For now it should do double duty functioning as a a sceniced fiddle, or active staging, yard in the same location as the existing East Staging module. When I do return to building the Nooksack section, the Green Rock/East Staging will move to the east of Nooksack. As sections are added to the east, Green Rock will continue to move east as well, ultimately taking its final spot as only Green Rock, no longer doing double duty as staging. 

Seeing that their 90' turntable kit was on sale at Walthers, I went ahead, ordered it, and started track planning. My current plan, seen at the top of this post, builds upon the existing staging module. Trying to use some of the materials that I have on hand, I plan to use the couple of code 100 turnouts that I have left over from my modular adventures in Seattle. I also have a PowerShield Auto Reverser circuit board that I bought many years ago and never used that I can use for the DCC track power on the turntable. 

Opportunity for Infrastructure Upgrade
Having moved the East Staging module out and to a workbench gives access to the attic's one electrical outlet. One of the infrastructure issues (beyond those connected with the attic stairs/trapdoor) that has dogged me is the need to string electrical cords willy-nilly throughout the attic. My plan is to extend the circuit with a number of boxes. Not only will that be tidier and potentially safer, but I will add the option of easily plugging in a portable air conditioner or heater making the train attic more comfortable mid-summer or mid-winter. While I may want to fish an additional circuit up from the breaker box in the basement at some point, hardwiring some additional outlets to this circuit while it is open, seems very doable and makes a lot of sense. 

Moving forward, I see a couple of obvious next steps. Designing and building some benchwork extensions to the existing module to allow for my new track plan is an obvious next step. I have already masked up and made a trip to the big box store for some lumber. I drew up a plan for the added benchwork framing and made a cut list. I guess I will soon be spending some time with my friend the miter saw! I also see another trip to the big box store for metal clad armored cable, bushings, boxes, and receptacles. Both of these projects as well as mocking up the track plan at full size and constructing the turntable are all potential future posts, leading to more frequent updates here on the GNbranch.


Monday, July 20, 2020

Updates (and Lessons Learned) from Willow Junction

Despite the heat, I have continued to work on the scenery and structures on the Willow Junction portion of the 4th Subdivision. Having the road into the scene completed has prodded me into focusing on this section. First, I worked on some scenery to help hide the abrupt meeting of the backdrop and the ground. Having decided to use the Great Northern portable depot that I started a number of years ago, I have been making some progress on completing that kit. As ballast hadn't been installed on the mainline in this section, I did some ballasting. Over the last several days, I painted some HO scale figures to include in the interior of the station, as including some interior details is part of my plan for the station. In this update, I will touch on some of techniques I used.

One of the challenges in creating the illusion of reality and depth in a model railroad backdrop is creating a smooth or hidden transition to the background (in fact this is one of the points in the scenery AP judging). In this area, I wanted to hide the joint with a combination of a raised landscape or berm and a grove of trees. I cut and carved some scraps of foam using both some pink insulation foam and some packing foam. In the photo, the foam has been already been carved and positioned and I am in the process of gluing it in place with a foam-safe adhesive. As I positioned the foam, for the most part, I left a small space behind it, rather than placing it right up against the painted backdrop.

After the adhesive had dried, I taped some wax paper to the backdrops and painted the foam with my standard "ground" latex paint. On one section of the pink foam it had left a rock-like texture when I scored and snapped it. I painted that section with a gray craft paint. After the paint had dried I also applied "ground goop" to soften some edges and add additional texture on and around the foam. After taking this photo, I added a first layer of ground foam.

This photo, showing the "too regular" portion of the berm and the backboard joint to the right that still need to be resolved, also shows the placement of the GN "portable" depot. This station will be located along the main line here, on a wooden platform. While I am still undecided about adding a light to the depot, I will have visible shadow box interior scenes. So, I have added paper flooring and a wall between the baggage area and the waiting room. In trying to determine the interior colors, I found photos of the Whitefish GN station and a site documenting the restoration of an early GN station online. While not a perfect match to either, off-white walls and a darker gray wainscot seemed like a reasonable choice. Having them on hand, I chose Americana "Bleached Sand" and "Slate Gray" as my compromise colors to paint the interior. I also noted that I should paint my bright green bench that I planned to use a brown or natural wood color.

This portable depot kit, purchased from the Great Northern Railway Historical Society, has proven to be a bit difficult to build. For example, each window is made up of five separate laser cut pieces, before adding the two clear pieces representing the window glass. This is fiddly work with my shaky hands! Also, many of the window openings required final sanding with an emory board or file to allow the windows to fit. That said, so far, I am pleased with how the depot is looking. I am also quite pleased with the Vallejo "Sky Grey" and "Neutral Grey" Model Color paints. Those two colors are a close match to the Great Northern's building color scheme of the 1930s until they changed to white and green in the mid-1950s. The Vallejo paints brush on very nicely with good coverage and minimal brush marks. 

As I am getting close to finishing the completion and installation of the windows, I chose some of my stash of unpainted figures to use in the station scene. I primed the figures using a Krylon camouflage rattle can that I had on hand. After letting the figures dry over night, I went ahead and painted them with craft paints intending to use the inside to outside technique. As I found that the sand colored primer was a bit too dark for the skin color, I broke the sequence part way through and repainted the figure's faces and hands. The blue tape, sticky side up, worked fine for holding the figures for the spray painting. However, many of the seated figures liberated themselves from the tape while I was applying colors or washes, next time I will secure them in some other way.  All in all, I think they will be fine for inside the depot, and I have gained some experience in figure painting. 

So, I think I have just one more ballasting session on the Willow Junction side, and if I continue to make headway with the completion of the depot I hope to move on to getting some ground cover, trees, and a gravel road wrapped up around the asphalt road before my next update.

Sunday, June 21, 2020

4th Subdivision System Map


Over the last few days I sketched out this system map for the 4th Subdivision. The map puts my conceptual or mental map for the railroad down on paper. While I still intend to create a more "finished" version, I'm thinking that this sketch version may be helpful in several ways. As the 4th Subdivision is proto-freelanced, made up of a combination of real and made up locations and scenarios, I need a way to establish and convey its place in the real world to myself and others.  

Whille the Cascade Division of the Great Northern Railway did not have a 4th Subdivision, the mainline between Seattle and Vancouver did cross the Nooksack River at Ferndale in Whatcom County. The Northern Pacific also ran north and south through western Whatcom County. Early in the planning of the railroad, I established its location on a map. What I hadn't done until now was to sketch out the specifics of the entire 4th Subdivision. This system map depicts the topography and distances between those parts of the subdivision that will be modeled and those that won't. It should help me in working on scenery as well as planning for operations. As operations becomes more of a possibility, a system map should provide an overview or context for visitors. 


Friday, June 12, 2020

Leone Road

Road in Whatcom County
While it has been a while since posting here (sorry!), I have been working on the 4th Subdivision and with my local NMRA division.

Continuing with scenery on the Willow Junction side of my railroad last month, I decided to tackle modeling an asphalt road, after watching a couple of instructional videos by Gerry Leone on MRVP. One of his major issues with other approaches to modeling asphalt roads was that they lacked the white aggregate that appears after the top layer of tar wears off on asphalt roads. Looking back at a photo I had taken on my last trip to the Pacific Northwest, I noticed that the dots of white aggregate definitely are a noticeable characteristic of that style of road.


The key to Leone's technique is using sandpaper as the surface of the road, painting it a gray color, dry brushing it with a lighter color, and drawing in cracks before weathering the surface. In general I followed  his techniques closely, although I found myself using slightly different materials, based on what I had on hand or easy access to.

  • 100 grit sandpaper
  • .030 styrene
  • 3M Hi-Strength 90 contact cement
  • Rustoleum Painter's Touch 2X flat gray
  • Vallejo Model Air "light grey" (thinned)
  • Vallejo Model Color "sky grey"
  • Pigma Micron .05 permanent pen
  • Pan Pastels or Bragdon Powders
  • Vallejo Model Wash "dark grey" 
  • Vallejo Model Air "white"

My first step was identifying the size and location of the road. I went with Leone's notion of a twenty-four foot wide road. It enters from the aisle, crossing the railroad before ending at a tee with two gravel or dirt roads paralleling the backdrop. I plan to add a small rise along this section, just in front of the backdrop to hide the right angle joint. I also planned on having a culvert under the road with a small water/boggy feature right at the aisle edge. I made paper templates for the two sections of road that would be paved, and remembering to turn them over, traced them on the back of 100 grit sandpaper. 


After cutting the sandpaper out, the next step was spraying the back of the sandpaper and the styrene sheet with contact cement. I had never used spray contact cement before, but with newspaper down and working on the back porch, I managed to accomplish that without making too much of a mess. After letting the cement dry to tacky, I carefully glued the sandpaper in place on the styrene. As I didn't have a brayer, I rolled the spray can over the sandpaper to ensure a firm grip. After letting the exposed contact cement on the styrene sheet dry a bit more, I sprayed the sandpaper with the 2X flat gray primer, still working out on the porch. I find the 2X primer and paint line to be pretty good for modeling; it covers well, without obscuring fine details. After allowing it to dry over lunch, I went up to the train attic and fired up the airbrush and spray booth to apply an uneven coat of thinned Model Air "light grey." I thinned it with about one part Vallejo airbrush thinner and two parts water. I have learned to NOT thin Vallejo with isopropyl alcohol. This airbrushed application adds a subtle bit of texture and color variety to the otherwise very regular gray from the 2X primer.

Now we have arrived at the critical step. Dry brushing the painted sandpaper surface with a lighter gray provides the visual illusion of the missing white pebbles or aggregate. I used a Vallejo "sky grey" color and a fan brush as Gerry Leone suggested. One key is to use a kind of a dabbing or stippling approach and to be random with the brushwork. Avoid following the tire pattern or any other pattern with the dry brushing. It ends up looking kind of splotchy at this point, but  that is what you want. 

After the paint had dried, I started the weathering procedure. The first step is to draw in the cracks or patches in the surface of the road with a fine-tipped permanent pen. I used a Pigma Micron .05 pen. 

I followed the coarse texture of the sandpaper to guide my lines as I drew in some cracks or patches. Then I started the weathering procedure that Leone had demonstrated using Pan Pastels, The problem was that my set of Pan Pastels are all geared towards rust and raw umber shades and tints which did not work well. I then shifted gears and applied some gray and ash colors from my Bragdon Powder collection. That helped, but it still needed some toning down of the umber. I tried adding some puddles of "dark grey" Model Wash, but fearing they would be too dark, dipped my brush into clear water and added that to the wash, thinning it in place. Figuring that this was the place to stop, I let the wash dry. An hour or so later, I masked off the stripes with blue painter's tape and dry brush or stenciled in the white stripes. 

When I cut out the road shapes with a sharp hobby knife, I left a narrow boarder along the edge, which I 
"painted" with full strength white glue and attached ballast as a gravel shoulder. 

I then started the process of building up the landforms under and around the road pieces. I glued some cork strip to the edge of the layout and along the cork track underlayment. Then I mixed up some Sculptamold and built up between the cork strips and attempted to create banks and ditches as well as inserting a painted black plastic straw as a culvert under the road. As part of the process of fitting the road surface to one of the applications of Sculptamold, I managed to spill a bit of the material onto the road surface. Wetting it down with water dissolved it, but forgetting that the surface was sandpaper, blotting it with a paper towel was a definite mistake. The paper fibers were now a part of the road surface! I later ended up applying another grey wash puddle to that area which helps to disguise the fibers somewhat. 

Before the final application of Sculptamold dried, I pressed the road surface into place. With an application of some CA at one of the corners, the road surface was a permanent part of the landscape, ready for some scenery applications around it. To eliminate the illusion of winter wonderland, I painted the white  surface with my standard earth brown color. I recently ordered some Woodland Scenics water products and I will paint the ditch bottoms with their "Water Undercoat" paint as the first step of adding a swampy area here along the culvert area. In the photo, you can see that I had started applying ballast between the tracks to prepare for the next step of adding a grade crossing.

Knowing that I had some stripwood on hand and that wooden grade crossings were appropriate for my era, I decided to scratchbuild one. I did a Google image search of "wood grade crossing" and found that the Illinois Commerce Commission has a large inventory of grade crossing photographs online. Noting that many of them are made from what appear to be ties, I cut a few pieces of stripwood matching the size of the track ties to a scale nine feet and experimented to see what might work. I also had some thinner stripwood for between the rails that is just a bit wider than the ties. I decided to use that as well; I wanted the track to work flawlessly rather than to be prototypically sincere. Then it was just a matter of cutting, staining, fitting, and finally gluing the stripwood in place with CA to build a representational wood grade crossing.