Tuesday, January 23, 2024

A Signal Tower for East Branch? -- Part 3

Photo with current status of the tower

Knowing that a photo is a good way to evaluate how a modeling project is going, I definitely see some evidence that the tower is not as close to done as I had thought. While the grout that I experimented with in my last post has a texture that I really like, the signal tower's base is extremely obvious. Once I am satisfied with the placement or location of the tower, I need to hide that seam with another application of the grout mixture or the next layer of ground cover. At least a path to the back door, as well as the first layer of the driveway would be another next step for the surrounding scenery.  Some details like barrels, garbage cans, and boxes along with some weathering would help set the scene. In the photo, I can really see how shiny the roof appears. A quick spray of Dull Coat would kill that sheen. 
 

At some point since the last post on the signal tower, I made the decision not to try to light the tower. Yes, I had a "Just Plug" light on hand, but I hadn't really thought through how I would use it. First of all, the light and the connection plug are both big. To run either through the floor and base would require a big hole, perhaps 1/4 of an inch, or cutting the wire and soldering a connector to each end. Also, this section of the temporary sceniced staging is on a hollow-core door and 1" insulation. Will it be worth the effort to figure out running a wire through that? I decided that for here and now that it isn't. 

I made some paper signs, labeling the tower East Branch. I also have a Great Northern logo for the tower. Now, I am having second thoughts about the labels, leading to second thoughts about the function of the tower itself as well. 

Nooksack Control Panel
Today, as I was running a pair of trains brainstorming how operations might work here in the first phase of TOMA, I noted how I have the switch controls set up. The East Branch sceniced staging has hand-thrown Peco turnouts, while Nooksack itself has a control panel for Tortoise switch motors. The control panel sure gives the appearance of a model board that a tower operator might see. Shouldn't the tower be associated with the control panel? I am thinking that perhaps it should. 

Potential change of plans here!

No matter what I decide in terms of function and location of the tower, how did it get to the current stage of "close to doneness" from where I last posted about it over the holidays? 

Again, by using Vallejo Model Colors "sky grey" and "neutral gray" close matches to GN standard light and dark grey colors used from the 1930s through the mid 1950s are achieved. I painted a second coat on the doors and windows of both floors and painted the clapboards of the second floor with the lighter grey (which needed a second coat). I also painted a few roof shingles with an assortment of brown and grey colors. I later toned down the somewhat cartoony look with a control coat of Vallejo Model Wash "dark grey." 

While the walls were still apart I measured the window openings with calipers and cut out some clear styrene to represent window glass. I glued the clear styrene in place behind the window frames with canopy glue. After the glue dried, I cut some small strips of masking tape and applied it to the upper back of the windows to represent window shades. 

I decided that with all those windows I should make some attempts towards an interior even if I wasn't going to include a light. After gluing two of the walls back together and in place, I measured and cut a piece of novelty siding to represent floor boards. I painted the floor with acrylic craft paints and a final Vallejo Wash before installing it. After sliding it into place, I glued the other walls in place. I used Plastruct's Bondene and Plastic Weld, typically brushed on from the inside. I also made some benches and tables from my scale wood stash and painted up a couple of inexpensive figures that I had on hand. After constructing the furniture and the paint had dried on the figures, I glued them all in place with canopy glue. I am leaving the roof unglued as it snaps in place securely, and I may decide to add more interior details or light after all.

While I am less sure where to locate my raffle prize, and it still needs some signage, details, and weathering; I am calling it done(ish) for now. 

If the tower controls the switches in Nooksack, how would the train crew communicate with the tower? Would it just function as a yard office? 


Wednesday, January 17, 2024

East Branch: Starting Scenery From the Ground Up


Switch Tower Location along the NP interchange track before applying grout
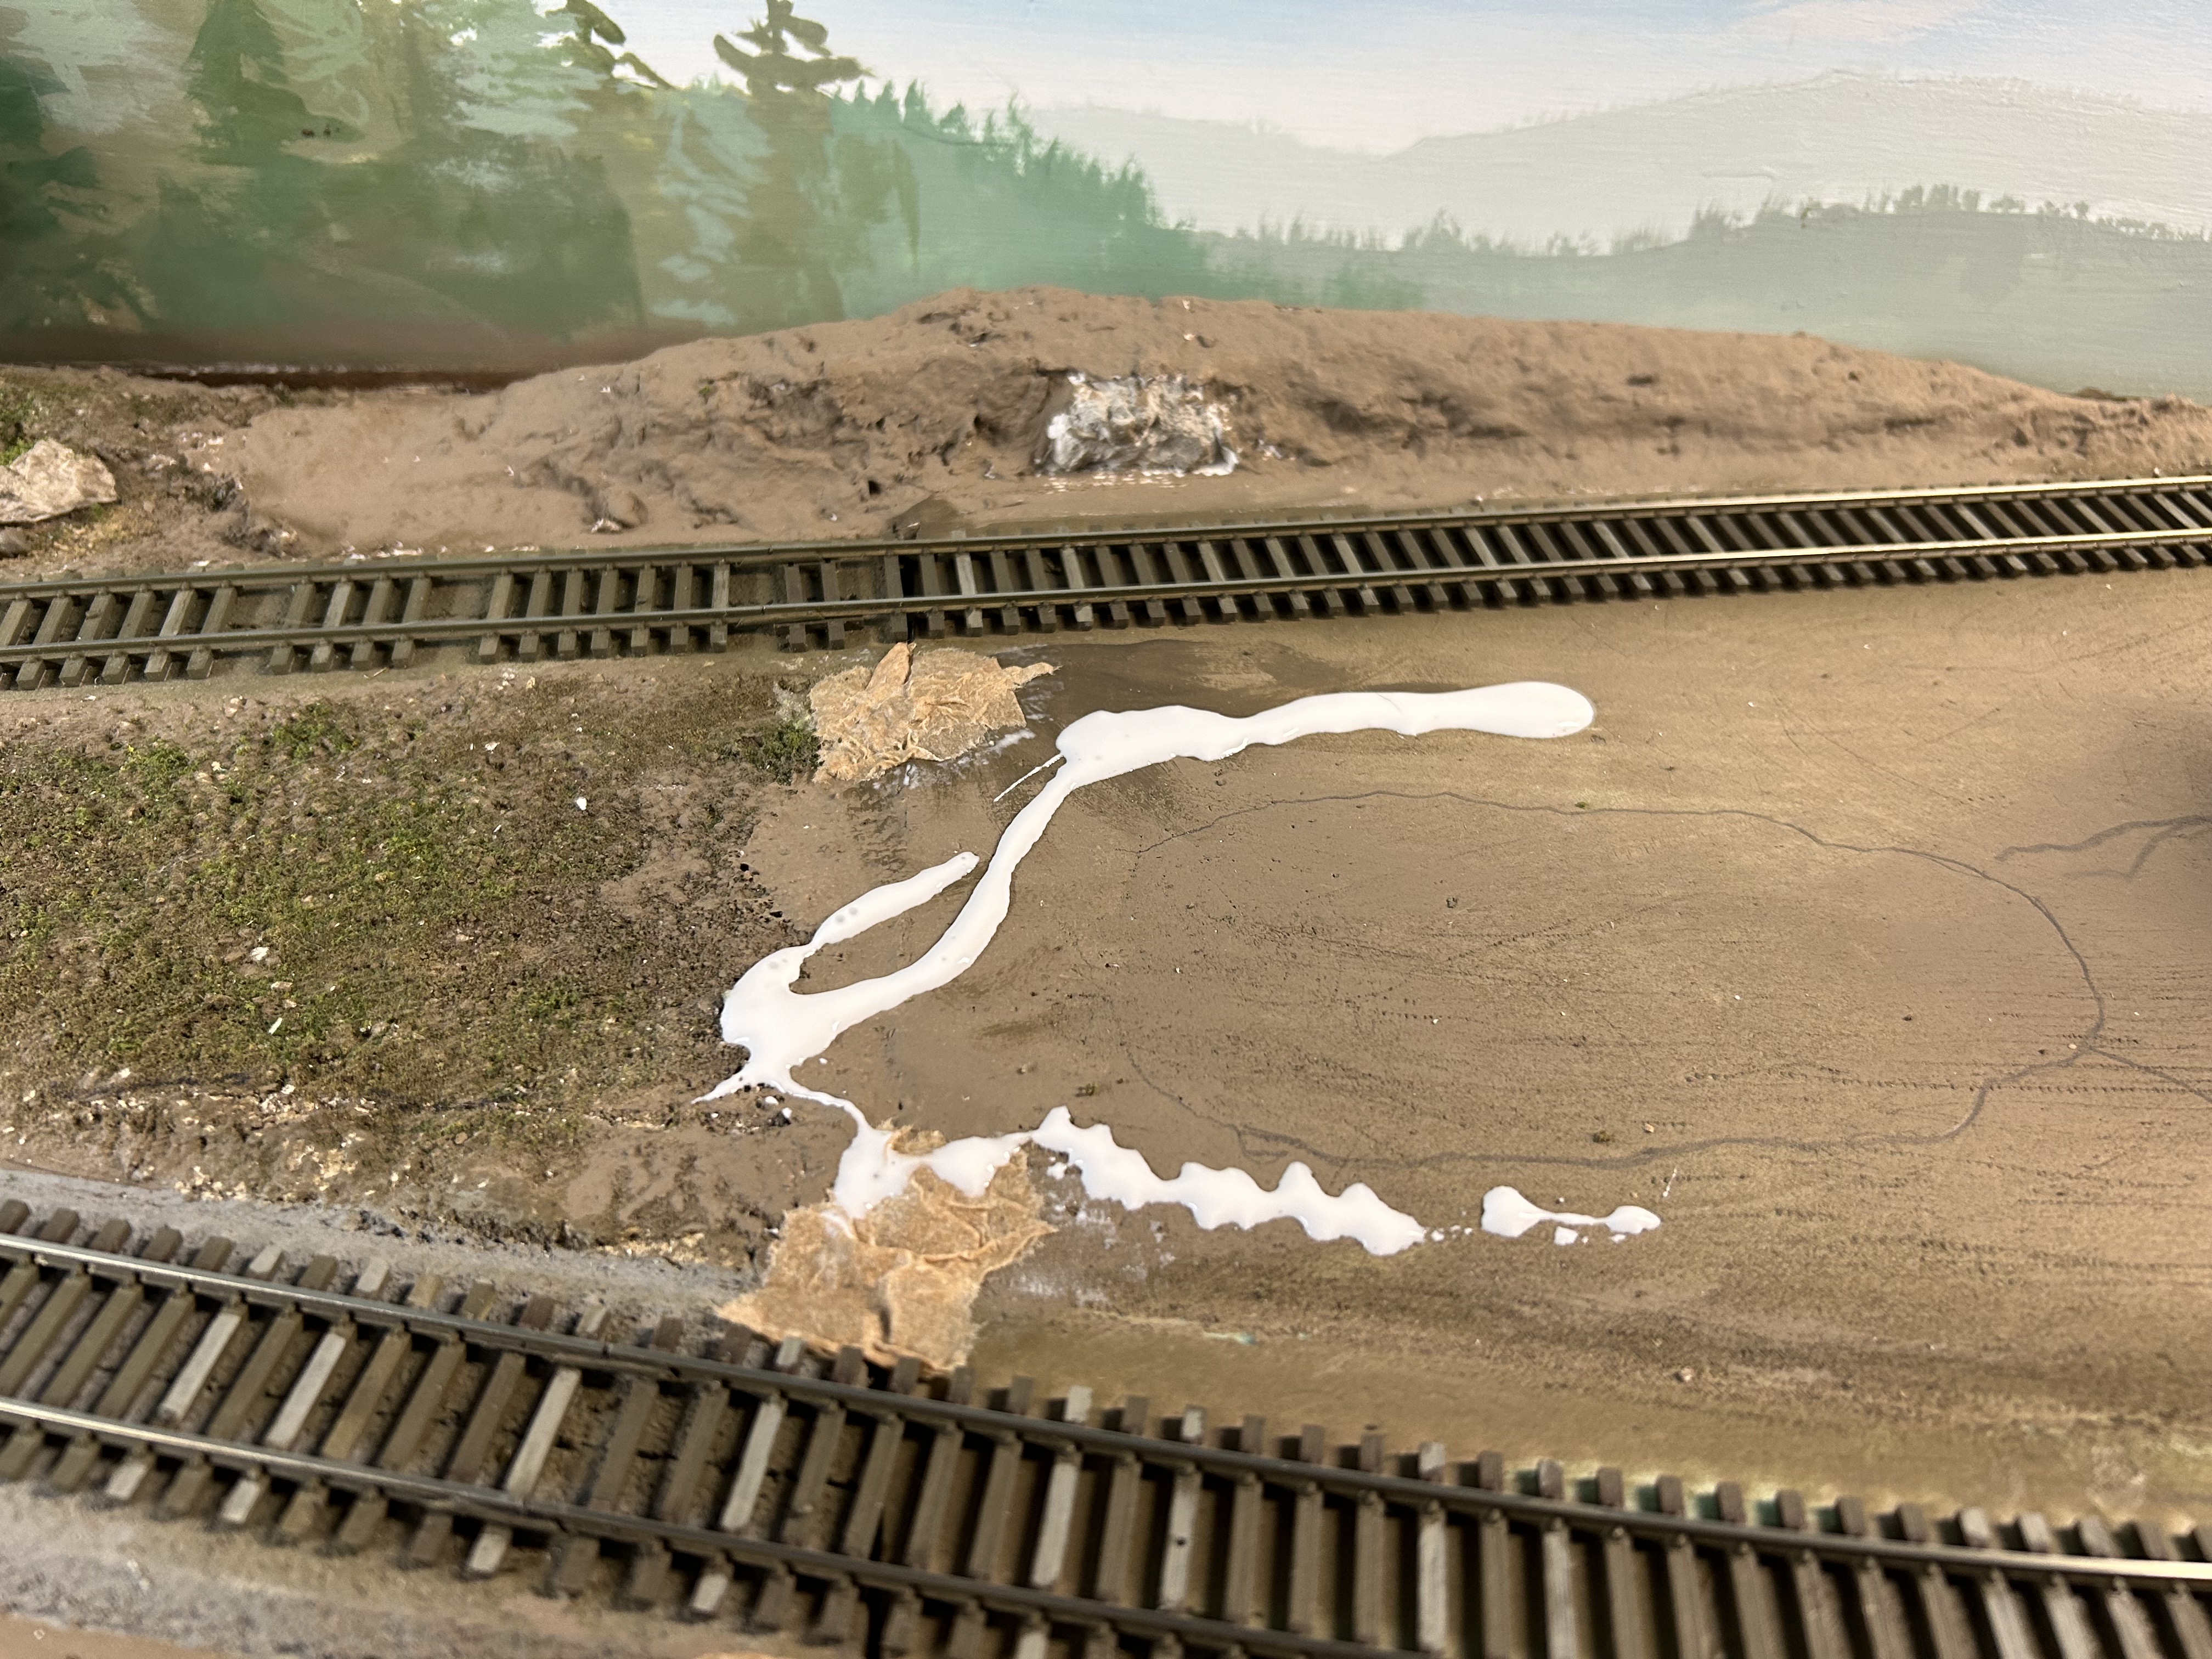
As I continue with painting and reconstructing the signal tower, I decided to start some scenery around the area. After outlining the base of the structure and the tentative location of a road/driveway into the tower, I started the ground cover application with dirt. 

I am trying a new (to me) technique for this first layer: sanded grout. I had picked up a couple of tubs last year, but had not gotten around to trying them. After watching a couple of YouTube videos by Kathy Millatt and Martin Welberg, I decided that I could tackle this technique. They showed several different approaches, so I forged on with the materials I had on hand. I had picked up the two one-pound tubs of Polyblend Plus sanded grout at a nearby Home Depot. One color was 09 Natural Gray and the other was 380 Haystack. I also had some yogurt containers with some mixed ballast and a tub of "tube sand" on hand.

Before mixing up a blend, I sifted some of the tube sand, separating the sand from the small stones. The kitchen strainer seen in the photo fits perfectly into a yogurt or cream cheese cup. I use the small stones as talus or river rocks, and I figured the sand would add a slightly different texture and color to my trial blend. I sifted four or five spoonfuls of tube sand and then added a heaping spoonful of each color of the sanded grout to that tub of sifted sand. I also dropped in a bit of fine gray and a mix of brown and black Woodland Scenics ballast. Then I stirred it up.

Before I started to apply the grout mix, I glued a paper patch to the cracks/gaps between the modules. I used white glue and little bits of recycled paper towel, conveniently an earth brown color. Then I went ahead and dipped a small (one-inch) bristle brush into a tub of water and brushed the white glue around. I went right up to the outline of the base of the switch tower and of the future road while I stopped just a little short of the ties. I worked on no more than about a square foot at a time. After spreading the glue, I used a spoon to shake my sanded grout mix over the wet glue. While a fine mister may have been a better choice, I used an eye dropper to apply 70% isopropyl alcohol to the grout mix. Then I dripped scenic cement into the grout to secure everything in place. I also shook just a bit more of the dry grout mix onto any areas that seemed really "soupy." 

Grout mix "earth" applied around the tower scene, but still wet
I applied the grout mixture all around the future location of the switch tower and the entrance road and parking area. I also applied it to the berm behind the interchange track and to the "viewblock" foam mound. I am curious as to how much (or if) the color value lightens as the mix dries. I really like the texture of the grout mix compared to the ground goop I have used in the past. It seemed to me that the vermiculite pieces in the ground goop were the size of small boulders in HO scale. I also applied some of the stones under the rock casting as well as spooning on some of the sand in one section because I ran out of my grout mix. I am curious how that variety in texture will appear once it is all dry.

While my next post will probably be an update on the switch tower, the next steps here are ground foam, static grass, trees, and roadway. Depending on what this scene looks like as the "ground" dries, I am thinking that this new technique is a keeper for the first layer, starting from the ground up.


Friday, December 29, 2023

A Signal Tower For East Branch -- Part 2

Workbench on Christmas Eve

Between the last post and Christmas Eve I made some progress with the Atlas switch tower. The tools, materials, and status of the tower are seen in the photo of my workbench. To get to this point during the buildup towards the holiday, I did manage to spend a few minutes on the tower on a number of different days. Since things had to dry and this was my only project, that schedule worked out fine. I will use a bullet list format with each bullet point representing a different day to document the progress.

  • I scrubbed the plastic walls, base, and roof with 70% isopropyl alcohol using a toothbrush. After the alcohol dried, I painted the edges of the base with my standard "earth brown" latex paint. 
  • I took the second floor walls out to the garage to paint with 2X Ultra Cover "flat gray" spray primer. As it was in the 30s, I brought the wall sections back into the basement to fully dry after spraying both sides of the walls. I lightly sponged a red and brown craft paint onto the bricks of the first floor.  
  • I applied a control coat of Vallejo Wash "dark gray" to the brick walls of the first floor.
  • Using Vallejo 70.992 Model Air "neutral gray," I painted the first coat onto the windows and doors of both the first and second floors of the tower. After measuring the thickness of the blue plastic door with calipers, I added .040 X .080 styrene strip to the top and base of the scrap box door in order to match the opening on the first floor wall. 
Today, as I write this a few days after Christmas, I returned to the tower revamp, but I will wait until I have made even more progress to discuss it in my next post. 


Monday, December 18, 2023

A Signal Tower For East Branch

At an in-person meet of my "new" NMRA division a week ago, I "won" a couple of somewhat dilapidated HO scale buildings as a raffle prize. One of them was an Atlas signal tower with a missing door and a loose wall. I decided that it would be a good project to get me out of a modeling funk. Adding a light and some interior details along with some painting practice might allow me to work towards a reasonable stand-in without the stress of underachieving with my self-imposed expectations on an expensive kit.

Possible location between the NP Interchange and 4th Subdivision mainline

By adding this structure here, I can also complete a first layer of scenery in the neighboring nearby couple of feet of terrain. These two projects should get me going again. Nothing too challenging with them, but I can get back in practice and hopefully see some progress. 

Atlas signal tower, partially disassembled

While it is not even close to a Great Northern prototype buiding, I have decided that it is a relic of the Bellingham and Northern Railroad that the GN took over. I found a Woodland Scenics Just Plug light in a parts drawer. As I mentioned earlier I will create some kind of interior for the second floor. The paint scheme will be the GN dark and light grey. The dark grey for the doors and window frames will help disguise the oversize window mullions, a trick I remember Lance Mindheim writing about somewhere. My first step was to further disassemble the building a bit more so that I can drill openings through the base and floor for the Just Plug wire. While this is not a contest level project, I hope it is just what I need to get back in the flow of actually working on the railroad!


Friday, November 3, 2023

TOMA Phase One: Modeling East Branch

The east staging now has a name, and the image above is the draft track diagram using the Copperplate font just as was used in the control panel at Nooksack. Unlike that control panel, it will just name the location and the tracks. The turnouts are manual; touch toggles will not be used here at the sceniced staging. 

East end of East Branch

Now that East Branch has a name and I have recovered from the MER convention, it is time to move forward with next steps. Two of the first steps are to paint the new track on the "run-around" extension and to paint the unpainted seam on the backdrop. The yard office, while complete enough to manipulate for positioning, needs to be completed. With those steps under way I can also finalize terrain dips and bumps, locations for roads or paths, and first layers of ground cover. To help keep me on track, I have created a next steps to-do list. 


Rails and ties painted on new runaround


Yesterday, I got started on my list by tackling the painting of the track here and the few places that new track had been installed on Nooksack. I have written about my process for painting track on this staging module before. One approach that I did a bit differently was to paint the ties soon after airbrushing the rails and ties. By the time I had cleaned the airbrush and related bottle, the ties had skimmed over, so I went ahead and painted the ties, mixing tie brown and grey craft acrylics as I went. While on a roll, I also unpacked some furnace filter trees to judge height and potential shadows on the backdrop, and after conferring with a photo pencilled in some outlines for later painting the gap in the backdrop.

Cleaning recently painted rails with wooden stick

As mentioned earlier, I painted the several patches of unpainted rail on the Nooksack module while I had the airbrush and paint out. After the acrylic paint had dried, but not really set up, I tackled cleaning the rails. I have found that the cleaned wooden sticks from my wife's favorite frozen yogurt bars are excellent for this task. Sliding them along the rails with two fingers and moderate pressure cleans the acrylic paint off easily. I am not sure how well this would work if the paint was allowed to set up overnight or if I was using oil based paint, but with freshly applied but dry acrylics it is the way to go.

This led me to consider one of the "research" sections of my next steps to-do list: track cleaning options. The frozen yogurt sticks are a keeper, but after doing some listening, reading, and YouTube viewing I am revisiting my track cleaning approach. 

I have been using abrasive foam blocks to clean the rail. I may continue to  do so after heavy scenery application, but my research suggests that abrasive blocks used regularly cause problems. They create micro scratches and, as Joe Fugate and others point out, the micro abrasions lead to excess oxidation from micro arcing of the metal wheels and powered track. One solution is polishing the railheads by burnishing with a stainless steel fender washer. I will pick up a couple of larger stainless steel washers the next time I find myself at the big box or hardware store. Many people suggest epoxying a washer wide enough to span both rails to a wooden block/handle. Obviously the track power needs to be off when this burnishing is happening! Joe Fugate again, points out a potential flaw to this approach. The fender washer polishing only hits the top of the rails without polishing the inner curve of the rounded rail, but the wheel is curved as it approaches the flange and this curve is a large part of the conductive surface. His solution is to also polish the rails with a stainless steel spoon burnishing along between the rails.

Cleaning the rail is not just for appearance and remediation after heavy scenery application, but for consistent conductivity and smooth running by removing dust and oxidation. Over the last few years, many online sources (Ron's Train's and Things is one) note the importance of using nonpolar over polar cleaners. Polar cleaners (typically containing some water) have an electrical charge and hence promote micro arcing and oxidation while nonpolar have significantly less potential for micro arcing and forming oxidation. A Joe Fugate Publisher's Musings in MRH explains this and lists some nonpolar cleaning solvents such as WD-40 Contact Cleaner, CRC Contact Cleaner and Protectant, and mineral spirits. 

Learning Points:

  1. Wooden sticks for paint removal on rails
  2. Abrasive blocks only for severe cleaning
  3. Stainless steel washer and/or spoon for polishing rail
  4. Replace polar solvent (isopropyl alcohol) with nonpolar solvent (mineral spirits) for solvent of choice for track and wheel cleaning


Thursday, October 26, 2023

Backdrop Clinic Handouts


At the recent MER convention in Altoona, I gave the most recent version of my clinic on backdrops. The clinic discusses: 

  1. A rationale for why one might use backdrops
  2. Applications and materials for creating backdrops
  3. Tips and tricks for realism with backdrops
  4. A gallery of photos of model railroads I have visited with backdrop examples
  5. A discussion of a new approach to evaluating "Background" as a part of the NMRA Achievement Program 


Due to some self-imposed technical issues I ran short on time. One of the audience members asked about access to the clinic, so I am attempting to make a downloadable version of my handout and a downloadable pdf copy of the PowerPoint slides available. This is an experiment forcing Blogger to work with Dropbox. The links should automatically download to your computer. Please use the comments to let me know if this approach works.

Link to download the handout

Link to download the PDF of PowerPoint slides

Wednesday, September 20, 2023

TOMA Phase One: Three Quick Updates

 1. Track Down and Wiring Complete on East Staging

Track down and ready to connect to the DCC bus extension

With my procedures for prepping the turnouts and soldering feeders under the rails, laying track and electrical work are interwoven rather than two sequenced steps. I have written about this process before, and it really does become easier after doing it multiple times. 

I did have one frustrating stumbling block that illustrates what I think of as the difference between remodeling and new construction. In fitting the new flex track into the glued down (well, technically latex caulked down) spur and mainline track, I had to peel up the existing ends and fit it to the new track. Track nails do not hold in the foam insulation board, and I did not want to be trying to adjust track on wet caulk. I should have worked from the existing spur track ends towards the new turnout instead of my standard procedure of working outward from the turnout. Adding to my frustration was the realization that I only had three Micro Engineering code 83 insulated rail joiners which fit nicely onto Peco turnouts, but are a bear to slip onto the Atlas flex track. Well, I almost immediately lost the third "spare" joiner into the ether as it flew off the end of a rail as I tried to force it on. While I had filed the ends of the rail, I had not made sure to have enough joiners on hand. I ultimately got the track installed with the last two insulated joiners. Must. Order. More.

The next day, the notion that "model railroading is fun" actually lived up to its reputation as the DCC bus extension, feeder drop connections, and Tam Valley Frog Juicer all wired up smoothly even though I was working under the layout. Having the right tools and materials on hand and having experience using them certainly makes things go smoother. I cleaned the rails and ran a loco over the new work. It ran smoothly, so I went ahead and soldered rail joiners. Again I cleaned the rails and ran a loco. It also ran smoothly. As I have a couple of sections of new (unpainted) track on the Nooksack module, I decided to run some experimental ops over the whole TOMA Phase One (Nooksack, trestle scene, and both staging sections) before breaking out the airbrush for final track painting.

2. First Operations Session

Having unpacked my Alco RS3 #229, I set up a west run of a freight extra from the, as yet unnamed, east staging. Using a switch list to organize the work, I arranged for pick ups and drop offs at the NP interchange, pick ups and drop offs at the trailing point switches in Nooksack, and some cars to continue on to Ferndale (in the west staging.) Using the switch list to list cars to be picked up and dropped off worked well. However, after almost immediately realizing that the Nooksack track had not been used or cleaned recently and that I hadn't cleaned the wheels of the RS3 since before packing it to move in 2021, I took a break to clean wheels and track. I thoroughly enjoyed doing some switching work, guided by just a switch list. I think that the process would work well with a second person, breaking the tasks up between engineer and conductor. 

I did jot down some steps to take to improve the experience, either just running solo or adding another person or two. Either labeled placeholder mockups of the industries or just labels to identify industries or spots in Nooksack are needed. The tape holding the lighted toggle switches in the control panel is not working consistently and needs to be replaced. Finally, make sure that locomotive wheels and all rail are clean before the session! 

#229 turned and ready to make up an east bound extra from the west staging

3. Freight Car Roster Update

While looking through boxes of railroad stuff in search of my locomotives I found the kits and ready to run rolling stock that I intend to add to my roster for the initial TOMA layout. I will have enough freight rolling stock to represent a reasonable mix of kinds of cars, railroads, and regional origin. The thirty-one car total should be more than enough to run, allowing for variety, and the total should allow for appropriate car flow at the proposed industries. 

I haven't really thought about my locomotive, passenger car, or caboose roster at this point. I have several locomotives that need decoder upgrades and all my locos other than #229 need some weathering. Both of those factors are potential gumption traps for me. To move beyond simple switching and just one train I will need to move beyond fear of failure and at least do some simple weathering and attempt a hard wired decoder install! Or not, and focus on structure and scenery work while enjoying some solo switching with what is there now.

Current Freight Car Roster with Railroad highlighted on cars weathered and at standard: