Monday, April 18, 2022

Planning for Operations on the 4th Subdivision: Trains and Towns


Eastbound "Mail Train" with a local freight in the siding at Willow Springs on the old layout 
My plans for the current model railroad include two scheduled passenger trains and several scheduled freight trains. Also, with my current plan, the logging railroad has trackage rights on the 4th Subdivision. 

One scheduled passenger train will be a "mail train" traveling between Port Gulick Bay staging and Chikamin with stops at stations between them and turning at Chikamin. It will be made up of the doodlebug and sixty foot RPO seen in the photo. The other scheduled passenger train will be a "milk train" that leaves from Ferndale Jct. staging, works the Carnation plant spur, returns empty milk cans along the way, and then turns at Chikamin to return. It will pick up full milk cans at stations, before working the Carnation plant and returning to Ferndale staging. 

At least one scheduled local freight will travel between Ferndale Jct. and Chikamin. Other expected daily freights will include the "Rock Train" with silica sand from east of Chikamin and limestone from the NP interchange and then returning with empties. A daily turn from Ferndale Jct. to Port Gulick and back may be scheduled. At some point, a weekly "stock train" may be added as an extra, and when needed an additional local may also be added as an extra. 

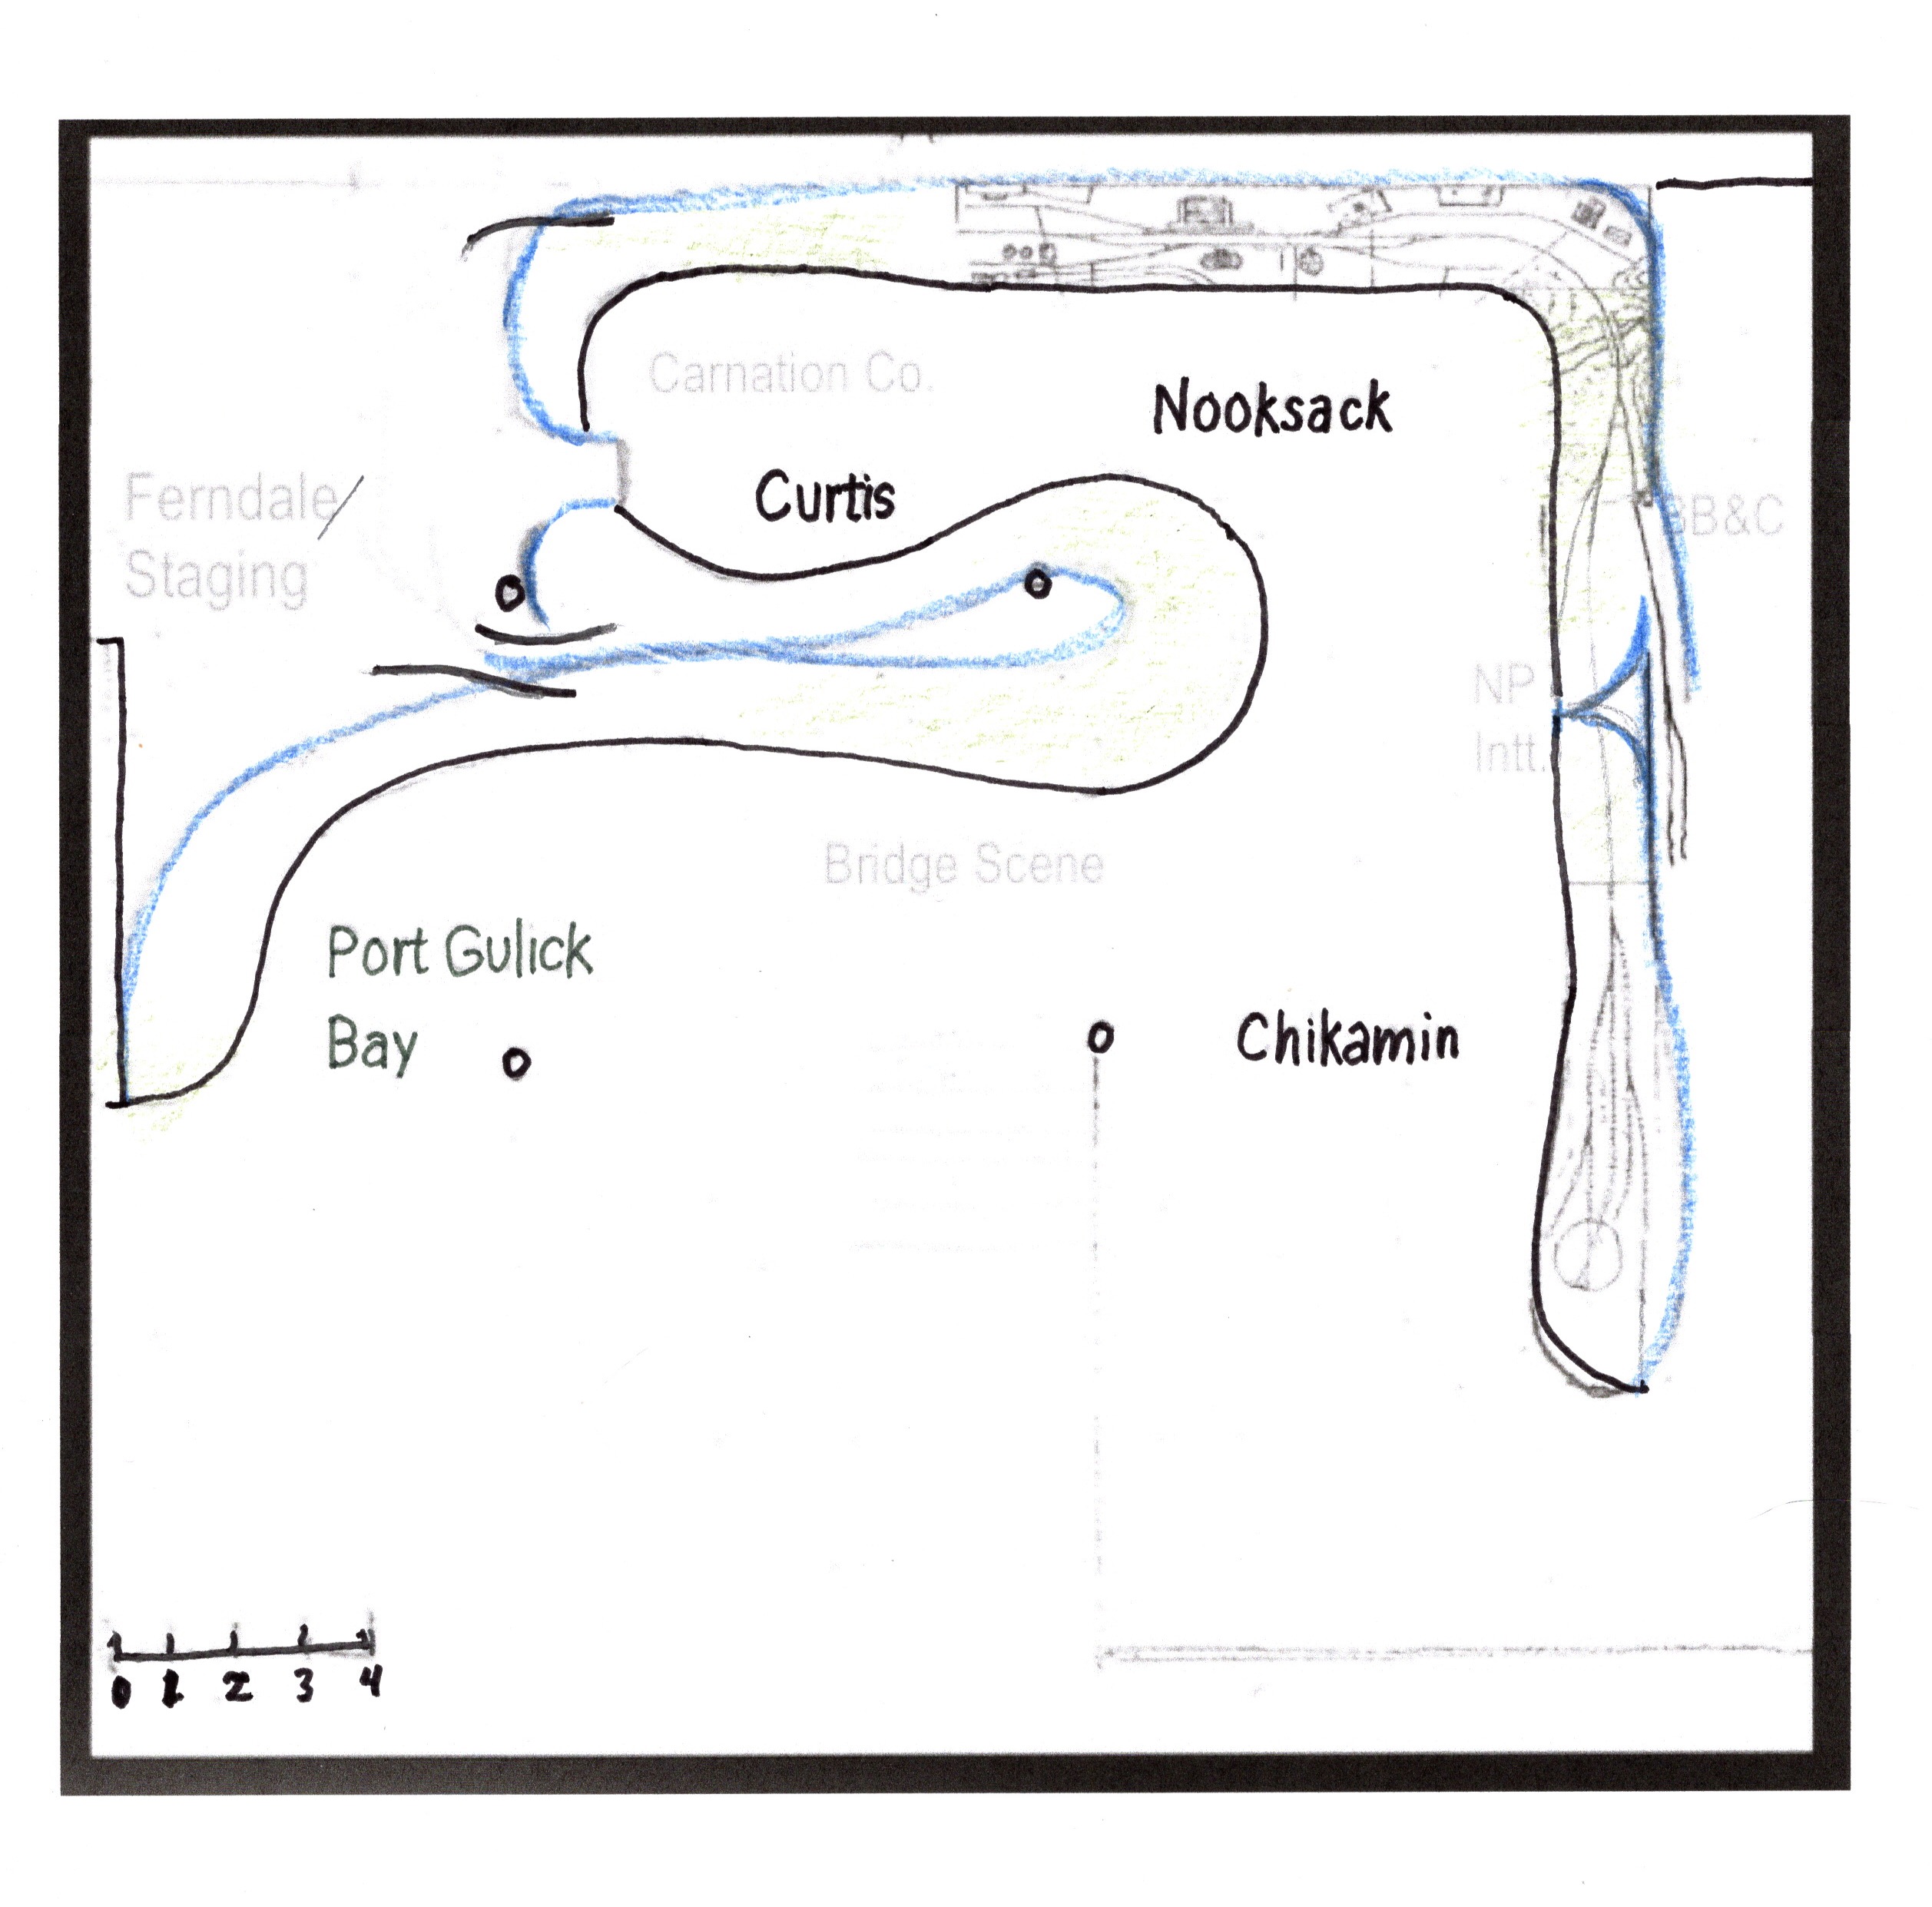
Benchmark footprint plan for the 4th Subdivision

Traveling from the west at sea level through farmland and forest to the east into the Cascade foothills, the 4th Subdivision travels through several towns with related industries. I will list them in order with prototype and modeling notes:

  • Port Gulick 
    • Look at Anacortes for industry details and ideas
    • Mayger Old Fish Station at Columbiariverimages has backdrop ideas
    • Passenger train and town industries into hidden staging to turn
    • Harbor and wharf industries as modelagenic features
  • Curtis 
    • Features a lumber mill
    • Look at Nooksack plans from Meadville layout
    • Good stretch of scenery between Port Gulick and Curtis
  • Ferndale Jct. 
    • Hidden run-through
    • Hidden fiddle tracks (see recent track plan)
    • Walk through utility area (furnace, well, filter, etc.)
    • Removable staging for work on utilities?
    • Carnation Company is visible (have photos and plans of prototype)
  • Nooksack
    • Use existing Willow Springs module
    • Extend passing track for seven car train?
    • Everson as prototype for cannery
    • Other industries? 
    • NP interchange and logging junction in scenic section?
  • Chikamin
    • Use existing module, but extend it a bit?
    • Redo all the track? (It is code 100 and Atlas switches)
    • Replace turntable? 
Schematic sketch of 4th Subdivision (boxes represent scenic breaks)


Thursday, April 7, 2022

Update on Designing the 4th Subdivision


Most recent version of the 4th Division


In planning for the larger railroad, intended to fill two thirds of the basement, I have been following some of the guidelines in Lance Mindheim's book, How to Design a Model Railroad, as I described in a post last November. In addition to the three plans mentioned in that post, I worked out three or four others (each of them had some problems) utilizing modules from my attic layout in Meadville before coming up with this final (?) version. 

In addition to using some of the previous modules or sections, I want to hit some operational and visual goals. While I expect to be just running by myself most of the time, I also want to be able to match at least the minimum requirements for the AP operations (Chief Dispatcher) certificate and be able to hold operations sessions with a few others in case I find myself leaning in either of those directions. I also know that for me to be happy with my model railroad, I will want it to appear realistic, like a miniature world, approaching the look of a three dimensional painting.    

Existing modules to incorporate

Keeping in mind that while this planning is for the entire railroad, I intend to follow Joe Fugate's TOMA (The One Module Approach) suggestion of building one or two sections to completion and operate with temporary staging before adding additional sections. The town of Nooksack on the benchwork footprint plan at the beginning of this post is one of the existing modules as is the trestle scene module that we moved from our former home. While I may want to lengthen the passing track, those modules should go back together well. Unless I make a huge shift in my thinking, making some minor adjustments to those two modules and getting them under way will be the beginning of the 4th Subdivision v.2.

In Mindheim's book, he suggests reviewing several considerations before moving from the footprint and route stage to overlaying the final schematic and track plan. Generally following from his prompt questions, here are some of my thoughts based on this final version.

  • While I might want some kind of continuous run possibility, this is essentially a point to point design. The staging/Ferndale area is not developed at this point, but my unplanned concept is for a combination of fiddle yard staging and a direct run through. If practicable I may add continuous running here with "the blob" as the other end, but if it doesn't work out, that is okay as it won't interfere with my operations plan. 
  • For the most part, this design contains easy access without lift-outs or duckunders, and it has fairly open aisle-ways. Ferndale staging is the main exception to this as it is hidden from the main layout, and the access to it requires walking around into the utility area. The dead end aisle with both Carnation Co. and Curtis has the potential to become crowded with multiple operators, and the entrance to it is below my desired four foot aisle-ways. It is more spacious than the rejected plans though.
  • The turn-back blob at a five foot width will allow for maintaining my curve radius minimum of 24." The reach-in distances are all quite manageable. Both of these were issues in previous design attempts. 
  • One area of concern is having suitable scenic or negative space between the more intensive secondary track elements. Particularly if I plan on somewhat longer train lengths, I want to avoid trains just running from one built up area directly into another with the locomotive in one and the caboose still in another. 
While I don't have all the areas and trackwork thoroughly planed here, I am confident that I can identify any minor changes in the Nooksack modules needed to move forward, start those changes, and begin some room prep.


Saturday, March 26, 2022

Ingleton: Scenery, Rolling Stock, and Operations Update


Swift reefer in front of Associated Grocers warehouse

Since my last post, I have finished ballasting the track and started some operations on the Ingleton shelf. In doing so, I have made some progress and have discovered the need for some focus. In this post, I hope to define the next steps for myself, as well as review track ballasting. 

First of all, Ingleton is freelanced other than it is designed as a possible Inglenook switching puzzle or game. It is set in the 1930s to be able to use some of my rolling stock collection that would not be found on the 4th Subdivision, my larger railroad set in 1954 and still in design phase. Initially, I have been using switch lists to structure some switching on Ingleton, which I am imagining to be several spurs at the edge of a yard set in the Pacific Northwest. My 0-6-0 yard switcher backs in with three cars to be set out at specific locations and with instruction to pick up the three cars from the spur tracks; a fun, short session. The next step may well be to figure out how to set up the Inglenook game. 

To get to the point where I can explore implementing the Inglenook rules, I need to enlarge my collection of rolling stock. This doesn't mean buying more, but building some existing kits and making sure that some of my existing rolling stock is up to standard. That in turn requires revisiting what those standards might be. A focus for the next month for me and a future blog post may well be an exploration of those standards and the process of making sure at least eight pieces of rolling stock are ready. As I have quite a stash of unbuilt kits and cars in need of repair or upgrade, I may end up with more than the minimum, adding some variety to the play. 

As mentioned before, I have finished the ballasting on the Ingleton shelf. I worked slowly and carefully, applying materials for just a few feet at a time. This approach, using actual stone materials, works well with what I feel are acceptable results. I may want to later revisit the ballast to add airbrushed effects. At one of the modeling Zoom sessions that I attend, Dick Bradley pointed out that what I thought was reddish rust is actually brake dust. That color, soot or oil, and spillage from rolling stock are all textures that might be applied later. While I like the real stone ballast, when I move on to the 4th Subdivision, I may change the proportion to lighten the final mix just a bit. At this point I will pick up from the last post with a review of how I ballast track. 

Ground cover along the tracks
After my last post describing ballasting between the rails, I worked my way along all the track on the Ingleton shelf, adding a layer of basic ground cover along the track. I first painted  a stripe of white glue along each side of the track and then applied a mix of ground covers. The main three that I applied were Woodland Scenics Blended Turf Earth Blend, Scenic Express Medium Natural Soil and Dirt, and Woodland Scenics Blended Turf Green Blend. I then applied 70% Isopropyl Alcohol and Scenic Glue with medicine droppers. I then sprinkled on more of the ground covers in light areas. 

Ballast applied between the rails and the ground cover
The next step was to apply my ballast mix between the outside of the rails and the (now dry) ground cover along the tracks. Using a plastic spoon, I applied the ballast along the outside of the rails. Then, using a soft brush, I brushed the ballast off the tie ends and the dirt and greenery along the tracks. I pinched on a bit more in light spaces and made sure I was satisfied before applying the alcohol wetting agent and scenic cement with droppers. In applying either material, it is safer to move the dropper along the rail above the ballast and along the ground cover below the ballast, allowing the materials to wick into the ballast. 


Learning Points:

  • MR's Cody Grivno's approach to ballasting works well for me.
  • Painting the tie tops and using real stone ballast provides acceptable realism.
  • A slightly lighter color ballast and applying additional color or texture are next steps 


Saturday, March 5, 2022

Ingleton Shelf: Scenery Started

This recent photo was taken with the scenery cement still wet

In my last post I mentioned starting scenery around the Associated Grocers warehouse, so that is what I have done. While the track plan was designed primarily to facilitate the Inglenook switching puzzle, my intention has been to also represent more prototypical operations with the three stub sidings servicing the warehouse and associated team tracks. I also wanted to work on developing realistic scenery techniques that might translate to the larger railroad. 

To hide the inherent flatness of the plank and the mainline look of the cork roadbed, I applied Sculptamold around the edges of the cork and painted it after it dried. One problem of using the narrow shelf and the Inglenook track plan involves a not quite large enough space for the future loading dock for the team track. By adding some raised fascia on the ends and building a couple of different styles of track bumpers, I hopefully solved the imminent  problem of rolling stock careening off the shelf. In this photo, one can see the first use of the tentative ballast color for the shelf and at least part of my future railroad. 

Instead of the generic Woodland Scenics grey made from walnut shells that I have used in the past, I am experimenting with a different mix on the Ingleton shelf. I am leaning towards a mix of two parts Arizona Rock and Mineral Company's #1152 Empire Builder to one part Express Scale #50 Blended Ballast as a starting point. In studying my GN Morning Star book, https://www.amazon.com/Great-Northern-Color-Vol-Lines/dp/1582481849, the color of the ballast varied from location to location as well as from various track types, mainline to siding. Airbrushing rust and soot colors over the track and ballast is another approach suggested by studying the prototype photos in Hickcox's book. 

On the shelf, I have continued with the ballasting approach suggested by Model Railroader's Cody Grivno that I reviewed in an earlier post. He starts by spreading the ballast between the rails,  brushing it off the ties and web of the rail, and applying wetting agent and scenic cement with an eyedropper from the outside. He lets that step dry before attempting to ballast outside the rails or on the shoulder of the cork. In the photo, one can see my use of a soft brush to clear off the tops of the ties. In my most recent session, I went ahead and applied other scenery along the side of track in the team track area. I used a mix of brown and cinder ballast along with Express Scale's Medium Natural Soil & Dirt as well as several other ground foams to establish the team track area. If I am not happy with the result, I can always add another layer. 

This shelf is really quite freelanced, with less specificity than the 4th Subdivision. It is set in the west in the 1930s. As I work to improve my skills, I am finding that having a prototype to work from leads to significantly more realistic results. I recently found a prototype source that I can work from or at least be inspired by on this shelf and in planning the new version of the 4th Subdivision. The Cornell University Library has a set of over one-hundred photos from 1960 taken in yards and sidings of the Great Northern in Everett and Seattle here. I printed one out and had it available while working.

The next steps include some very basic ground cover along the rest of the track and ballasting the track. I do not like the abrupt end of the flat seen in the photo. For that issue, I have a couple of ideas, but I just am not sure. I have ordered a loading dock kit and several tie piles from Blair Line for the team track area. Whether I will add additional structures or go with just scenery such as a small cut, a dirt road, or berm with trees is up in the air. For now, I may just complete the ballasting and as suggested by Mindheim's blog post, spread some Heki grass fiber over the brown paint, and start focusing on developing the operations. 

Learning Points:

  • Prototype sources are helpful even in creating realistic scenery
  • Roads, scenery, and structures should be considered in original planning
  • A custom, quality ballast mix adds realism

Friday, February 18, 2022

Associated Grocers: Part 3


Although the surrounding scenery needs work, the grocery warehouse background structure is complete, As mentioned previously, several additions were needed to help highlight the loading dock and its sure spots.  

I printed out several sets of 1, 2, 3, 4 numerals for signs to label the doors as specific sure spots. I tried for a happy medium between large enough for an operator to read them easily and small enough for a somewhat realistic scale size. I found 8 pt. font size to approximate that happy medium. For the font I chose "Futura" as it is from the late 1920s and, as a sans-serif, it is easy to read. My attempts to create a border around the numerals did not work well, so the signs are just black numerals on a white background. My application technique was basic: white glue on the back of the tiny cut-out paper rectangles with the signs brushed into place with a clean damp brush followed by a light application of a gray wash.

I decided that Ingleton shelf would be a reasonable place to try out Woodland Scenics' "Just-Plug" system. I included their "Lights and Hub" starter kit and power source with an online order, but found I would either have to drill a large hole through my building's wall or resort to splicing/soldering. So, I spent more money on their gooseneck wall lights and installed two over the loading dock. While the system is pricey, it is relatively easy to add to it. Plus the hub has the ability to dial in the intensity of individual lights. I will wait to make a final decision on the value of the system until I add more to it. 

The next steps will be to fit the building into the scene with first applications of surrounding scenery and adding more details. I can feel accomplished in that I actually finished the building, but I also realize that I still need more practice. The building corners are not square, several joints are less than perfect, and at least one window has an obvious glue smudge. On the other hand, this is a background building on a practice plank built to increase skills and self awareness, not a contest entry.

Friday, February 11, 2022

Gumption Traps and Jack Burgess Solutions

I am building the Ingleton shelf partially to judge amounts of time, energy, and motivation needed for various aspects of model railroading as part of the self-analysis recommended as a first step in designing a model railroad. In my last post I mentioned that building the Associated Grocers building is taking longer than I expected. Not maintaining expected progress and faltering motivation are issues I discussed much earlier in a post on modeler's block

In thinking about this over the last week or so, I started remembering a concept from a book I read decades ago. "Gumption traps" are a concept from Robert Pirsig's Zen and the Art of Motorcycle Maintenance from 1974. In this post, I will explore the concept, how it might apply to model railroading, and some possible solutions, including some suggestions made in several Jack Burgess videos.

Gumption can be defined as initiative or the energy and determination to accomplish something. Pirsig's concept of gumption "trap" can be thought of as those things that block or stifle gumption. They can sap energy, undermine one's belief that success is possible, and cause one to falter in drive to complete progress or even get started. Pirsig identifies two kinds of gumption traps: external ones that he calls "set backs" and internal ones that he refers to as "hang-ups."

Set Backs:

  • Skipping an earlier step: Because the plastic parts were never washed, the paint scuffed off the finished model.
  • Can't get a needed part: It's on backorder from Walthers with an unknown timeframe.
  • Facing a step that one doesn't know how to do or even find out how to do: The screw is stripped to remove the boiler, so how do I clean the dried up grease from the gears?
  • Health or age issues: Between tired eyes and shaky hands, can I even do this any more?
  • Comfort/environment issues: The attic was too cold in the winter and too hot in the summer.
  • Unexpected expenses: One clear, eight foot 1 X 3 is ten dollars plus tax?
  • Oops: This one has almost infinite examples.
Hang-ups:

Hang-ups are personal quirks or psychological issues. Pirsig discusses three: "ego, anxiety, and boredom." Ego can be seen as an unrealistically high self evaluation where new facts or situations aren't considered and asking for help isn't an option. Anxiety is fear of failure. I suspect this is what keeps me from finishing the last steps of things in life and model railroading. Somehow I find "I really like how that is going, but its not quite done yet" (and it never gets done) preferable to the possibility of "I really messed that up." Boredom can be the result of not seeing something freshly or being able to achieve a flow state. Boredom can in turn result in tunnel vision or less than desirable results. (Pirsig's main point was around the meaning or philosophy of "quality" with the concept of gumption trap as a smaller component of his argument. I think I might have to reread his book to see where "good enough" fits in my personal philosophy of quality.)

Solutions: 

In general, most possible solutions to gumption traps revolve around learning how to acknowledge and adjust to them or avoid them. 

While Jack Burgess does not mention or refer to gumption traps in any way, he certainly pinpoints some ways to adjust to and avoid some of my model railroad gumption traps in several of his model railroading videos, particularly Get Organized and Tricks to Better Models. Here are a few from Get Organized:
  • Commit to just 15-30 minutes every day
  • Have all the parts on hand (perhaps put yourself on the stockpile to hoarding continuum) 
  • Have all the tools on hand at the workbench 
  • Be able to find what you want
  • Stock what you will need
  • Use an Optivisor
The Tricks video stresses the use of jigs. If one needs multiples of a sub-assembly creating a jig is not an extra step, but a time saver leading to more consistent results. As I get older, my always shaky hands are getting worse. Finding ways to utilize a stable "third hand," create a temporary jig, or to stabilize my hand may prevent frustration.

This post may have strayed from model railroading into pop philosophy and psychology, but it was a useful exploration, at least for me!

Tuesday, February 1, 2022

Associated Grocers: Part 2


Continuing on with this structure build, I scratch-built a loading dock, one of the next steps mentioned in my last post, intended as a feature of the Associated Grocers warehouse. 

As I planned on using scale lumber that I had on hand, a first task that I needed to tackle was unpacking and organizing my strip wood. Having asked my wife's family to save their paper towel tubes to add to the ones we collected, I inserted them into a box on a workshop shelf along with a sketch labeling their contents. I also updated my reference table of scale to actual measurements. Knowing what I had on hand and the measurements of the warehouse and track location, I went ahead and drew up plans for the dock seen at the beginning of this post. 

While drawing  the scale plans, I also created a cut list of how many pieces of each size of "lumber" I would need. I installed a new blade in my Chopper and rotated the self-healing mat. Then I went ahead and started cutting all the pieces, including a few extra of each size. The Chopper is a real time saver, and it allows for consistent and accurate cuts. While saving time, I always remind myself to not rush, as the user must pay attention to that sharp razor blade while pulling the finished pieces out. 

After cutting all the lengths of stripwood, the next step was to stain them all. The stain I had on hand was Hunterline's "Raw Umber" weathering mix. While applying it full strength, it is a warm dark colored stain. Jumping ahead of myself here, after assembling the dock, I was not happy with the final color. At the time I let the pieces dry overnight, and went ahead with the assembly of the loading dock. 

After the the strip wood had dried overnight, I started  assembly of the dock. While I found that my shaky hands were a bit of a hindrance, I still got into a zone with glueing the loading dock together and never stopped for "in progress" photos. I first taped down my scale drawing on my workbench's plate glass and then taped a sheet of wax paper over the drawing. I used wood glue applied with a toothpick for assembly. I gathered the tools I planned to use: two squares, an older Stanley square with a heavy metal base and a small Zona square, and a pair of tweezers. I glued up the 8" X 16" frame right over the drawing. I then spread enough of the glue for around four or five of the deck boards. Using the base of the Stanley as a backstop or partial jig and the Zona to square up the just applied deck boards, applying the individual boards went smoothly and quickly. After the deck and frame had a chance to set up, I turned it over to glue in the posts. As I mentioned earlier, after the loading dock was completed, I was not satisfied with the dock color. I sanded the surface of the deck to lighten it somewhat and applied a light wash of a different color. I am thinking it it is an acceptable solution, but not ideal.


As seen in the photo above, The kitbashed Associated Grocers warehouse is close to completion. To get to this state I completed several steps in addition to building the loading dock. I glued in the windows and doors, attached the clear styrene window glazing, taped masking tape behind some of the windows to represent window shades, and fit black construction paper behind the windows. I cut and fit a styrene roof for the main structure adding simulated tar paper and several vents. I painted and glued on the roof over the loading dock from the Walthers kit. Also, I used the concrete steps from the kit, but the paint I used appears too light in the photo. An easy solution will be to apply the same wash that I applied to the foundation. To get this photo I had to add some side lighting, as the roof over the loading dock creates a shadow hiding the loading dock and doors which should conceptually be the focus of the building.

The next steps all revolve around highlighting rather than hiding the loading dock area. First of all, I need to continue down the rabbit hole of adding lighting. I ordered several components of the "Just Plug" lighting system, but once I had them, I found a major problem. Yesterday, I traveled to a brick and mortar store not too far from our home (Trains and Lanes in Easton) to pick up some additional components. The loading dock needs some details in addition to lighting. As this structure is intended to provide some sure spots to add operational interest, I also need to add some signage numbering the doors.

Learning Points:

  • Experiment with stains ahead of time and develop a "go-to" mix.
  • Remember the purpose of the building in making design and construction decisions.
  • This project is not reflective of actual time spent in structure building; unpacking, organizing, and waiting for materials all ate up time and energy.