Monday, October 28, 2019

Upgrade to the NP Interchange

The new Northern Pacific interchange track

I had the Meadville Model Railroad Club (MMRC) over last week as part of our new round-robin approach. Eight people did fit (barely) into the train attic, and we painted ties! Apparently though, it is becoming a tradition that with a visit from MMRC members, I make changes to the 4th Subdivision.

Nick Ozorak, the originator of the MMRC, suggested a change in location of the NP interchange track. Originally I planned the interchange to flow into the backdrop at ninety degrees and be reflected with a mirror as seen in the photo from the beginnings of the 4th subdivision. He suggested that it curve into the front corner instead, avoiding all the problems with the use of a mirror as well as following a curve more typical of an interchange into an interlocking connected with a crossing at grade.


Deciding to go ahead with the suggested change, the first step was to pry up the interchange track. One complication was that the interchange track is also my DCC programing track. Between having constructed a "dead zone" area in the programing track and soldering the feeders to the underside of the rails, I decided to keep the existing wiring, rather than clipping and resoldering. This meant that I would need to chisel out a channel for the red and black feeders, thinking it would be easier than rewiring. It worked, and it was easier than rewiring.

Like I had with the original interchange, I carved a scrap piece of cedar shingle/shim to the proper width to make the transition from cork roadbed to the plywood. Then, I smoothed and beveled the edges and any gaps with putty. After the putty dried, I sanded it before applying a quick coat of my brown earth latex paint. After finally dropping and tacking the relocated track in place with a couple of track nails as well as double checking that the electrical connections were still working, I could call the new location as finished as the nearby track work.

However, I was in "a zone" and decided to go further, starting some scenery for this new and improved scene. I glued a scrap of pink foam shaped to create a slope at the edge of the backdrop. I placed several furnace filter trees in place temporarily, and noticed that they cast shadows on the painted "sky." The solution for that problem is to hide the shadows of trees with (wait for it) trees. So, after protecting the track with blue painter's tape and removing the three-dimensional trees, I mixed up some craft paints (a medium green, a gray, and raw umber) and roughed in some background trees. Then I applied some ground goop to create some undulations and hide the former roadbed.

Remembering that one advantage of using ground goop is the ability to apply ground cover while the goop is still wet, I went ahead and applied real dirt and several colors and textures of ground foam. After saturating it with 70% isopropyl alcohol as a wetting agent and applying scenic cement with an eye dropper, I  added a few conifers at the edge of the backdrop.

Now that some basic scenery is in place, I could go ahead and start ballasting. The next steps would be to add some bushes and lower foliage to the scene. Also, the vertical trim at the edge of the scene needs screwed in place and painted with my Andiron green fascia color. Finally, my plan is to have one signal located along the mainline here, representing the entrance to the virtual interlocking. Whether to move along to another area with the basic scenery or to keep building on the start here is a question for another day. Either way, I am quite happy with the relocated interchange track and the nudge into getting some scenery under way.

Friday, September 20, 2019

Research Revisited

Industrial Map of Washington published in 1945
Despite not much happening on my railroad, over the last month or so I have been involved in a number of NMRA activities some of which relate to the 4th Subdivision. In addition to preparing for Division 12's first big event, the Alleghany Western Mini-Meet, I have been thinking about adapting or extending the 4th Subdivision with the Chief Dispatcher AP certificate in mind and using the Golden Spike Award as a motivator and a stepping stone into the NMRA Achievement Program. While these may well be topics for future posts,  I first want to document some additional research into Washington State in the early 1950s and the Great Northern Railroad that I have been doing. In addition to general research that may apply to my model railroad, some of what I found could also lead to adding to the ambiance of the train room in the event of hosting tours or ops-sessions.

The industrial map at the top of this post is useful for both research and ambiance. It was produced in 1945 for school children and published by the office of the Secretary of State. Not only does its visual style capture the time, but it also gives a good overview of the kinds of industry appropriate for my railroad. It reinforces some of the assumptions I have been making in designing the 4th Subdivision as well as giving some guidance as I continue planning additional operations.


Seattle_-_4th_&_Westlake,_1953_(35099997716).jpg (1200×950)
By Seattle Municipal Archives from
Seattle, WA - 4th & Westlake, 1953,
CC BY 2.0, https://commons.wikimedia.org/
w/index.php?curid=59978095

Another image that could be used to establish ambiance is this photo taken in Seattle. The photo, taken in 1953, shows 4th and Westlake looking north. While I came across it through Google, it is part of the Seattle Municipal Archives, a photo source worth further exploration. The autos seen in the photo and the central Great Northern advertising sign both help establish the time period and the relative importance of the Great Northern Railway.

Some additional resources for researching Washington state history related to developing an accurate operational plan, finding photo sources, or just establishing a sense of time and place are listed below:


Kake Salmon Cannery
As part of my long range plan is to include a harbor scene at Port Gulick Bay, the fictional western end of the 4th Subdivision, I will want to include logical industries that invoke the Pacific Northwest. One such possibility would be a salmon canning facility. Although based in Alaska, the Kake Salmon Cannery portrays such an industry and is very well documented online. Wikimedia Commons contains a large number of files including numerous photographs and drawings as the cannery was documented for its listing on the National Register of Historic Places. 

Postcard view of the Empire Builder
Building or researching a model railroad includes more than just the setting; it also includes the railroad. Over the years I have found several useful sights specific to the Great Northern Railway:
Recently, I came across an awesome railroad photography site: RR Pictures Archives. It has an amazing collection of railroad photos. By going into the fallen flags section I was able to go to the Great Northern collections of rolling stock and locomotives. What a selection! Great color shots to have as resources for weathering or detailing models. 

Clearly part of my interest in model railroading stems from an interest in history. In this post, I wanted to not just document some of my recent trips down the rabbit hole of research, but to also keep a record of this collection of internet sources for future exploration. 

Wednesday, July 31, 2019

West End Extension Continued: Trains Running and Next Steps


In the last post about the west end extension, I decided to keep it simple by focusing on it being a "scenery break." With that decision made, I have progressed on my to-do list over the last few weeks. In the listing of the steps, I will provide links to the initial "how-to" posting of my approach to that step. After attaching the plywood top and creek bed to the grid frame, I painted the underneath with white primer and ran the DCC bus. Then I positioned the west end extension, now to be referred to as the James Creek Canyon, in place. I drew a center line for the track on the plywood and glued the cork roadbed in place. In attaching the legs with carriage bolts, I found that I needed to use a Forstner bit to recess the bolt heads to later attach the four foot staging. With the James Creek Canyon extension bolted in place, the track and feeders installed, and the staging C-clamped in place, a five-car eastbound freight left staging and headed into Willow Springs.

Now that the James Creek Canyon section is operational, the scenic challenges and some "infrastructure" (as Mike Hauk calls it) questions remain. By notching and tapering the end of the valance hardboard I was able to bend it into a parabolic curve and tuck it into one of the sloping roof rafters. I now have a concrete tunnel portal and a Micro-Engineering girder bridge kit to start the scene. Extending and bending the existing backdrop into the scene and creating realistic terrain with the benchwork up against the ceiling remain as a challenge.

The attic trap door and stairs are the "infrastructure" challenge that initially started this whole extension project. Renee, my wife, has made several suggestions to make the train attic safer. One is to create a drop-in floor panel or cap for the top of the stairs. Another is to, in addition to replacing the rope in the pulley system with wire cable, add a second safety cable that clips in place when the trap door will be open for a while. I am also thinking that some form of warning or caution paint could be applied to the upper edges of the trap door. Unexpectedly stepping backward into the abyss of the stairs, having the heavy trap door slam shut, or just banging into the trap door with an elbow are all events I would like to prevent for myself or guests.

Sunday, July 28, 2019

Workbench Tool Caddy


I am a “spreader,” and when I get going on a project my workbench is full! Tools, different stages of construction, and different steps all spread out and cover every square inch of the work bench. I desperately needed a way to corral all my small hand tools in one place. In the photo above, one can see the new tool caddy doing just that.   


I saw an article in the July 1998 Model Railroader by Lionel Strang, where he built a tool caddy in a convenient size with scrap wood he had on hand. He built it in tiers with a 2" X 10" base and a 1" X 6" flat on it with a 2" X 2" in the back and then a 1" X 2" in front of the 2" X 2". He built his with holes all the way through, a removable hardboard base, and painted white for a professional look.

I followed his basic concept with what I had on hand, but with two additions. My scale rule had no home and I wanted a place for the ruler to live to be included. Also, I had a Styrofoam block that I could use to store sharps, such as hobby knives, by slipping them into the foam.

Seen from the end, the construction can be easily understood. I started with a piece of 1/2 inch plywood that fit on my workbench conveniently. I glued (using wood glue) and nailed a thin strip of plywood as a stop on the back and glued a 2" X 4" flat on the plywood forming a tight sleeve for the Styrofoam to press fit into (allowing it to be rotated as the blade slots wear it out). In front of the 2" X 4", I glued a 1" X 2" forming another shelf and back of the mini-shelf/slot for my scale rule. Then I glued and nailed a strip of trim along the front forming the other side of the scale rule “slot.”

 After the glue dried, starting with the 2" X 4", I drilled holes of the appropriate size into the surface of the wood to hold the pliers, tweezers, small screwdrivers, files, and nail set that were in use, cluttering up my workbench, without a specific place to live. Larger tools had homes on the pegboard and some specific tools had homes in mini-kits in drawers. But these small frequently used tools now had a home.

I am still a spreader, but with a place for everything, everything now had a place (other than where I last set it down).  While my caddy doesn’t have the professional look of a final paint job, I have room to add more holes in the caddy to add any other tools that start collecting around my work surface.

Tuesday, July 2, 2019

West End Extension Continued: Scenery vs. Operations?


Now, with the open grid benchwork clamped in place, travel around the top of the stairs is definitely more convenient than it was with the fold-up staging deployed, the problem discussed in the last few posts. The solution is tight, but better.

To get to this point, I glued and nailed the framing together. Working out in the wood-shop in the barn, I set up on the bench. I used a pair of corner clamps after applying wood glue to the joints to hold them square before nailing with a pneumatic nailer. In one area, I clamped and glued a block of wood behind an angled joint to avoid nails poking through to the back. Using the air tool definitely sped up the process of constructing the frame, even with the "travel time" of moving back and forth from the barn to the attic.


When I positioned the plywood top on the benchwork in place in the attic, before cutting out a portion for the creek, I started having second thoughts about my plans for this new area of the railroad. Part of the issue is that extending the backdrop and/or the valance into this area is going to be tricky, at best, no matter what I do. I started thinking to myself, "What about using that area behind the existing backdrop as hidden staging?" This opened up a whole new possibility and a bit of a conflict: will the focus of this west end extension be on scenery or operations?

Snapshot of Iain Rice illustration
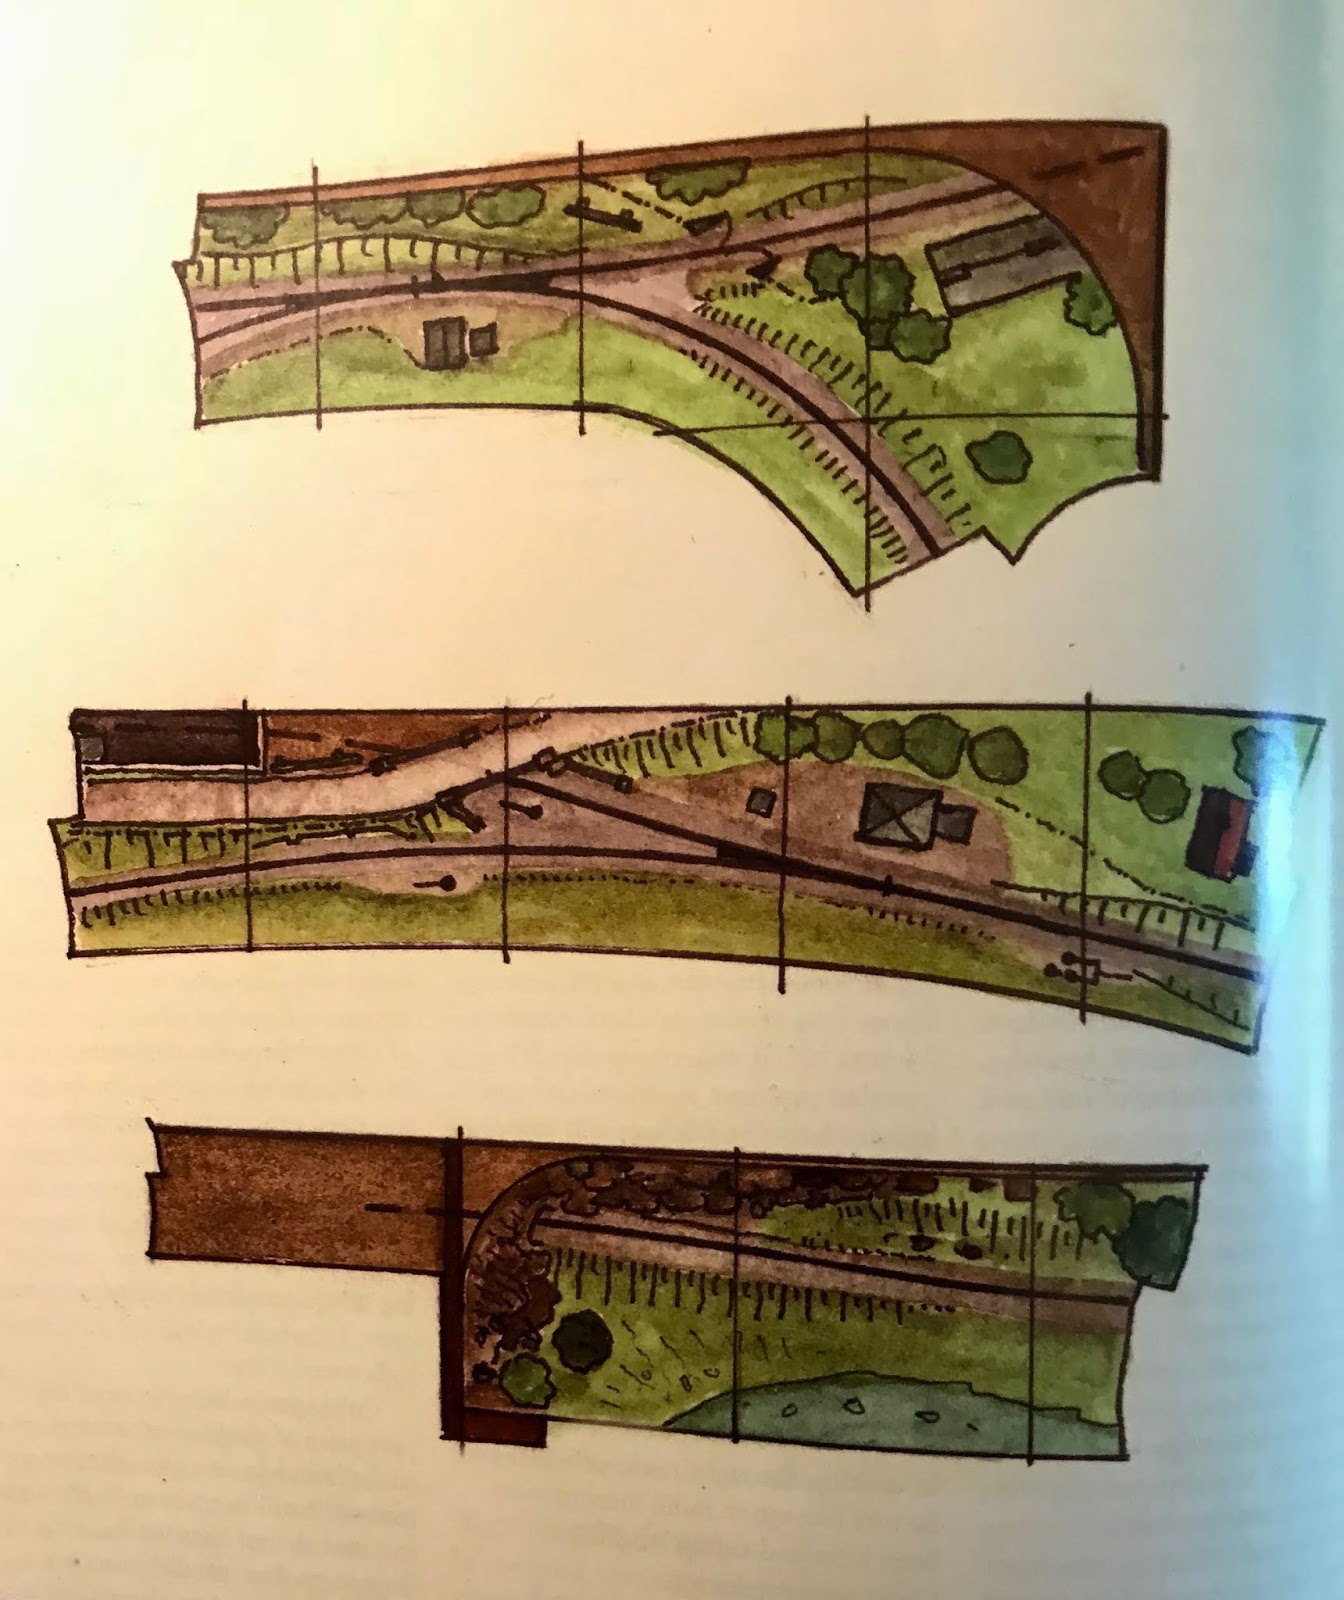
One might ask, "How could this tight little S-curve be a focus on operations?" Well, first of all, Iain Rice in his book, Shelf Layouts for Model Railroads, explains his concept of the "bitsa" approach. Three examples are illustrated on page 32 of his book and seen in my snapshot from the book. Rather than modeling the "whole of something," you include only enough to suggest the whole. In my case, I could have a junction turnout leading to an interchange with the logging railroad, the Puget Sound and Badger River Railroad, which hasn't yet made an appearance along the 4th Subdivision. This would be a line to say, Camp Three, disappearing behind the existing backdrop with the PS&BR having trackage rights westward over the GN. Mr. Rice's middle illustration shows a similar junction which opens up the possibility of signals and/or a "tower man" position. Adding another operating position and another train disappearing into a tunnel/nook are two of the main ways David Capron suggests in his video-taped clinic to achieve "Full Operations on a Small, Room Size Layout." Just as an aside here, if one is an NMRA member and has registered on their website, full access to a large number of video-taped clinics from past national NMRA conventions is an awesome benefit!

Despite investigating how a "bitsa" approach could add operating potential, I ended up going back to a scenery-based focus. Remembering why I am doing this, a tight squeeze at the top of the stairs, should remind me that this is not an ideal location for a "tower man" to be located. Also, yes it would be an additional train (or two: one out and one in), but really, it would travel four feet from staging to staging in this awkward location. Another consideration in making this decision is the overall mix of "empty" space or scenery-only space with operations-intense space. The first third of the eventual railroad, which I often call the initial U-shaped layout, currently has only one scenic break between track-work intense areas. Having a scenic break as this western
extension's focus will hopefully lead to more of the kind of balance recommended by railroad planners such as Lance Mindheim. A final fortuitous bit of research in my stacks (my wife refers to them as "those endless piles") of model railroad magazines led me to Reference Sheet No. 390  from the Great Northern Railway Historical Society: "The Tunnels of the Montana Central Railway." In a different section of the Prickly Pear Creek Canyon from the one with the pony truss bridge mentioned in an earlier post, Tunnel 5 is a prototype for a concrete tunnel portal, curved track, and a short girder bridge that matches the terrain planned for this west extension. A snapshot of a page from this reference sheet is seen here, suggesting how to include steep hillsides to hide the sloping roof. This is what Tony Koester refers to as a Layout Design Element or LDE with, in this case, a focus on scenery. I think that I will of necessity compress an already tight scene and change the location, but use a bridge kit and tunnel portal that are closer to the prototype than the ones I have on hand.


With the decision made to go with a scenery-focused extension, I cut out an area for the creek from the plywood top and a plywood creek bed below. I left the bridge area in place until I have a kit and have it started. I also have the two legs cut to length and drilled to install leveling bolts. The next steps in approximate order are to:
  • Attach creek bed and top plywood pieces to the frame
  • Paint benchwork with white primer and legs with black paint
  • Run DCC bus and install European style terminal blocks as needed
  • Order Micro Engineering thru girder bridge and "concrete" style tunnel portal
  • Attach cork roadbed and track
  • Drop and attach feeders
  • Figure out curved backdrop, valance end, and terrain
  • Bolt the extension to existing benchwork, mount legs, and attach the (former drop-down, but now permanently up) staging.


Wednesday, June 12, 2019

West End Extension

Cardboard template in place to the west of Willow Springs
Despite the scenery issues raised by positioning the benchwork back from the aisle and coming into direct contact with the sloping ceiling, that appears to be the best approach for navigating around the top of the stairs. The discussion of the problems navigating around the top of the stairs and the trapdoor was the topic of my previous post.

I started construction based on the basic shape of the cardboard template. The first steps were to draw up a plan and make some lumber purchases at the local big box store. I picked up some 1" X 4" pine boards and a 2' X 4' 1/2 inch plywood "handy panel." Although I had thought about using L-girder construction, I decided to stay with the open grid framing I have used so far on the benchwork for the 4th Subdivision. I used the cardboard template to trace the curve on the plywood before cutting it out with my jigsaw. 

Working in the shop out in the barn
Then using both the drawing and the actual plywood "top" as a template under the framing, I started measuring and cutting the framing boards. The one somewhat tricky part involved the angle cuts for the diagonal brace at the curved front of the section as they were not an even forty-five degree cut. Other than that it was just a matter of careful measuring and cutting on the miter saw.
Double checking the plan with flex track

While figuring out the basic construction of this new west end extension's benchwork, I also did some sketching of scenery ideas on paper and full size plotting on the plywood "top." With some flex track, I was able to mock up how the track might fit on what is essentially an S-curve through the scene. While the allotted space did not allow for the 150' Pratt Truss Bridge that I had been thinking about, I still wanted to include a bridge scene. 

I had a small bridge from a collection of HO stuff from my younger cousin, James. Researching bridges a bit, I learned that this was a pony truss bridge (no connection across the top) and although not labeled, it was probably a Life-Like brand model. The bridge has some nice molded-in details and with a paint job, will look good considering its toy train origins. Doing more research, I found a prototype pony truss bridge with several nice photos on Bridgehunter.com: the Little Prickly Pear Creek Bridge, a BNSF and ex Great Northern bridge in Montana. So, with the bridge from James, now the creek, the bridge, and the scene have names; it will be the James Creek Bridge scene.

Having finalized the bridge scene concept, I went ahead and cut away some of the 1" X 4" stock for the grid framing to support the plywood base of the creek. I also have a cardboard template started for the creek base. 

At this point, the next step will be to glue and nail the framing together for this new section of benchwork. Then, I will be able to clamp it in place, figure out the support system (legs etc.), and move forward with additional planning of the trackwork, bridge placement, and terrain construction. A lesson that I have supposedly learned is to complete the cork, trackwork, and electrical work before the benchwork is permanently in place, allowing me to tip the section up on a workbench rather than working from underneath. As I move forward, I will need to keep this lesson in mind.


Saturday, May 25, 2019

Issues With the Current West Staging

Last week I had a couple of guests from the Meadville Model Railroad Club over to see the 4th Subdivision and run some trains. While I have had some issues with the fold-up, west-end staging running trains by myself, the issues were exacerbated with three of us up in the train attic. As I am seriously considering expanding the model railroad to host more than just fun-for-one ops-sessions, the existing staging potentially creates some real problems.
West-end fold up staging deployed
While it is not a problem at all when it is folded up, when deployed, the west staging is awkward and potentially dangerous. Due to the three-track staging yard's location at the top of the stairs to the attic when in use, rolling stock can not be set up prior to the session. As the situation stands, this staging must be unfolded and rolling stock positioned as a part of any ops-session. Anyone involved needs to be up in the train room, as the stairs are difficult to navigate. With just one folding leg, the staging can not be used to support someone trying to get through.

With the trap door open, humans have to try to navigate with only thirteen inches between the trapdoor and the staging yard. At the shoe level, one has to step down one step while moving sideways across the top of the stairs. Very awkward if one needs to get to the other end of the room during an operations session or, worse yet, go up or down the stairs. Gracie, the cat in the photo, has no problem. My human guests were also concerned about the lack of bumpers or other ways to stop rolling stock from crashing to the floor off the end of the tracks. If that was the only problem, it would be an easy fix.

With the trap door down, dodging the trap door cable and styrofoam insulation is an even tighter squeeze. While I intend to replace the rope with sturdy metal cable and to cover the insulation with a plywood cap capable of withstanding folks standing on it, it still would be a major bottleneck and/or a tripping hazard. While fun-for-one operations by myself will continue to be a major use of the railroad, I am planning on finding ways to have more model railroaders occasionally join me. The fold up staging yard is not working out as well as I thought it might just operating by myself; it will not be an acceptable feature as I transition to multi-person ops-sessions. 

I have defined the existing staging yard opposite the trapdoor at the top of the stairs as a major problem. What are some solutions? The space between the stairs and the opposite sloping ceiling is tight. Should I just give up on the attic as the location for my model railroad? I don't think so, as I have no practical alternative without winning the lottery. I think having permanent trackage located farther from the stairs is the approach I will explore. The first step that I took was to craft a cardboard template to see if this approach allows more convenient movement around the stairs. It is easier to navigate around the stairs and trapdoor with the template I came up with in place.

Building a new section at the west end of the existing Willow Springs section solves the existing problem, but raises a series of design issues to be worked out:
  • How much of this section will be sceniced?
  • With a lot of the new section right up against the sloping ceiling how will a backdrop function?
  • How will the existing/planned backdrop and valance from the rest of the railroad transition to this new section?
  • Will I be able to use my new Central Valley 150' Pratt Truss Bridge kit in the sceniced portion?
  • With the S-curved shape of this section and the potential of a river cut out, what kind of benchwork will be most applicable?
  • Will the fold-up staging yard work "permanently" mounted to the west end of this new section?
Sketching out some track locations on the cardboard template, I continue to see this as a workable solution. One possibility is to have a sloping backdrop behind some of this section, while the existing backdrop and valance curve into some kind of end cap. I am leaning towards L-girder benchwork due to its flexibility with odd shapes and multiple levels. I need to research it further and start drawing some plans.